This is default featured slide 1 title

Go to Blogger edit html and find these sentences.Now replace these sentences with your own descriptions.

This is default featured slide 2 title

Go to Blogger edit html and find these sentences.Now replace these sentences with your own descriptions.

This is default featured slide 3 title

Go to Blogger edit html and find these sentences.Now replace these sentences with your own descriptions.

This is default featured slide 4 title

Go to Blogger edit html and find these sentences.Now replace these sentences with your own descriptions.

This is default featured slide 5 title

Go to Blogger edit html and find these sentences.Now replace these sentences with your own descriptions.

Showing posts with label Capture. Show all posts

sharkPy - NSA Tool to Dissect, Analyze, and Interact with Network Packet Data using Wireshark and libpcap capabilities


A python module to dissect, analyze, and interact with network packet data as native Python objects using Wireshark and libpcap capabilities. sharkPy dissect modules extend and otherwise modify Wireshark's tshark. SharkPy packet injection and pcap file writing modules wrap useful libpcap functionality.

SharkPy comes with six modules that allows one to explore, create, and/or modify packet data and (re)send data over network, and write (possibly modified) packets to a new pcap output file. This is all done within python program or interactive python session.
  1. sharkPy.file_dissector -- dissect capture file packets using Wireshark's dissection libraries and present detailed packet dissections to caller as native Python objects.
  2. sharkPy.wire_dissector -- capture packets from interface and dissect captured packets using Wireshark's dissection libraries. Presents packets to callers as native Python objects.
  3. sharkPy.file_writer -- write (possibly modified) packets to a new output pcap file. For example, one can dissect packet capture file using sharkPy.file_dissector, create new packets based on the packets in the dissected file, and then write new/modified packets to an output pcap file.
  4. sharkPy.wire_writer -- write arbitrary data (e.g. modified packets) to specified network interface using libpcap functionality. Currently, sharkPy users are responsible for correctly building packets that are transmitted using this module's functionality.
  5. sharkPy.utils -- a set of utility functions
  6. sharkPy.protocol_blender -- protocol specific convenience functions. Currently contains functions for ipv4 and tcp over ipv4.
SharkPy is provided "as-is" with NO WARRANTIES expressed or implied under GPLv2. Use at your own risk.

Design Goals
  1. Deliver dissected packet data to callers as native python objects.
  2. Provide functionality within a Python environment, either a python program or interactive python session.
  3. Make commands non-blocking whenever reasonable providing command results to caller on-demand.
  4. Be easy to understand and use assuming one understands Wireshark and python basics.
  5. Pack functionality into a small number of commands.
  6. Build and install as little C-code as possible by linking to preexisting Wireshark shared libs.

Why sharkPy?
SharkPy has a long-term goal of segmenting Wireshark's incredible diversity of capabilities into a set of shared libraries that are smaller, more modular, more easily compiled and linked into other projects. This goal seperates sharkPy from other similar efforts that endeavor to marry Wireshark/tshark and Python.
The first step is provide Wireshark/tshark capabilities as Python modules that can be compiled/linked outside of Wireshark's normal build process. This has been achieved at least for some linux environments/distros. Next step is to expand to a broader range of linux distros and Windows improving stability along the way. Once this is completed and sharkPy's capabilities are similar to those provided by tshark, the sharkPy project devs will start the process of segmenting the code base as described above.

HOW-TO

VM INSTALL

Should install/run on most linux distros as long as Wireshark version 2.0.1 or newer is installed and the following steps (or equivalent) are successful.

## ubuntu-16.04-desktop-amd64 -- clean install
sudo apt-get git
git clone https://github.com/NationalSecurityAgency/sharkPy
sudo apt-get install libpcap-dev
sudo apt-get install libglib2.0-dev
sudo apt-get install libpython-dev
sudo apt-get install wireshark-dev #if you didn't build/install wireshark (be sure wireshark libs are in LD_LIBRARY_PATH)
sudo apt-get install wireshark #if you didn't build/install wireshark (be sure wireshark libs are in LD_LIBRARY_PATH)
cd sharkPy
sudo ./setup install

DOCKER

Set up
First, make sharkPy directory and place Dockerfile into it. cd into this new directory.<br/>

Build sharkPy Docker image
docker build -t "ubuntu16_04:sharkPy" .

Notes:
  • build will take a while and should be completely automated.
  • sharkPy dist code will be in /sharkPy
  • build creates Ubuntu 16.04 image and installs sharkPy as a Python module

Run interactively as Docker container.
Should give you command prompt
docker run -it ubuntu16_04:sharkPy /bin/bash

Command prompt and access to host NICs (to allow for network capture)
docker run -it --net=host ubuntu16_04:sharkPy /bin/bash


sharkPy API

Dissecting packets from file

dissect_file(file_path, options=[], timeout=10): collect packets from packet capture file delivering packet dissections when requested using get_next_from_file function.
  • name of packet capture file.
  • collection and dissection options. Options are disopt.DECODE_AS and disopt.NAME_RESOLUTION.
  • timeout: amount of time (in seconds) to wait before file open fails.
  • RETURNS tuple (p, exit_event, shared_pipe):
    • p: dissection process handle.
    • exit_event: event handler used to signal that collection should stop.
    • shared_pipe: shared pipe that dissector returns dissection trees into.
    • NOTE: users should not directly interact with these return objects. Instead returned tuple is passed into get_next_from_file and close_file functions as input param.
get_next_from_file(dissect_process,timeout=None): get next available packet dissection.
  • dissect_process: tuple returned from the dissect_file function.
  • timeout: amount to time to wait (in seconds) before operation timesout.
  • RETURNS root node of packet dissection tree.
close_file(dissect_process): stop and clean up.
  • dissect_process: tuple returned from the dissect_file function.
  • RETURNS None.
  • NOTE: close_file MUST be called on each session.

Dissecting packets from wire

dissect_wire(interface, options=[], timeout=None): collect packets from interface delivering packet dissections when requested using get_next function.
  • name of interface to capture from.
  • collection and dissection options. Options are disopt.DECODE_AS, disopt.NAME_RESOLUTION, and disopt.NOT_PROMISCUOUS.
  • timeout: amount of time (in seconds) to wait before start capture fails.
  • RETURNS tuple (p, exit_event, shared_queue).
    • p: dissection process handle.
    • exit_event: event handler used to signal that collection should stop.
    • shared_queue: shared queue that dissector returns dissection trees into.
    • NOTE: users should not directly interact with these return objects. Instead returned tuple is passed into get_next_from_wire and close_wire functions as input param.
get_next_from_wire(dissect_process,timeout=None): get next available packet dissection from live capture.
  • dissect_process: tuple returned from the dissect_wire function.
  • timeout: amount to time to wait (in seconds) before operation timesout.
  • RETURNS root node of packet dissection tree.
close_wire(dissect_process): stop and clean up from live capture.
  • dissect_process: tuple returned from the dissect_wire function.
  • RETURNS None.
  • NOTE: close_wire MUST be called on each capture session.

Writing data/packets on wire or to file

wire_writer(write_interface_list): wire_writer constructor. Used to write arbitrary data to interfaces.
  • write_interface_list: list of interface names to write to.
  • RETURNS: wire_writer object.
    • wire_writer.cmd: pass a command to writer.
      • wr.cmd(command=wr.WRITE_BYTES, command_data=data_to_write, command_timeout=2)
      • wr.cmd(command=wr.SHUT_DOWN_ALL, command_data=None, command_data=2)
      • wr.cmd(command=wr.SHUT_DOWN_NAMED, command_data=interface_name, command_data=2)
    • wire_writer.get_rst(timeout=1): RETURNS tuple (success/failure, number_of_bytes_written)
file_writer(): Creates a new file_writer object to write packets to an output pcap file.
  • make_pcap_error_buffer(): Creates a correctly sized and initialized error buffer.
    • Returns error buffer.
  • pcap_write_file(output_file_path, error_buffer): create and open new pcap output file.
    • output_file_path: path for newly created file.
    • err_buffer: error buffer object returned by make_pcap_error_buffer(). Any errors messages will be written to this buffer.
    • RETURNS: ctypes.c_void_p, which is a context object required for other write related functions.
  • pcap_write_packet(context, upper_time_val, lower_time_val, num_bytes_to_write, data_to_write, error_buffer): writes packets to opened pcap output file.
    • context: object returned by pcap_write_file().
    • upper_time_val: packet epoch time in seconds. Can be first value in tuple returned from utility function get_pkt_times().
    • lower_time_val: packet epoch time nano seconds remainder. Can be second value in tuple returned from utility function get_pkt_times().
    • num_bytes_to_write: number of bytes to write to file, size of data buffer.
    • data_to_write: buffer of data to write.
    • err_buffer: error buffer object returned by make_pcap_error_buffer(). Any errors messages will be written to this buffer.
    • RETURNS 0 on success, -1 on failure. Error message will be available in err_buffer.
  • pcap_close(context): MUST be called to flush write buffer, close write file, and free allocated resources.
    • context: object returned by pcap_write_file().
    • RETURNS: None.

Utility functions

do_funct_walk(root_node, funct, aux=None): recursively pass each node in dissection tree (and aux) to function. Depth first walk.
  • root_node: node in dissection tree that will be the first to be passed to function.
  • funct: function to call.
  • aux: optional auxilliary variable that will be passed in as parameter as part of each function call.
  • RETURNS None.
get_node_by_name(root_node, name): finds and returns a list of dissection nodes in dissection tree with a given name (i.e. 'abbrev').
  • root_node: root of dissection tree being passed into function.
  • name: Name of node used as match key. Matches again 'abbrev' attribute.
  • RETURNS: a list of nodes in dissection tree with 'abbrev' attribute that matches name.
  • NOTE: 'abbrev' attribute is not necessarily unique in a given dissection tree. This is the reason that this function returns a LIST of matching nodes.
get_node_data_details(node): Returns a tuple of values that describe the data in a given dissection node.
  • node: node that will have its details provided.
  • RETURNS: tuple (data_len,first_byte_index, last_byte_index, data, binary_data).
    • data_len: number of bytes in node's data.
    • first_byte_index: byte offset from start of packet where this node's data starts.
    • last_byte_index: byte offset from start of packet where this node's data ends.
    • data: string representation of node data.
    • binary_data: binary representation of node data.
get_pkt_times(pkt=input_packet): Returns tuple containing packet timestamp information.
  • pkt: packet dissection tree returned from one of sharkPy's dissection routines.
  • RETURNS: The tuple (epoch_time_seconds, epoch_time_nanosecond_remainder). These two values are required for file_writer instances.
find_replace_data(pkt, field_name, test_val, replace_with=None, condition_funct=condition_data_equals, enforce_bounds=True, quiet=True): A general search, match, and replace data in packets.
  • pkt: packet dissection tree returned from one of sharkPy's dissection routines.
  • field_name: the 'abbrev' field name that will have its data modified/replaced.
  • test_val: data_val/buffer that will be used for comparison in matching function.
  • replace_with: data that will replace the data in matching dissection fields.
  • condition_funct: A function that returns True or False and has the prototype condition_funct(node_val, test_val, pkt_dissection_tree). Default is the condition_data_equals() function that returns True if node_val == test_val. This is a literal byte for byte matching.
  • enforce_bounds: If set to True, enforces condition that len(replace_with) == len(node_data_to_be_replaced). Good idea to keep this set to its default, which is True.
  • quiet: If set to False, will print error message to stdout if the target field 'abbrev' name cannot be found in packet dissection tree.
  • RETURNS: new packet data represented as a hex string or None if target field is not in packet.
condition_data_equals(node_val, test_val, pkt_dissection_tree=None): A matching function that can be passed to find_replace_data().
  • node_val: value from the dissected packet that is being checked
  • test_val: value that node_val will be compared to.
  • pkt_dissection_tree: entire packet dissection tree. Not used in this comparison.
  • RETURNS True if a byte for byte comparison reveals that node_val == test_val. Otherwise, returns False.
condition_always_true(node_val=None, test_val=None, pkt_dissection_tree=None): A matching function that can be passed to find_replace_data().
  • node_val: Not used in this comparison
  • test_val: Not used in this comparison
  • pkt_dissection_tree: entire packet dissection tree. Not used in this comparison.
  • RETURNS True ALWAYS. Useful of the only matching criteria is that the target field exists in packet dissection.

Protocol Blender

ipv4_find_replace(pkt_dissection, src_match_value=None, dst_match_value=None, new_srcaddr=None, new_dstaddr=None, update_checksum=True, condition_funct=sharkPy.condition_data_equals): Modifies select ipv4 fields.
  • pkt_dissection: packet dissection tree.
  • src_match_value: current source ip address to look for (in hex). This value will be replaced.
  • dst_match_value: current destination ip address to look for (in hex). This value will be replaced.
  • new_srcaddr: replace current source ip address with this ip address (in hex).
  • new_dstaddr: replace current destination ip address with this ip address (in hex).
  • update_checksum: fixup ipv4 checksum if True (default).
  • condition_funct: matching function used to find correct packets to modify.
tcp_find_replace(pkt_dissection, src_match_value=None, dst_match_value=None, new_srcport=None, new_dstport=None, update_checksum=True, condition_funct=sharkPy.condition_data_equals): Modifies select fields for tcp over ipv4.
  • pkt_dissection: packet dissection tree.
  • src_match_value: current source tcp port to look for (in hex). This value will be replaced.
  • dst_match_value: current destination tcp port to look for (in hex). This value will be replaced.
  • new_srcaddr: replace current source tcp port with this tcp port (in hex).
  • new_dstaddr: replace current destination tcp port with this tcp port (in hex).
  • update_checksum: fixup tcp checksum if True (default).
  • condition_funct: matching function used to find correct packets to modify.

Dissect packets in a capture file
>>> import sharkPy

Supported options so far are DECODE_AS and NAME_RESOLUTION (use option to disable)
>>> in_options=[(sharkPy.disopt.DECODE_AS, r'tcp.port==8888-8890,http'), (sharkPy.disopt.DECODE_AS, r'tcp.port==9999:3,http')]

Start file read and dissection.
>>> dissection = sharkPy.dissect_file(r'/home/me/capfile.pcap', options=in_options)

Use sharkPy.get_next_from_file to get packet dissections of read packets.
>>> rtn_pkt_dissections_list = []
>>> for cnt in xrange(13):
... pkt = sharkPy.get_next_from_file(dissection)
... rtn_pkt_dissections_list.append(pkt)

Node Attributes:
abbrev: frame.
name: Frame.
blurb: None.
fvalue: None.
level: 0.
offset: 0.
ftype: 1.
ftype_desc: FT_PROTOCOL.
repr: Frame 253: 54 bytes on wire (432 bits), 54 bytes captured (432 bits) on interface 0.
data: 005056edfe68000c29....<rest edited out>

Number of child nodes: 17
frame.interface_id
frame.encap_type
frame.time
frame.offset_shift
frame.time_epoch
frame.time_delta
frame.time_delta_displayed
frame.time_relative
frame.number
frame.len
frame.cap_len
frame.marked
frame.ignored
frame.protocols
eth
ip
tcp

Node Attributes:
abbrev: frame.interface_id.
name: Interface id.
blurb: None.
fvalue: 0.
level: 1.
offset: 0.
ftype: 6.
ftype_desc: FT_UINT32.
repr: Interface id: 0 (eno16777736).
data: None.

Number of child nodes: 0

...<remaining edited out>

Must always close sessions
>>> sharkPy.close_file(dissection)

Take a packet dissection tree and index all nodes by their names (abbrev field)
>>> pkt_dict = {}
>>> sharkPy.collect_proto_ids(rtn_pkt_dissections_list[0], pkt_dict)

Here are all the keys used to index this packet dissection
>>> print pkt_dict.keys()
['tcp.checksum_bad', 'eth.src_resolved', 'tcp.flags.ns', 'ip', 'frame', 'tcp.ack', 'tcp', 'frame.encap_type', 'eth.ig', 'frame.time_relative', 'ip.ttl', 'tcp.checksum_good', 'tcp.stream', 'ip.version', 'tcp.seq', 'ip.dst_host', 'ip.flags.df', 'ip.flags', 'ip.dsfield', 'ip.src_host', 'tcp.len', 'ip.checksum_good', 'tcp.flags.res', 'ip.id', 'ip.flags.mf', 'ip.src', 'ip.checksum', 'eth.src', 'text', 'frame.cap_len', 'ip.hdr_len', 'tcp.flags.cwr', 'tcp.flags', 'tcp.dstport', 'ip.host', 'frame.ignored', 'tcp.window_size', 'eth.dst_resolved', 'tcp.flags.ack', 'frame.time_delta', 'tcp.flags.urg', 'ip.dsfield.ecn', 'eth.addr_resolved', 'eth.lg', 'frame.time_delta_displayed', 'frame.time', 'tcp.flags.str', 'ip.flags.rb', 'tcp.flags.fin', 'ip.dst', 'tcp.flags.reset', 'tcp.flags.ecn', 'tcp.port', 'eth.type', 'ip.checksum_bad', 'tcp.window_size_value', 'ip.addr', 'ip.len', 'frame.time_epoch', 'tcp.hdr_len', 'frame.number', 'ip.dsfield.dscp', 'frame.marked', 'eth.dst', 'tcp.flags.push', 'tcp.srcport', 'tcp.checksum', 'tcp.urgent_pointer', 'eth.addr', 'frame.offset_shift', 'tcp.window_size_scalefactor', 'ip.frag_offset', 'tcp.flags.syn', 'frame.len', 'eth', 'ip.proto', 'frame.protocols', 'frame.interface_id']

Note that pkt_dict entries are lists given that 'abbrevs' are not always unique within a packet.
>>> val_list = pkt_dict['tcp']

Turns out that 'tcp' list has only one element as shown below.
>>> for each in val_list:
... print each
...
Node Attributes:
abbrev: tcp.
name: Transmission Control Protocol.
blurb: None.
fvalue: None.
level: 0.
offset: 34.
ftype: 1.
ftype_desc: FT_PROTOCOL.
repr: Transmission Control Protocol, Src Port: 52630 (52630), Dst Port: 80 (80), Seq: 1, Ack: 1, Len: 0.
data: cd960050df6129ca0d993e7750107d789f870000.

Number of child nodes: 15
tcp.srcport
tcp.dstport
tcp.port
tcp.port
tcp.stream
tcp.len
tcp.seq
tcp.ack
tcp.hdr_len
tcp.flags
tcp.window_size_value
tcp.window_size
tcp.window_size_scalefactor
tcp.checksum
tcp.urgent_pointer

Shortcut for finding a node by name:
>>> val_list = sharkPy.get_node_by_name(rtn_pkt_dissections_list[0], 'ip')

Each node in a packet dissection tree has attributes and a child node list.
>>> pkt = val_list[0]

This is how one accesses attributes
>>> print pkt.attributes.abbrev
tcp
>>> print pkt.attributes.name
Transmission Control Protocol

Here's the pkt's child list
>>> print pkt.children
[<sharkPy.dissect.file_dissector.node object at 0x10fda90>, <sharkPy.dissect.file_dissector.node object at 0x10fdb10>, <sharkPy.dissect.file_dissector.node object at 0x10fdbd0>, <sharkPy.dissect.file_dissector.node object at 0x10fdc90>, <sharkPy.dissect.file_dissector.node object at 0x10fdd50>, <sharkPy.dissect.file_dissector.node object at 0x10fddd0>, <sharkPy.dissect.file_dissector.node object at 0x10fde50>, <sharkPy.dissect.file_dissector.node object at 0x10fded0>, <sharkPy.dissect.file_dissector.node object at 0x10fdf90>, <sharkPy.dissect.file_dissector.node object at 0x1101090>, <sharkPy.dissect.file_dissector.node object at 0x11016d0>, <sharkPy.dissect.file_dissector.node object at 0x11017d0>, <sharkPy.dissect.file_dissector.node object at 0x1101890>, <sharkPy.dissect.file_dissector.node object at 0x1101990>, <sharkPy.dissect.file_dissector.node object at 0x1101b50>]

Get useful information about a dissection node's data
>>> data_len, first_byte_offset, last_byte_offset, data_string_rep, data_binary_rep=sharkPy.get_node_data_details(pkt)
>>> print data_len
54
>>> print first_byte_offset
0
>>> print last_byte_offset
53
>>> print data_string_rep
005056edfe68000c29....<rest edited out>
>>> print binary_string_rep
<prints binary spleg, edited out>

CAPTURE PACKETS FROM NETWORK AND DISSECT THEM

SharkPy wire_dissector provides additional NOT_PROMISCUOUS option
>>> in_options=[(sharkPy.disopt.DECODE_AS, r'tcp.port==8888-8890,http'), (sharkPy.disopt.DECODE_AS, r'tcp.port==9999:3,http'), (sharkPy.disopt.NOT_PROMISCUOUS, None)]

Start capture and dissection. Note that caller must have appropriate permissions. Running as root could be dangerous!
>>> dissection = sharkPy.dissect_wire(r'eno16777736', options=in_options)
>>> Running as user "root" and group "root". This could be dangerous.

Use sharkPy.get_next_from_wire to get packet dissections of captured packets.
>>> for cnt in xrange(13):
... pkt=sharkPy.get_next_from_wire(dissection)
... sharkPy.walk_print(pkt) ## much better idea to save pkts in a list

Must always close capture sessions
>>> sharkPy.close_wire(dissection)

WRITE DATA (packets) TO NETWORK

Create writer object using interface name
>>> wr = sharkPy.wire_writer(['eno16777736'])

Send command to write data to network with timeout of 2 seconds
>>> wr.cmd(wr.WRITE_BYTES,'  djwejkweuraiuhqwerqiorh', 2)

Check for failure. If successful, get return values.
>>> if(not wr.command_failure.is_set()):
... print wr.get_rst(1)
...
(0, 26) ### returned success and wrote 26 bytes. ###

WRITE PACKETS TO OUTPUT PCAP FILE

Create file writer object
>>> fw = file_writer()

Create error buffer
>>> errbuf = fw.make_pcap_error_buffer()

Open/create new output pcap file into which packets will be written
>>> outfile = fw.pcap_write_file(r'/home/me/test_output_file.pcap', errbuf)

Dissect packets in an existing packet capture file.
>>> sorted_rtn_list = sharkPy.dissect_file(r'/home/me/tst.pcap', timeout=20)

Write first packet into output pcap file.

Get first packet dissection
>>> pkt_dissection=sorted_rtn_list[0]

Acquire packet information required for write operation
>>> pkt_frame = sharkPy.get_node_by_name(pkt_dissection, 'frame')
>>> frame_data_length, first_frame_byte_index, last_frame_byte_index, frame_data_as_string, frame_data_as_binary = sharkPy.get_node_data_details(pkt_frame[0])
>>> utime, ltime = sharkPy.get_pkt_times(pkt_dissection)

Write packet into output file
>>> fw.pcap_write_packet(outfile, utime, ltime, frame_data_length, frame_data_as_binary, errbuf)

Close output file and clean-up
>>> fw.pcap_close(outfile)

Match and replace before writing new packets to output pcap file
import sharkPy, binascii

test_value1 = r'0xc0a84f01'
test_value2 = r'c0a84fff'
test_value3 = r'005056c00008'

fw = sharkPy.file_writer()
errbuf = fw.make_pcap_error_buffer()
outfile = fw.pcap_write_file(r'/home/me/test_output_file.pcap', errbuf)
sorted_rtn_list = sharkPy.dissect_file(r'/home/me/tst.pcap', timeout=20)

for pkt in sorted_rtn_list:

# do replacement
new_str_data = sharkPy.find_replace_data(pkt, r'ip.src', test_value1, r'01010101')
new_str_data = sharkPy.find_replace_data(pkt, r'ip.dst', test_value2, r'02020202')
new_str_data = sharkPy.find_replace_data(pkt, r'eth.src', test_value3, r'005050505050')

# get detains required to write to output pcap file
pkt_frame = sharkPy.get_node_by_name(pkt, 'frame')
fdl, ffb, flb, fd, fbd = sharkPy.get_node_data_details(pkt_frame[0])
utime, ltime = sharkPy.get_pkt_times(pkt)

if(new_str_data is None):
new_str_data = fd

newbd = binascii.a2b_hex(new_str_data)
fw.pcap_write_packet(outfile, utime, ltime, fdl, newbd, errbuf)

fw.pcap_close(outfile)


PRET - Printer Exploitation Toolkit


PRET is a new tool for printer security testing developed in the scope of a Master's Thesis at Ruhr University Bochum. It connects to a device via network or USB and exploits the features of a given printer language. Currently PostScript, PJL and PCL are supported which are spoken by most laser printers. This allows cool stuff like capturing or manipulating print jobs, accessing the printer's file system and memory or even causing physical damage to the device. All attacks are documented in detail in the Hacking Printers Wiki.

The main idea of PRET is to facilitate the communication between the end-user and the printer. Thus, after entering a UNIX-like command, PRET translates it to PostScript, PJL or PCL, sends it to the printer, evaluates the result and translates it back to a user-friendly format. PRET offers a whole bunch of commands useful for printer attacks and fuzzing.

Installation
PRET only requires a Python2 interpreter. For colored output and SNMP support however, third party party modules need to be installed:
# pip install colorama pysnmp
If running on a Windows console and Unicode characters are not displayed correctly, install the win_unicode_console module:
# pip install win_unicode_console
For experimental, ‘driverless’ printing (see print command), ImageMagick and GhostScript need to be installed:
# apt-get install imagemagick ghostscript

Usage
usage: pret.py [-h] [-s] [-q] [-d] [-i file] [-o file] target {ps,pjl,pcl}

positional arguments:
target printer device or hostname
{ps,pjl,pcl} printing language to abuse

optional arguments:
-h, --help show this help message and exit
-s, --safe verify if language is supported
-q, --quiet suppress warnings and chit-chat
-d, --debug enter debug mode (show traffic)
-i file, --load file load and run commands from file
-o file, --log file log raw data sent to the target

Example usage:
$ ./pret.py laserjet.lan ps
$ ./pret.py /dev/usb/lp0 pjl

Positional Arguments:
PRET requires a valid target and a printer language as arguments. The target can either be the IP address/hostname of a network printer (with port 9100/tcp open) or a device like /dev/usb/lp0 for a local USB printer. To quickly discover all network printers in your subnet using SNMP broadcast, simply run PRET without arguments:
./pret.py
No target given, discovering local printers

address device uptime status
───────────────────────────────────────────────────────────────────────────────
192.168.1.5 hp LaserJet 4250 10:21:49 Ready
192.168.1.11 HP LaserJet M3027 MFP 13 days Paper jam
192.168.1.27 Lexmark X792 153 days Ready
192.168.1.28 Brother MFC-7860DW 16:31:17 Sleep mode
The printer language to be abused must be one of ps, pjl or pcl. Not all languages are supported by every printer, so you may wan't to switch languages if you don't receive any feedback. Each printer language is mapped to a different set of PRET commands and has different capabilities to exploit.

Optional Arguments:
--safe tries to check via IPP, HTTP and SNMP if the selected printing language (PS/PJL/PCL) is actually supported by the device before connecting. On non-networked printers (USB, parallel cable) this test will fail.
--quit suppresses printer model determination, intro message and some other chit-chat.
--debug shows the datastream actually sent to the device and the feedback received. Note that header data and other overhead is filtered. The see the whole traffic, use wireshark. Debugging can also be switched on/off within a PRET session using the debug command
--load filename reads and executes PRET commands from a text file. This is usefull for automation. Command files can also be invoked later within a PRET session via the load command.
--log filename writes a copy of the raw datastream sent to the printer into a file. This can be useful to build a malicious print job file which can be deployed on another printer not directly reachable, for example by printing it from USB drive.

Generic Commands
After connecting to a printer device, you will see the PRET shell and can execute various commands:
$ ./pret.py laserjet.lan pjl
________________
_/_______________/|
/___________/___//|| PRET | Printer Exploitation Toolkit v0.25
|=== |----| || by Jens Mueller <jens.a.mueller@rub.de>
| | ô| ||
|___________| ô| ||
| ||/.´---.|| | || 「 cause your device can be
|-||/_____\||-. | |´ more fun than paper jams 」
|_||=L==H==||_|__|/

(ASCII art by
Jan Foerster)

Connection to laserjet.lan established
Device: hp LaserJet 4250

Welcome to the pret shell. Type help or ? to list commands.
laserjet.lan:/> help

Available commands (type help <topic>):
=======================================
append debug edit free id ls open restart timeout
cat delete env fuzz info mirror printenv selftest touch
cd df exit get load mkdir put set traversal
chvol disable find help lock nvram pwd site unlock
close display format hold loop offline reset status version

laserjet.lan:/> ls ../../
- 834 .profile
d - bin
d - dev
d - etc
d - hp
d - hpmnt
- 1276 init
d - lib
d - pipe
d - tmp
laserjet.lan:/> exit
A list of generic PRET commands is given below:
help      List available commands or get detailed help with 'help cmd'.
debug Enter debug mode. Use 'hex' for hexdump: debug [hex]
load Run commands from file: load cmd.txt
loop Run command for multiple arguments: loop <cmd> <arg1> <arg2> …
open Connect to remote device: open <target>
close Disconnect from device.
timeout Set connection timeout: timeout <seconds>
discover Discover local printer devices via SNMP.
print Print image file or raw text: print <file>|"text"
site Execute custom command on printer: site <command>
exit Exit the interpreter.
Generic file system operations with a PS/PJL/PCL specific implementation are:
┌───────────┬─────┬─────┬─────┬────────────────────────────────────────┐
│ Command │ PS │ PJL │ PCL │ Description │
├───────────┼─────┼─────┼─────┼────────────────────────────────────────┤
│ ls │ ✓ │ ✓ │ ✓ │ List contents of remote directory. │
│ get │ ✓ │ ✓ │ ✓ │ Receive file: get <file> │
│ put │ ✓ │ ✓ │ ✓ │ Send file: put <local file> │
│ append │ ✓ │ ✓ │ │ Append to file: append <file> <str> │
│ delete │ ✓ │ ✓ │ ✓ │ Delete remote file: delete <file> │
│ rename │ ✓ │ │ │ Rename remote file: rename <old> <new> │
│ find │ ✓ │ ✓ │ │ Recursively list directory contents. │
│ mirror │ ✓ │ ✓ │ │ Mirror remote filesystem to local dir. │
│ cat │ ✓ │ ✓ │ ✓ │ Output remote file to stdout. │
│ edit │ ✓ │ ✓ │ ✓ │ Edit remote files with vim. │
│ touch │ ✓ │ ✓ │ │ Update file timestamps: touch <file> │
│ mkdir │ ✓ │ ✓ │ │ Create remote directory: mkdir <path> │
├───────────┼─────┼─────┼─────┼────────────────────────────────────────┤
│ cd │ ✓ │ ✓ │ │ Change remote working directory. │
│ pwd │ ✓ │ ✓ │ │ Show working directory on device. │
│ chvol │ ✓ │ ✓ │ │ Change remote volume: chvol <volume> │
│ traversal │ ✓ │ ✓ │ │ Set path traversal: traversal <path> │
├───────────┼─────┼─────┼─────┼────────────────────────────────────────┤
│ format │ ✓ │ ✓ │ │ Initialize printer's file system. │
│ fuzz │ ✓ │ ✓ │ │ File system fuzzing: fuzz <category> │
├─ ─ ─ ─ ─ ─┴─ ─ ─┴─ ─ ─┴─ ─ ─┴─ ─ ─ ─ ─ ─ ─ ─ ─ ─ ─ ─ ─ ─ ─ ─ ─ ─ ─ ─ ┤
│ path - Explore fs structure with path traversal strategies. │
│ write - First put/append file, then check for its existence. │
│ blind - Read-only tests for existing files like /etc/passwd. │
├───────────┬─────┬─────┬─────┬────────────────────────────────────────┤
│ df │ ✓ │ ✓ │ │ Show volume information. │
│ free │ ✓ │ ✓ │ ✓ │ Show available memory. │
└───────────┴─────┴─────┴─────┴────────────────────────────────────────┘

Commands in PS mode
id         Show device information.
version Show PostScript interpreter version.
devices Show available I/O devices.
uptime Show system uptime (might be random).
date Show printer's system date and time.
pagecount Show printer's page counter.

lock Set startjob and system parameters password.
unlock Unset startjob and system parameters password.
restart Restart PostScript interpreter.
reset Reset PostScript settings to factory defaults.
disable Disable printing functionality.
destroy Cause physical damage to printer's NVRAM.
hang Execute PostScript infinite loop.

overlay Put overlay eps file on all hardcopies: overlay <file.eps>
cross Put printer graffiti on all hardcopies: cross <font> <text>
replace Replace string in documents to be printed: replace <old> <new>
capture Capture further jobs to be printed on this device.
hold Enable job retention.

set Set key to value in topmost dictionary: set <key=value>
known List supported PostScript operators: known <operator>
search Search all dictionaries by key: search <key>
dicts Return a list of dictionaries and their permissions.
resource List or dump PostScript resource: resource <category> [dump]

dump Dump dictionary: dump <dict>
Dictionaries: - systemdict - statusdict - userdict
- globaldict - serverdict - errordict
- internaldict - currentsystemparams
- currentuserparams - currentpagedevice

config Change printer settings: config <setting>
duplex - Set duplex printing.
copies # - Set number of copies.
economode - Set economic mode.
negative - Set negative print.
mirror - Set mirror inversion.
Not all commands are supported by every printer. Especially Brother and Kyocera devices use their own PostScript clones – Br-Script and KPDL – instead of licensing original ‘Adobe PostScript’. Such flavours of the PostScript language may not be 100% compatible, especially concerning security sensitive features like capturing print jobs. Access to the file system is supported by most printers, however usually limited to a certain, sandboxed directory.

Commands in PJL mode
id         Show device information.
status Enable status messages.
version Show firmware version or serial number (from 'info config').
pagecount Manipulate printer's page counter: pagecount <number>
printenv Show printer environment variable: printenv <VAR>
env Show environment variables (alias for 'info variables').
set Set printer environment variable: set <VAR=VALUE>

display Set printer's display message: display <message>
offline Take printer offline and display message: offline <message>
restart Restart printer.
reset Reset to factory defaults.
selftest Perform various printer self-tests.
disable Disable printing functionality.
destroy Cause physical damage to printer's NVRAM.
flood Flood user input, may reveal buffer overflows.

lock Lock control panel settings and disk write access.
unlock Unlock control panel settings and disk write access.
hold Enable job retention.

nvram NVRAM operations: nvram <operation>
nvram dump [all] - Dump (all) NVRAM to local file.
nvram read addr - Read single byte from address.
nvram write addr value - Write single byte to address.

info Show information: info <category>
info config - Provides configuration information.
info filesys - Returns PJL file system information.
info id - Provides the printer model number.
info memory - Identifies amount of memory available.
info pagecount - Returns the number of pages printed.
info status - Provides the current printer status.
info ustatus - Lists the unsolicited status variables.
info variables - Lists printer's environment variables.
Some commands are supported exclusively by HP printers, because other vendors have only implemented a subset of the PJL standard. This is especially true for PML based commands like restartor reset. Enabling long-term job retention via the hold command seems to be possible for some Epson devices only. NVRAM access via the nvram command is a proprietary feature of Brother printers. Limited access to the file system is supported by various HP, OKI, Konica, Xerox, Epson and Ricoh devices.

Commands in PCL mode
selftest   Perform printer self-test.
info Show information: info <category>
info fonts - Show installed fonts.
info macros - Show installed macros.
info patterns - Show user-defined patterns.
info symbols - Show symbol sets.
info extended - Show extended fonts.
PCL is a very limited page description language without access to the file system. The get/put/ls commands therefore use a virtual file system based on PCL macros, implemented mostly for the hack value. This proof-of-concept shows that even a device which supports only minimalist languages like PCL can be used to store arbitrary files like copyright infringing material. Although such a file sharing service is not a security vulnerability per se, it might apply as ‘misuse of service’ depending on the corporate policy

File Listing
  • pret.py - Executable main program
  • capabilities.py - Routines to check for printer langauge support
  • discovery.py - Routines to list printers using SNMP broadcast
  • printer.py - Generic code to describe a printing device
  • postscript.py - PS spezific code (inherits from class printer)
  • pjl.py - PJL spezific code (inherits from class printer)
  • pcl.py - PCL spezific code (inherits from class printer)
  • helper.py - Help functions for output, logging, sockets, etc.
  • codebook.py - Static table of PJL status/error codes
  • fuzzer.py - Constants for file system fuzzing
  • mibs/* - Printer specific SNMP MIBs
  • db/* - database of supported models
  • lpd/* - Scripts for LPD fuzzing

Getting Started
Given the features and various proprietary extensions in printing languages like PostScript and PJL, conducting a pentest on printers is not a trivial job. PRET can help to assist and verify known issues in the language. Once you have played around with the tool, you may wan't to perform a systematic printer security analysis. A good starting point is the Printer Security Testing Cheat Sheet.


WiFi-Pumpkin v0.8.5 - Framework for Rogue Wi-Fi Access Point Attack


WiFi-Pumpkin is a very complete framework for auditing Wi-Fi security. The main feature is the ability to create a fake AP and make Man In The Middle attack, but the list of features is quite broad.

Installation
  • Python 2.7
 git clone https://github.com/P0cL4bs/WiFi-Pumpkin.git
cd WiFi-Pumpkin
./installer.sh --install
or download .deb file to install
sudo dpkg -i wifi-pumpkin-0.8.5-all.deb
sudo apt-get -f install # force install dependencies if not install normally
refer to the wiki for Installation

Features
  • Rogue Wi-Fi Access Point
  • Deauth Attack Clients AP
  • Probe Request Monitor
  • DHCP Starvation Attack
  • Credentials Monitor
  • Transparent Proxy
  • Windows Update Attack
  • Phishing Manager
  • Partial Bypass HSTS protocol
  • Support beef hook
  • ARP Poison
  • DNS Spoof
  • Patch Binaries via MITM
  • Karma Attacks (support hostapd-mana)
  • LLMNR, NBT-NS and MDNS poisoner (Responder)
  • Pumpkin-Proxy (ProxyServer (mitmproxy API))
  • Capture images on the fly
  • TCP-Proxy (with scapy)

Plugins
Plugin Description
dns2proxy This tools offer a different features for post-explotation once you change the DNS server to a Victim.
sslstrip2 Sslstrip is a MITM tool that implements Moxie Marlinspike's SSL stripping attacks based version fork @LeonardoNve/@xtr4nge.
sergio-proxy Sergio Proxy (a Super Effective Recorder of Gathered Inputs and Outputs) is an HTTP proxy that was written in Python for the Twisted framework.
BDFProxy-ng Patch Binaries via MITM: BackdoorFactory + mitmProxy, bdfproxy-ng is a fork and review of the original BDFProxy @secretsquirrel.
Responder Responder an LLMNR, NBT-NS and MDNS poisoner. Author: Laurent Gaffie

Transparent Proxy


Transparent proxies(mitmproxy) that you can use to intercept and manipulate HTTP traffic modifying requests and responses, that allow to inject javascripts into the targets visited. You can easily implement a module to inject data into pages creating a python file in directory "plugins/extension/" automatically will be listed on Pumpkin-Proxy tab.

Plugins Example Dev
from mitmproxy.models import decoded # for decode content html
from plugins.extension.plugin import PluginTemplate

class Nameplugin(PluginTemplate):
meta = {
'Name' : 'Nameplugin',
'Version' : '1.0',
'Description' : 'Brief description of the new plugin',
'Author' : 'by dev'
}
def __init__(self):
for key,value in self.meta.items():
self.__dict__[key] = value
# if you want set arguments check refer wiki more info.
self.ConfigParser = False # No require arguments

def request(self, flow):
print flow.__dict__
print flow.request.__dict__
print flow.request.headers.__dict__ # request headers
host = flow.request.pretty_host # get domain on the fly requests
versionH = flow.request.http_version # get http version

# get redirect domains example
# pretty_host takes the "Host" header of the request into account,
if flow.request.pretty_host == "example.org":
flow.request.host = "mitmproxy.org"

# get all request Header example
self.send_output.emit("\n[{}][HTTP REQUEST HEADERS]".format(self.Name))
for name, valur in flow.request.headers.iteritems():
self.send_output.emit('{}: {}'.format(name,valur))

print flow.request.method # show method request
# the model printer data
self.send_output.emit('[NamePlugin]:: this is model for save data logging')

def response(self, flow):
print flow.__dict__
print flow.response.__dict__
print flow.response.headers.__dict__ #convert headers for python dict
print flow.response.headers['Content-Type'] # get content type

#every HTTP response before it is returned to the client
with decoded(flow.response):
print flow.response.content # content html
flow.response.content.replace('</body>','<h1>injected</h1></body>') # replace content tag

del flow.response.headers["X-XSS-Protection"] # remove protection Header

flow.response.headers["newheader"] = "foo" # adds a new header
#and the new header will be added to all responses passing through the proxy

About plugins
plugins on the wiki

TCP-Proxy Server
A proxy that you can place between in a TCP stream. It filters the request and response streams with (scapy module) and actively modify packets of a TCP protocol that gets intercepted by WiFi-Pumpkin. this plugin uses modules to view or modify the intercepted data that possibly easiest implementation of a module, just add your custom module on "plugins/analyzers/" automatically will be listed on TCP/UDP Proxy tab.
from scapy.all import *
from scapy_http import http # for layer HTTP
from default import PSniffer # base plugin class

class ExamplePlugin(PSniffer):
_activated = False
_instance = None
meta = {
'Name' : 'Example',
'Version' : '1.0',
'Description' : 'Brief description of the new plugin',
'Author' : 'your name',
}
def __init__(self):
for key,value in self.meta.items():
self.__dict__[key] = value

@staticmethod
def getInstance():
if ExamplePlugin._instance is None:
ExamplePlugin._instance = ExamplePlugin()
return ExamplePlugin._instance

def filterPackets(self,pkt): # (pkt) object in order to modify the data on the fly
if pkt.haslayer(http.HTTPRequest): # filter only http request

http_layer = pkt.getlayer(http.HTTPRequest) # get http fields as dict type
ip_layer = pkt.getlayer(IP)# get ip headers fields as dict type

print http_layer.fields['Method'] # show method http request
# show all item in Header request http
for item in http_layer.fields['Headers']:
print('{} : {}'.format(item,http_layer.fields['Headers'][item]))

print ip_layer.fields['src'] # show source ip address
print ip_layer.fields['dst'] # show destiny ip address

print http_layer # show item type dict
print ip_layer # show item type dict

return self.output.emit({'name_module':'send output to tab TCP-Proxy'})


crackle - Crack Bluetooth Smart (BLE) Encryption


crackle cracks BLE Encryption (AKA Bluetooth Smart).

crackle exploits a flaw in the BLE pairing process that allows an attacker to guess or very quickly brute force the TK (Temporary Key). With the TK and other data collected from the pairing process, the STK (Short Term Key) and later the LTK (Long Term Key) can be collected.

With the STK and LTK, all communications between the master and the slave can be decrypted.
Before attempting to use crackle, review the FAQ to determine whether it is the appropriate tool to use in your situation.

crackle was written by Mike Ryan mikeryan@lacklustre.net See web site for more info: http://lacklustre.net/projects/crackle/

Modes of Operation
crackle has two major modes of operation: Crack TK and Decrypt with LTK.

Crack TK
This is the default mode used when providing crackle with an input file using -i .
In Crack TK mode, crackle brute forces the TK used during a BLE pairing event. crackle exploits the fact that the TK in Just Works(tm) and 6-digit PIN is a value in the range [0,999999] padded to 128 bits.
crackle employs several methods to perform this brute force: a very fast method if all pairing packets are present in the input file, and a slow method if a minimum set of packets is present.
To use this mode, launch crackle with an input PCAP or PcapNG file containing one or more connections with a BLE pairing conversation. crackle will analyze all connections, determine whether it is possible to crack a given connection, and automatically choose the best strategy to crack each one.
If the TK successfully cracks, crackle will derive the remaining keys used to encrypt the rest of the connection and will decrypt any encrypted packets that follow. If the LTK is exchanged (typically the first thing done after encryption is established) crackle will output this value to stdout. The LTK can be used to decrypt any future communications between the two endpoints.
Provide crackle with an output file using -o to create a new PCAP file containing the decrypted data (in addition to the already unencrypted data).
Example usage:
$ crackle -i input.pcap -o decrypted.pcap

Decrypt with LTK
In Decrypt with LTK mode, crackle uses a user-supplied LTK to decrypt communications between a master and slave. This mode is identical to the decryption portion of Crack TK mode.
Example usage:
$ crackle -i encrypted.pcap -o decrypted.pcap -l 81b06facd90fe7a6e9bbd9cee59736a7

Running Crackle

Crack TK Mode
In Crack TK mode, crackle requires a PCAP file that contains a BLE pairing event. The best way to generate such a file is to use an Ubertooth to capture a pairing event between a master and a slave.
To check if your PCAP file contains all the necessary packets, run crackle with the -i option:
crackle -i <file.pcap>
crackle will analyze each connection in the input file and output the results of its analysis to stdout. If you have all the components of a pairing conversation, the output will look like this:
Analyzing connection 0:
xx:xx:xx:xx:xx:xx (public) -> yy:yy:yy:yy:yy:yy (public)
Found 13 encrypted packets

Cracking with strategy 0, 20 bits of entropy

!!!
TK found: 412741
!!!

Decrypted 12 packets
LTK found: 81b06facd90fe7a6e9bbd9cee59736a7

Specify an output file with -o to decrypt packets!
To decrypt all packets, add the -o option:
crackle -i <file.pcap> -o <output.pcap>
The output file will contain decrypted versions of all the encrypted packets from the original PCAP, as well as all the unencrypted packets. Note that CRCs are not recalculated, so the CRCs of decrypted packets will be incorrect.

Decrypt with LTK
In Decrypt with LTK mode, crackle requires a PCAP file that contains at a minimum LL_ENC_REQ and LL_ENC_RSP packets and the LTK used to encrypt the communications.
The format for LTK is a 128 bit hexadecimal number with no spaces or separators, most-significant octet to least-significant octet. Example:
-l 81b06facd90fe7a6e9bbd9cee59736a7
To check if your PCAP file contains all the necessary packets, run crackle with -i and -l:
crackle -i <file.pcap> -l <ltk>
If you have both of the required packets, the program should produce output similar to this:
Analyzing connection 0:
xx:xx:xx:xx:xx:xx (public) -> yy:yy:yy:yy:yy:yy (public)
Found 9 encrypted packets
Decrypted 6 packets

Specify an output file with -o to decrypt packets!
To decrypt all packets, add the -o option:
crackle -i <file.pcap> -o <out.pcap> -l <ltk>
The output file will be produced similarly to the output file described above.

Sample Files
The test files included in the tests directory serve as interesting input for playing with crackle. Review the README files included in each test's subdirectory.
Grab some sample files for cracking with crackle. Refer to the README inside the tarball for more information:
https://lacklustre.net/bluetooth/crackle-sample.tgz

Frequently Asked Questions
We have compiled a list of Frequently Asked Questions .

See Also


Network-Analysis-Tools - Pcap Capture File Analysis Tool

Pcap Capture File Analysis Tool

Features
1-Top 10 Visited Sites
2-Emails
3-All Request Urls
4-User-Agents List
5-String Grep Mode
6-Connection details
7-Ports Used
8-ALL Ip List
9-Manuel Packet Filter
10-Smtp Analysis
11-Web Attack Detect

Installation Modules
$ pip install pyshark
$ pip install dpkt

Requirements(Third)
[+]Wireshark
[+]Tshark
[+]Mergecap
[+]Ngrep

Tested
[+]Debian
[+]Ubuntu

+SCREENSHOT

İmport Pcap File

Manuel Packet Filter


Web Application Attack Detect


Automatic Detect And Convert


ALL Conversation


ALL IP List


and more...


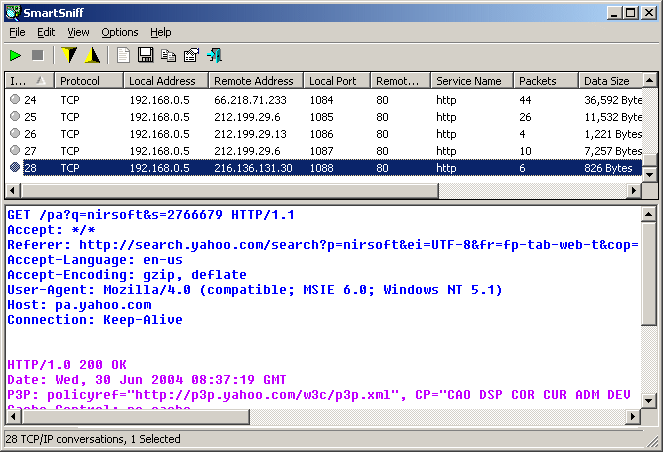
SmartSniff v2.16 - Capture TCP/IP packets on your network adapter


SmartSniff is a network monitoring utility that allows you to capture TCP/IP packets that pass through your network adapter, and view the captured data as sequence of conversations between clients and servers. You can view the TCP/IP conversations in Ascii mode (for text-based protocols, like HTTP, SMTP, POP3 and FTP.) or as hex dump. (for non-text base protocols, like DNS) 

SmartSniff provides 3 methods for capturing TCP/IP packets :
  1. Raw Sockets (Only for Windows 2000/XP or greater): Allows you to capture TCP/IP packets on your network without installing a capture driver. This method has some limitations and problems.
  2. WinPcap Capture Driver: Allows you to capture TCP/IP packets on all Windows operating systems. (Windows 98/ME/NT/2000/XP/2003/Vista) In order to use it, you have to download and install WinPcap Capture Driver from this Web site. (WinPcap is a free open-source capture driver.) 
    This method is generally the preferred way to capture TCP/IP packets with SmartSniff, and it works better than the Raw Sockets method.
  3. Microsoft Network Monitor Driver (Only for Windows 2000/XP/2003): Microsoft provides a free capture driver under Windows 2000/XP/2003 that can be used by SmartSniff, but this driver is not installed by default, and you have to manually install it, by using one of the following options:
  4. Microsoft Network Monitor Driver 3: Microsoft provides a new version of Microsoft Network Monitor driver (3.x) that is also supported under Windows 7/Vista/2008. Starting from version 1.60, SmartSniff can use this driver to capture the network traffic. 
    The new version of Microsoft Network Monitor (3.x) is available to download from Microsoft Web site.    

System Requirements

SmartSniff can capture TCP/IP packets on any version of Windows operating system (Windows 98/ME/NT/2000/XP/2003/2008/Vista/7/8) as long as WinPcap capture driver is installed and works properly with your network adapter. 

You can also use SmartSniff with the capture driver of Microsoft Network Monitor, if it's installed on your system.

Under Windows 2000/XP (or greater), SmartSniff also allows you to capture TCP/IP packets without installing any capture driver, by using 'Raw Sockets' method. However, this capture method has some limitations and problems:
  • Outgoing UDP and ICMP packets are not captured.
  • On Windows XP SP1 outgoing packets are not captured at all - Thanks to Microsoft's bug that appeared in SP1 update... 
    This bug was fixed on SP2 update, but under Vista, Microsoft returned back the outgoing packets bug of XP/SP1.
  • On Windows Vista/7/8: Be aware that Raw Sockets method doesn't work properly on all systems. It's not a bug in SmartSniff, but in the API of Windows operating system. If you only see the outgoing traffic, try to turn off Windows firewall, or add smsniff.exe to the allowed programs list of Windows firewall.   

[Password Sniffer Spy v2.0] Tool to Sniff and Capture HTTP/FTP/POP3/SMTP/IMAP Passwords


Password Sniffer Spy is the all-in-one Password Sniffing Tool to capture Email, Web and FTP login passwords passing through the network.


It automatically detects the login packets on network for various protocols and instantly decodes the passwords. Here is the list of supported protocols,
  • HTTP (BASIC authentication)
  • FTP
  • POP3
  • IMAP
  • SMTP
In addition to recovering your own lost passwords, you can use this tool in following scenarios,
  • Run it on Gateway System where all of your network's traffic pass through.
  • In MITM Attack, run it on middle system to capture the Passwords from target system.
  • On Multi-user System, run it under Administrator account to silently capture passwords for all the users.
It includes Installer which installs the Winpcap, network capture driver required for sniffing. For Windows 8, first you have to manually install Winpcap driver (in Windows 7 Compatibility mode) and then run our installer to install only Password Sniffer Spy.