This is default featured slide 1 title

Go to Blogger edit html and find these sentences.Now replace these sentences with your own descriptions.

This is default featured slide 2 title

Go to Blogger edit html and find these sentences.Now replace these sentences with your own descriptions.

This is default featured slide 3 title

Go to Blogger edit html and find these sentences.Now replace these sentences with your own descriptions.

This is default featured slide 4 title

Go to Blogger edit html and find these sentences.Now replace these sentences with your own descriptions.

This is default featured slide 5 title

Go to Blogger edit html and find these sentences.Now replace these sentences with your own descriptions.

Showing posts with label Database. Show all posts

getsploit - Command line utility for searching and downloading exploits


Command line search and download tool for Vulners Database inspired by searchsploit. It allows you to search online for the exploits across all the most popular collections: Exploit-DB, Metasploit, Packetstorm and others. The most powerful feature is immediate exploit source download right in your working path.

Python version
Utility was tested on a python2.6, python2.7, python3.6. If you found any bugs, don't hesitate to open issue

How to use

Search
# git clone https://github.com/vulnersCom/getsploit
# cd getsploit
# ./getsploit.py wordpress 4.7.0
Total found exploits: 8
Web-search URL: https://vulners.com/search?query=bulletinFamily%3Aexploit%20AND%20wordpress%204.7.0
+----------------------+--------------------------------+----------------------------------------------------+
| ID | Exploit Title | URL |
+======================+================================+====================================================+
| PACKETSTORM:141039 | WordPress 4.7.0 / 4.7.1 Insert | https://vulners.com/packetstorm/PACKETSTORM:141039 |
| | PHP Code Injection | |
+----------------------+--------------------------------+----------------------------------------------------+
| EDB-ID:41308 | WordPress 4.7.0/4.7.1 Plugin | https://vulners.com/exploitdb/EDB-ID:41308 |
| | Insert PHP - PHP Code | |
| | Injection | |
+----------------------+--------------------------------+----------------------------------------------------+
| EDB-ID:41223 | WordPress 4.7.0/4.7.1 - | https://vulners.com/exploitdb/EDB-ID:41223 |
| | Unauthenticated Content | |
| | Injection (PoC) | |
+----------------------+--------------------------------+----------------------------------------------------+
| PACKETSTORM:140893 | WordPress 4.7.0 / 4.7.1 REST | https://vulners.com/packetstorm/PACKETSTORM:140893 |
| | API Privilege Escalation | |
+----------------------+--------------------------------+----------------------------------------------------+
| PACKETSTORM:140902 | WordPress 4.7.0 / 4.7.1 | https://vulners.com/packetstorm/PACKETSTORM:140902 |
| | Content Injection / Code | |
| | Execution | |
+----------------------+--------------------------------+----------------------------------------------------+
| PACKETSTORM:140901 | WordPress 4.7.0 / 4.7.1 | https://vulners.com/packetstorm/PACKETSTORM:140901 |
| | Content Injection Proof Of | |
| | Concept | |
+----------------------+--------------------------------+----------------------------------------------------+
| EDB-ID:41224 | WordPress 4.7.0/4.7.1 - | https://vulners.com/exploitdb/EDB-ID:41224 |
| | Unauthenticated Content | |
| | Injection Arbitrary Code | |
| | Execution | |
+----------------------+--------------------------------+----------------------------------------------------+
| SSV-92637 | WordPress REST API content | https://vulners.com/seebug/SSV-92637 |
| | injection | |
+----------------------+--------------------------------+----------------------------------------------------+

Save exploit files
# ./getsploit.py -m wordpress 4.7.0
Total found exploits: 8
Web-search URL: https://vulners.com/search?query=bulletinFamily%3Aexploit%20AND%20wordpress%204.7.0
+----------------------+--------------------------------+----------------------------------------------------+
| ID | Exploit Title | URL |
+======================+================================+====================================================+
| PACKETSTORM:141039 | WordPress 4.7.0 / 4.7.1 Insert | https://vulners.com/packetstorm/PACKETSTORM:141039 |
| | PHP Code Injection | |
+----------------------+--------------------------------+----------------------------------------------------+
| EDB-ID:41308 | WordPress 4.7.0/4.7.1 Plugin | https://vulners.com/exploitdb/EDB-ID:41308 |
| | Insert PHP - PHP Code | |
| | Injection | |
+----------------------+--------------------------------+----------------------------------------------------+
| EDB-ID:41223 | WordPress 4.7.0/4.7.1 - | https://vulners.com/exploitdb/EDB-ID:41223 |
| | Unauthenticated Content | |
| | Injection (PoC) | |
+----------------------+--------------------------------+----------------------------------------------------+
| PACKETSTORM:140893 | WordPress 4.7.0 / 4.7.1 REST | https://vulners.com/packetstorm/PACKETSTORM:140893 |
| | API Privilege Escalation | |
+----------------------+--------------------------------+----------------------------------------------------+
| PACKETSTORM:140902 | WordPress 4.7.0 / 4.7.1 | https://vulners.com/packetstorm/PACKETSTORM:140902 |
| | Content Injection / Code | |
| | Execution | |
+----------------------+--------------------------------+----------------------------------------------------+
| PACKETSTORM:140901 | WordPress 4.7.0 / 4.7.1 | https://vulners.com/packetstorm/PACKETSTORM:140901 |
| | Content Injection Proof Of | |
| | Concept | |
+----------------------+--------------------------------+----------------------------------------------------+
| EDB-ID:41224 | WordPress 4.7.0/4.7.1 - | https://vulners.com/exploitdb/EDB-ID:41224 |
| | Unauthenticated Content | |
| | Injection Arbitrary Code | |
| | Execution | |
+----------------------+--------------------------------+----------------------------------------------------+
| SSV-92637 | WordPress REST API content | https://vulners.com/seebug/SSV-92637 |
| | injection | |
+----------------------+--------------------------------+----------------------------------------------------+

# ls
LICENSE README.md getsploit.py wordpress-470
# cd wordpress-470
# ls
edb-id41223.txt edb-id41224.txt edb-id41308.txt packetstorm140893.txt packetstorm140901.txt packetstorm140902.txt packetstorm141039.txt ssv-92637.txt

Local database
If your Python supports sqlite3 lib(builtin) you can use --update and --local commands to download whole exploit database to your PC. After update you can perform local offline searches.
# ./getsploit.py --update
Downloading getsploit database archive. Please wait, it may take time. Usually around 5-10 minutes.
219642496/219642496 [100.00%]
Unpacking database.
Database download complete. Now you may search exploits using --local key './getsploit.py -l wordpress 4.7'
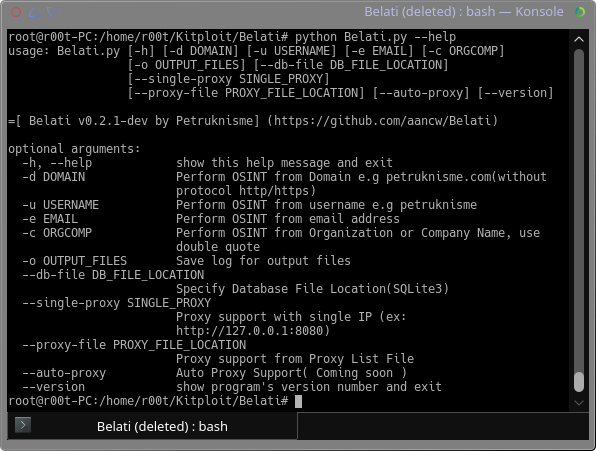

Belati - The Traditional Swiss Army Knife for OSINT


Belati is tool for Collecting Public Data & Public Document from Website and other service for OSINT purpose. This tools is inspired by Foca and Datasploit for OSINT.

What Belati can do?
  • Whois(Indonesian TLD Support)
  • Banner Grabbing
  • Subdomain Enumeration
  • Service Scanning for all Subdomain Machine
  • Web Appalyzer Support
  • DNS mapping / Zone Scanning
  • Mail Harvester from Website & Search Engine
  • Mail Harvester from MIT PGP Public Key Server
  • Scrapping Public Document for Domain from Search Engine
  • Fake and Random User Agent ( Prevent from blocking )
  • Proxy Support for Harvesting Emails and Documents
  • Public Git Finder in domain/subdomain
  • Public SVN Finder in domain/subdomain
  • Robot.txt Scraper in domain/subdomain
  • Gather Public Company Info & Employee
  • SQLite3 Database Support for storing Belati Results
  • Setup Wizard/Configuration for Belati

TODO
  • Automatic OSINT with Username and Email support
  • Organization or Company OSINT Support
  • Collecting Data from Public service with Username and Email for LinkedIn and other service.
  • Setup Wizard for Token and setting up Belati
  • Token Support
  • Email Harvesting with multiple content(github, linkedin, etc)
  • Scrapping Public Document with multiple search engine(yahoo, yandex, bing etc)
  • Metadata Extractor
  • Web version with Django
  • Scanning Report export to PDF
  • domain or subdomain reputation checker
  • Reporting Support to JSON, PDF
  • Belati Updater

Install/Usage
git clone https://github.com/aancw/Belati.git
cd Belati
git submodule update --init --recursive --remote
pip install -r requirements.txt #please use pip with python v2
sudo su
python Belati.py --help

Tested On
Ubuntu 16.04 x86_64 Arch Linux x86_64 CentOS 7

Python Requirements
This tool not compatible with Python 3. So use python v2.7 instead!

Why Need Root Privilege?
Nmap need Root Privilege. You can add sudo or other way to run nmap without root privilege. It's your choice ;)
Reference -> https://secwiki.org/w/Running_nmap_as_an_unprivileged_user
Don't worry. Belati still running when you are run with normal user ;)

Dependencies
  • urllib2
  • dnspython
  • requests
  • argparse
  • texttable
  • python-geoip-geolite2
  • python-geoip
  • dnsknife
  • termcolor
  • colorama
  • validators
  • tqdm
  • tldextract
  • fake-useragent

System Dependencies
For CentOS/Fedora user, please install this:
yum install gcc gmp gmp-devel python-devel

Library
  • python-whois
  • Sublist3r
  • Subbrute
  • nmap
  • git
  • sqlite3

Notice
This tool is for educational purposes only. Any damage you make will not affect the author. Do It With Your Own Risk!

Author
Aan Wahyu a.k.a Petruknisme(https://petruknisme.com)


PRET - Printer Exploitation Toolkit


PRET is a new tool for printer security testing developed in the scope of a Master's Thesis at Ruhr University Bochum. It connects to a device via network or USB and exploits the features of a given printer language. Currently PostScript, PJL and PCL are supported which are spoken by most laser printers. This allows cool stuff like capturing or manipulating print jobs, accessing the printer's file system and memory or even causing physical damage to the device. All attacks are documented in detail in the Hacking Printers Wiki.

The main idea of PRET is to facilitate the communication between the end-user and the printer. Thus, after entering a UNIX-like command, PRET translates it to PostScript, PJL or PCL, sends it to the printer, evaluates the result and translates it back to a user-friendly format. PRET offers a whole bunch of commands useful for printer attacks and fuzzing.

Installation
PRET only requires a Python2 interpreter. For colored output and SNMP support however, third party party modules need to be installed:
# pip install colorama pysnmp
If running on a Windows console and Unicode characters are not displayed correctly, install the win_unicode_console module:
# pip install win_unicode_console
For experimental, ‘driverless’ printing (see print command), ImageMagick and GhostScript need to be installed:
# apt-get install imagemagick ghostscript

Usage
usage: pret.py [-h] [-s] [-q] [-d] [-i file] [-o file] target {ps,pjl,pcl}

positional arguments:
target printer device or hostname
{ps,pjl,pcl} printing language to abuse

optional arguments:
-h, --help show this help message and exit
-s, --safe verify if language is supported
-q, --quiet suppress warnings and chit-chat
-d, --debug enter debug mode (show traffic)
-i file, --load file load and run commands from file
-o file, --log file log raw data sent to the target

Example usage:
$ ./pret.py laserjet.lan ps
$ ./pret.py /dev/usb/lp0 pjl

Positional Arguments:
PRET requires a valid target and a printer language as arguments. The target can either be the IP address/hostname of a network printer (with port 9100/tcp open) or a device like /dev/usb/lp0 for a local USB printer. To quickly discover all network printers in your subnet using SNMP broadcast, simply run PRET without arguments:
./pret.py
No target given, discovering local printers

address device uptime status
───────────────────────────────────────────────────────────────────────────────
192.168.1.5 hp LaserJet 4250 10:21:49 Ready
192.168.1.11 HP LaserJet M3027 MFP 13 days Paper jam
192.168.1.27 Lexmark X792 153 days Ready
192.168.1.28 Brother MFC-7860DW 16:31:17 Sleep mode
The printer language to be abused must be one of ps, pjl or pcl. Not all languages are supported by every printer, so you may wan't to switch languages if you don't receive any feedback. Each printer language is mapped to a different set of PRET commands and has different capabilities to exploit.

Optional Arguments:
--safe tries to check via IPP, HTTP and SNMP if the selected printing language (PS/PJL/PCL) is actually supported by the device before connecting. On non-networked printers (USB, parallel cable) this test will fail.
--quit suppresses printer model determination, intro message and some other chit-chat.
--debug shows the datastream actually sent to the device and the feedback received. Note that header data and other overhead is filtered. The see the whole traffic, use wireshark. Debugging can also be switched on/off within a PRET session using the debug command
--load filename reads and executes PRET commands from a text file. This is usefull for automation. Command files can also be invoked later within a PRET session via the load command.
--log filename writes a copy of the raw datastream sent to the printer into a file. This can be useful to build a malicious print job file which can be deployed on another printer not directly reachable, for example by printing it from USB drive.

Generic Commands
After connecting to a printer device, you will see the PRET shell and can execute various commands:
$ ./pret.py laserjet.lan pjl
________________
_/_______________/|
/___________/___//|| PRET | Printer Exploitation Toolkit v0.25
|=== |----| || by Jens Mueller <jens.a.mueller@rub.de>
| | ô| ||
|___________| ô| ||
| ||/.´---.|| | || 「 cause your device can be
|-||/_____\||-. | |´ more fun than paper jams 」
|_||=L==H==||_|__|/

(ASCII art by
Jan Foerster)

Connection to laserjet.lan established
Device: hp LaserJet 4250

Welcome to the pret shell. Type help or ? to list commands.
laserjet.lan:/> help

Available commands (type help <topic>):
=======================================
append debug edit free id ls open restart timeout
cat delete env fuzz info mirror printenv selftest touch
cd df exit get load mkdir put set traversal
chvol disable find help lock nvram pwd site unlock
close display format hold loop offline reset status version

laserjet.lan:/> ls ../../
- 834 .profile
d - bin
d - dev
d - etc
d - hp
d - hpmnt
- 1276 init
d - lib
d - pipe
d - tmp
laserjet.lan:/> exit
A list of generic PRET commands is given below:
help      List available commands or get detailed help with 'help cmd'.
debug Enter debug mode. Use 'hex' for hexdump: debug [hex]
load Run commands from file: load cmd.txt
loop Run command for multiple arguments: loop <cmd> <arg1> <arg2> …
open Connect to remote device: open <target>
close Disconnect from device.
timeout Set connection timeout: timeout <seconds>
discover Discover local printer devices via SNMP.
print Print image file or raw text: print <file>|"text"
site Execute custom command on printer: site <command>
exit Exit the interpreter.
Generic file system operations with a PS/PJL/PCL specific implementation are:
┌───────────┬─────┬─────┬─────┬────────────────────────────────────────┐
│ Command │ PS │ PJL │ PCL │ Description │
├───────────┼─────┼─────┼─────┼────────────────────────────────────────┤
│ ls │ ✓ │ ✓ │ ✓ │ List contents of remote directory. │
│ get │ ✓ │ ✓ │ ✓ │ Receive file: get <file> │
│ put │ ✓ │ ✓ │ ✓ │ Send file: put <local file> │
│ append │ ✓ │ ✓ │ │ Append to file: append <file> <str> │
│ delete │ ✓ │ ✓ │ ✓ │ Delete remote file: delete <file> │
│ rename │ ✓ │ │ │ Rename remote file: rename <old> <new> │
│ find │ ✓ │ ✓ │ │ Recursively list directory contents. │
│ mirror │ ✓ │ ✓ │ │ Mirror remote filesystem to local dir. │
│ cat │ ✓ │ ✓ │ ✓ │ Output remote file to stdout. │
│ edit │ ✓ │ ✓ │ ✓ │ Edit remote files with vim. │
│ touch │ ✓ │ ✓ │ │ Update file timestamps: touch <file> │
│ mkdir │ ✓ │ ✓ │ │ Create remote directory: mkdir <path> │
├───────────┼─────┼─────┼─────┼────────────────────────────────────────┤
│ cd │ ✓ │ ✓ │ │ Change remote working directory. │
│ pwd │ ✓ │ ✓ │ │ Show working directory on device. │
│ chvol │ ✓ │ ✓ │ │ Change remote volume: chvol <volume> │
│ traversal │ ✓ │ ✓ │ │ Set path traversal: traversal <path> │
├───────────┼─────┼─────┼─────┼────────────────────────────────────────┤
│ format │ ✓ │ ✓ │ │ Initialize printer's file system. │
│ fuzz │ ✓ │ ✓ │ │ File system fuzzing: fuzz <category> │
├─ ─ ─ ─ ─ ─┴─ ─ ─┴─ ─ ─┴─ ─ ─┴─ ─ ─ ─ ─ ─ ─ ─ ─ ─ ─ ─ ─ ─ ─ ─ ─ ─ ─ ─ ┤
│ path - Explore fs structure with path traversal strategies. │
│ write - First put/append file, then check for its existence. │
│ blind - Read-only tests for existing files like /etc/passwd. │
├───────────┬─────┬─────┬─────┬────────────────────────────────────────┤
│ df │ ✓ │ ✓ │ │ Show volume information. │
│ free │ ✓ │ ✓ │ ✓ │ Show available memory. │
└───────────┴─────┴─────┴─────┴────────────────────────────────────────┘

Commands in PS mode
id         Show device information.
version Show PostScript interpreter version.
devices Show available I/O devices.
uptime Show system uptime (might be random).
date Show printer's system date and time.
pagecount Show printer's page counter.

lock Set startjob and system parameters password.
unlock Unset startjob and system parameters password.
restart Restart PostScript interpreter.
reset Reset PostScript settings to factory defaults.
disable Disable printing functionality.
destroy Cause physical damage to printer's NVRAM.
hang Execute PostScript infinite loop.

overlay Put overlay eps file on all hardcopies: overlay <file.eps>
cross Put printer graffiti on all hardcopies: cross <font> <text>
replace Replace string in documents to be printed: replace <old> <new>
capture Capture further jobs to be printed on this device.
hold Enable job retention.

set Set key to value in topmost dictionary: set <key=value>
known List supported PostScript operators: known <operator>
search Search all dictionaries by key: search <key>
dicts Return a list of dictionaries and their permissions.
resource List or dump PostScript resource: resource <category> [dump]

dump Dump dictionary: dump <dict>
Dictionaries: - systemdict - statusdict - userdict
- globaldict - serverdict - errordict
- internaldict - currentsystemparams
- currentuserparams - currentpagedevice

config Change printer settings: config <setting>
duplex - Set duplex printing.
copies # - Set number of copies.
economode - Set economic mode.
negative - Set negative print.
mirror - Set mirror inversion.
Not all commands are supported by every printer. Especially Brother and Kyocera devices use their own PostScript clones – Br-Script and KPDL – instead of licensing original ‘Adobe PostScript’. Such flavours of the PostScript language may not be 100% compatible, especially concerning security sensitive features like capturing print jobs. Access to the file system is supported by most printers, however usually limited to a certain, sandboxed directory.

Commands in PJL mode
id         Show device information.
status Enable status messages.
version Show firmware version or serial number (from 'info config').
pagecount Manipulate printer's page counter: pagecount <number>
printenv Show printer environment variable: printenv <VAR>
env Show environment variables (alias for 'info variables').
set Set printer environment variable: set <VAR=VALUE>

display Set printer's display message: display <message>
offline Take printer offline and display message: offline <message>
restart Restart printer.
reset Reset to factory defaults.
selftest Perform various printer self-tests.
disable Disable printing functionality.
destroy Cause physical damage to printer's NVRAM.
flood Flood user input, may reveal buffer overflows.

lock Lock control panel settings and disk write access.
unlock Unlock control panel settings and disk write access.
hold Enable job retention.

nvram NVRAM operations: nvram <operation>
nvram dump [all] - Dump (all) NVRAM to local file.
nvram read addr - Read single byte from address.
nvram write addr value - Write single byte to address.

info Show information: info <category>
info config - Provides configuration information.
info filesys - Returns PJL file system information.
info id - Provides the printer model number.
info memory - Identifies amount of memory available.
info pagecount - Returns the number of pages printed.
info status - Provides the current printer status.
info ustatus - Lists the unsolicited status variables.
info variables - Lists printer's environment variables.
Some commands are supported exclusively by HP printers, because other vendors have only implemented a subset of the PJL standard. This is especially true for PML based commands like restartor reset. Enabling long-term job retention via the hold command seems to be possible for some Epson devices only. NVRAM access via the nvram command is a proprietary feature of Brother printers. Limited access to the file system is supported by various HP, OKI, Konica, Xerox, Epson and Ricoh devices.

Commands in PCL mode
selftest   Perform printer self-test.
info Show information: info <category>
info fonts - Show installed fonts.
info macros - Show installed macros.
info patterns - Show user-defined patterns.
info symbols - Show symbol sets.
info extended - Show extended fonts.
PCL is a very limited page description language without access to the file system. The get/put/ls commands therefore use a virtual file system based on PCL macros, implemented mostly for the hack value. This proof-of-concept shows that even a device which supports only minimalist languages like PCL can be used to store arbitrary files like copyright infringing material. Although such a file sharing service is not a security vulnerability per se, it might apply as ‘misuse of service’ depending on the corporate policy

File Listing
  • pret.py - Executable main program
  • capabilities.py - Routines to check for printer langauge support
  • discovery.py - Routines to list printers using SNMP broadcast
  • printer.py - Generic code to describe a printing device
  • postscript.py - PS spezific code (inherits from class printer)
  • pjl.py - PJL spezific code (inherits from class printer)
  • pcl.py - PCL spezific code (inherits from class printer)
  • helper.py - Help functions for output, logging, sockets, etc.
  • codebook.py - Static table of PJL status/error codes
  • fuzzer.py - Constants for file system fuzzing
  • mibs/* - Printer specific SNMP MIBs
  • db/* - database of supported models
  • lpd/* - Scripts for LPD fuzzing

Getting Started
Given the features and various proprietary extensions in printing languages like PostScript and PJL, conducting a pentest on printers is not a trivial job. PRET can help to assist and verify known issues in the language. Once you have played around with the tool, you may wan't to perform a systematic printer security analysis. A good starting point is the Printer Security Testing Cheat Sheet.


pwned - A command-line tool for querying the 'Have I been pwned?' service


A command-line tool for querying Troy Hunt's Have I been pwned? service using the hibp Node.js module.

Installation
npm install pwned -g

Usage
Usage: pwned [option | command]


Commands:

ba [options] <account> get all breaches for an account (username or email address)
breaches [options] get all breaches in the system
breach [options] <name> get a single breached site by breach name
dc [options] get all data classes in the system
pa [options] <email> get all pastes for an account (email address)

Each command has its own -h (--help) option.

Options:

-h, --help output usage information
-v, --version output the version number

Examples
Get all breaches for an account:
$ pwned ba pleasebeclean@fingerscrossed.tld
Good news — no pwnage found!
Get all breaches in the system, filtering results to just the 'adobe.com' domain:
$ pwned breaches -d adobe.com
-
Title: Adobe
Name: Adobe
Domain: adobe.com
BreachDate: 2013-10-04
AddedDate: 2013-12-04T00:00:00Z
PwnCount: 152445165
Description: In October 2013, 153 million Adobe accounts were breached with each containing an internal ID, username, email, <em>encrypted</em> password and a password hint in plain text. The password cryptography was poorly done and <a href="http://stricture-group.com/files/adobe-top100.txt" target="_blank">many were quickly resolved back to plain text</a>. The unencrypted hints also <a href="http://www.troyhunt.com/2013/11/adobe-credentials-and-serious.html" target="_blank">disclosed much about the passwords</a> adding further to the risk that hundreds of millions of Adobe customers already faced.
DataClasses:
- Email addresses
- Password hints
- Passwords
- Usernames
IsVerified: true
IsSensitive: false
IsActive: true
IsRetired: false
LogoType: svg
Get a single breached site by breach name:
$ pwned breach MyCompany
No breach found by that name.
Get all the data classes in the system, returning raw JSON results for external/chained consumption:
$ pwned dc --raw
["Account balances","Age groups","Astrological signs","Avatars","Bank account numbers","Banking PINs","Beauty ratings","Biometric data","Car ownership statuses","Career levels","Chat logs","Credit cards","Customer feedback","Customer interactions","Dates of birth","Device information","Device usage tracking data","Drinking habits","Drug habits","Education levels","Email addresses","Email messages","Employers","Ethnicities","Family members' names","Family plans","Financial transactions","Fitness levels","Genders","Geographic locations","Government issued IDs","Historical passwords","Home ownership statuses","Homepage URLs","Income levels","Instant messenger identities","IP addresses","Job titles","MAC addresses","Marital statuses","Names","Nicknames","Parenting plans","Partial credit card data","Passport numbers","Password hints","Passwords","Payment histories","Personal descriptions","Personal interests","Phone numbers","Physical addresses","Physical attributes","Political views","Private messages","Purchases","Races","Recovery email addresses","Relationship statuses","Religions","Reward program balances","Salutations","Security questions and answers","Sexual fetishes","Sexual orientations","Smoking habits","SMS messages","Social connections","Spoken languages","Time zones","Travel habits","User agent details","User statuses","User website URLs","Usernames","Website activity","Work habits","Years of birth"]
Get all pastes for an email address:
$ pwned pa nobody@nowhere.com
-
Source: Pastebin
Id: xyb8vavK
Title: null
Date: 2015-06-01T00:16:46Z
EmailCount: 8
-
Source: Pastebin
Id: DaaFj8Be
Title: CrackingCore - Redder04
Date: 2015-04-05T22:22:39Z
EmailCount: 116
-
Source: Pastebin
Id: 9MAAgecd
Title: IPTV YabancÄą Combolist
Date: 2015-02-07T15:21:00Z
EmailCount: 244
-
Source: Pastebin
Id: QMx1dPUT
Title: null
Date: 2015-02-02T20:45:00Z
EmailCount: 6607
-
Source: Pastebin
Id: zUFSee4n
Title: nethingoez
Date: 2015-01-21T15:13:00Z
EmailCount: 312
-
Source: AdHocUrl
Id: http://siph0n.in/exploits.php?id=4560
Title: BuzzMachines.com 40k+
Date: null
EmailCount: 36959
-
Source: AdHocUrl
Id: http://siph0n.in/exploits.php?id=4737
Title: PayPalSucks Database 102k
Date: null
EmailCount: 82071

probeSniffer - A Tool for Sniffing Unencrypted Wireless Probe Requests from Devices


 ____  ____   ___  ____    ___ _________  ____ _____ _____  ___ ____    
| \| \ / \| \ / _/ ___| \| | | |/ _| \
| o | D | | o )/ [( \_| _ || || __| __/ [_| D )
| _/| /| O | | _\__ | | || || |_ | |_| _| /
| | | \| | O | [_/ \ | | || || _]| _| [_| \
| | | . | | | \ | | || || | | | | | . \
|__| |__|\_|\___/|_____|_____|\___|__|__|____|__| |__| |_____|__|\__|
v2.1 by David SchĂźtz (@xdavidhu)

A tool for sniffing unencrypted wireless probe requests from devices:

new in 2.1:
  • Displaying the number of hosts
  • Logging to SQLite database file
  • Settable nickname for mac addresses
  • Options to filter output by mac address
  • Capturing 'boradcast' probe requests (without ssid)

requirements:
  • Kali Linux / Raspbian with root privileges
  • Python3 & PIP3 (probeSniffer will install the dependenices)
  • A wireless card (capable for monitor mode) and one other internet connected interface (for vendor resolve)

options:
  • -d / do not show duplicate requests
  • -b / do not show broadcast requests
  • -f / only show requests from the specified mac address
  • --addnicks / add nicknames to mac addresses
  • --flushnicks / flush nickname database
  • --nosql / disable SQL logging completely
  • --debug / turn debug mode on
  • -h / display help menu

installing:

Kali Linux / Raspbian:
$ sudo apt-get update && sudo apt-get install python3 python3-pip -y

$ git clone https://github.com/xdavidhu/probeSniffer

$ cd probeSniffer/

$ python3 -m pip install -r requirements.txt
WARNING: probeSniffer is only compatible with Python 3.3 & 3.4 & 3.5 & 3.6

usage:
Make sure to put your interface into monitor mode before!
$ sudo python3 probeSniffer.py [monitor-mode-interface] [options]


NSEarch - Nmap Scripting Engine Search


Nsearch, is a tool that helps you to find scripts that are used by nmap ( nse ) , you can search the scripts using differents keyword as the name, category and author, even using all the keyword in a single query,it is also possible to see the documentation of the scripts founded.

Requeriments
$ pip install pyyaml python-i18n

Debian(Ubuntu)
# apt-get install unzip libreadline-gplv2-dev build-essential checkinstall unzip sqlite3 libsqlite3-dev -y

REDHAT(CentOS)
# yum -y install bzip2 groupinstall "Development Tools"

Installation

To install the application is necessary run as root user the installation script (install.sh), for the time, the script is only for OS based on debian and based on Red Hat (CentOS). MacOSX or other UNIX it's better do the installation for each dependency manually.

Automatic Installation
# sh install.sh

File Configuration

Find the script.db's path, use the command below
$ find /usr -type f -name "script.db" 2>/dev/null | awk 'gsub("script.db","")'

Then create a config.yaml file, on the main path of the script
config:
scriptsPath: '/usr/local/share/nmap/scripts/'
filePath: '/usr/local/share/nmap/scripts/script.db'
fileBackup: 'scriptbk.db'
scriptdb: 'nmap_scripts.sqlite3'
categories: {"auth","broadcast","brute","default","discovery","dos","exploit","external","fuzzer","intrusive","malware","safe","version","vuln"}

USAGE:
  $ python nsearch.py

Main Menu

Initial Setup
 ================================================
_ _ _____ _____ _
| \ | |/ ___|| ___| | |
| \| |\ `--. | |__ __ _ _ __ ___ | |__
| . ` | `--. \| __| / _` || '__| / __|| '_ |
| |\ |/\__/ /| |___ | (_| || | | (__ | | | |
\_| \_/\____/ \____/ \__,_||_| \___||_| |_|
================================================
Version 0.4b http://goo.gl/8mFHE5 @jjtibaquira
Email: jko@dragonjar.org | www.dragonjar.org
================================================

Creating Database :nmap_scripts.sqlite3
Creating Table For Script ....
Creating Table for Categories ....
Creating Table for Scripts per Category ....
Upload Categories to Categories Table ...

Main Console
  ================================================
_ _ _____ _____ _
| \ | |/ ___|| ___| | |
| \| |\ `--. | |__ __ _ _ __ ___ | |__
| . ` | `--. \| __| / _` || '__| / __|| '_ |
| |\ |/\__/ /| |___ | (_| || | | (__ | | | |
\_| \_/\____/ \____/ \__,_||_| \___||_| |_|
================================================
Version 0.4b http://goo.gl/8mFHE5 @jjtibaquira
Email: jko@dragonjar.org | www.dragonjar.org
================================================

Cheking DB ... nmap_scripts.sqlite3
The DB is updated nmap_scripts.sqlite3

nsearch>

Basic Commands
  ================================================
_ _ _____ _____ _
| \ | |/ ___|| ___| | |
| \| |\ `--. | |__ __ _ _ __ ___ | |__
| . ` | `--. \| __| / _` || '__| / __|| '_ |
| |\ |/\__/ /| |___ | (_| || | | (__ | | | |
\_| \_/\____/ \____/ \__,_||_| \___||_| |_|
================================================
Version 0.4b http://goo.gl/8mFHE5 @jjtibaquira
Email: jko@dragonjar.org | www.dragonjar.org
================================================

nsearch> help

Nsearch Commands
================
addfav clear delfav doc exit help history last modfav search showfav

nsearch>
  ================================================
_ _ _____ _____ _
| \ | |/ ___|| ___| | |
| \| |\ `--. | |__ __ _ _ __ ___ | |__
| . ` | `--. \| __| / _` || '__| / __|| '_ |
| |\ |/\__/ /| |___ | (_| || | | (__ | | | |
\_| \_/\____/ \____/ \__,_||_| \___||_| |_|
================================================
Version 0.4b http://goo.gl/8mFHE5 @jjtibaquira
Email: jko@dragonjar.org | www.dragonjar.org
================================================

nsearch> help search

name : Search by script's name
category : Search by category
author : Search by author
Usage:
search name:http
search category:exploit
search author:fyodor
search name:http category:exploit author:fyodor

nsearch>
  ================================================
_ _ _____ _____ _
| \ | |/ ___|| ___| | |
| \| |\ `--. | |__ __ _ _ __ ___ | |__
| . ` | `--. \| __| / _` || '__| / __|| '_ |
| |\ |/\__/ /| |___ | (_| || | | (__ | | | |
\_| \_/\____/ \____/ \__,_||_| \___||_| |_|
================================================
Version 0.4b http://goo.gl/8mFHE5 @jjtibaquira
Email: jko@dragonjar.org | www.dragonjar.org
================================================

nsearch> search name:http author:calderon category:vuln
*** Name Author
[+] http-vuln-cve2012-1823.nse Paulino Calderon, Paul AMAR
[+] http-phpself-xss.nse Paulino Calderon
[+] http-wordpress-enum.nse Paulino Calderon
[+] http-adobe-coldfusion-apsa1301.nse Paulino Calderon
[+] http-vuln-cve2013-0156.nse Paulino Calderon
[+] http-awstatstotals-exec.nse Paulino Calderon
[+] http-axis2-dir-traversal.nse Paulino Calderon
[+] http-huawei-hg5xx-vuln.nse Paulino Calderon
[+] http-tplink-dir-traversal.nse Paulino Calderon
[+] http-trace.nse Paulino Calderon
[+] http-litespeed-sourcecode-download.nse Paulino Calderon
[+] http-majordomo2-dir-traversal.nse Paulino Calderon
[+] http-method-tamper.nse Paulino Calderon
  ================================================
_ _ _____ _____ _
| \ | |/ ___|| ___| | |
| \| |\ `--. | |__ __ _ _ __ ___ | |__
| . ` | `--. \| __| / _` || '__| / __|| '_ |
| |\ |/\__/ /| |___ | (_| || | | (__ | | | |
\_| \_/\____/ \____/ \__,_||_| \___||_| |_|
================================================
Version 0.4b http://goo.gl/8mFHE5 @jjtibaquira
Email: jko@dragonjar.org | www.dragonjar.org
================================================

nsearch> doc ssh <TAB>
ssh-hostkey.nse ssh2-enum-algos.nse sshv1.nse
nsearch> doc sshv1.nse
local nmap = require "nmap"
local shortport = require "shortport"
local string = require "string"

description = [[
Checks if an SSH server supports the obsolete and less secure SSH Protocol Version 1.
]]
author = "Brandon Enright"
nsearch>

Favorites Feature
  ================================================
_ _ _____ _____ _
| \ | |/ ___|| ___| | |
| \| |\ `--. | |__ __ _ _ __ ___ | |__
| . ` | `--. \| __| / _` || '__| / __|| '_ |
| |\ |/\__/ /| |___ | (_| || | | (__ | | | |
\_| \_/\____/ \____/ \__,_||_| \___||_| |_|
================================================
Version 0.4b http://goo.gl/8mFHE5 @jjtibaquira
Email: jko@dragonjar.org | www.dragonjar.org
================================================

nsearch> addfav name:http-vuln-cve2012-1823.nse ranking:great
[+] http-vuln-cve2012-1823.nse The Script was added successfully
nsearch>
  ================================================
_ _ _____ _____ _
| \ | |/ ___|| ___| | |
| \| |\ `--. | |__ __ _ _ __ ___ | |__
| . ` | `--. \| __| / _` || '__| / __|| '_ |
| |\ |/\__/ /| |___ | (_| || | | (__ | | | |
\_| \_/\____/ \____/ \__,_||_| \___||_| |_|
================================================
Version 0.4b http://goo.gl/8mFHE5 @jjtibaquira
Email: jko@dragonjar.org | www.dragonjar.org
================================================

nsearch> showfav
*** Name Ranking
[+] sslv2.nse normal
[+] http-vuln-cve2012-1823.nse great
nsearch>
  ================================================
_ _ _____ _____ _
| \ | |/ ___|| ___| | |
| \| |\ `--. | |__ __ _ _ __ ___ | |__
| . ` | `--. \| __| / _` || '__| / __|| '_ |
| |\ |/\__/ /| |___ | (_| || | | (__ | | | |
\_| \_/\____/ \____/ \__,_||_| \___||_| |_|
================================================
Version 0.4b http://goo.gl/8mFHE5 @jjtibaquira
Email: jko@dragonjar.org | www.dragonjar.org
================================================

nsearch> showfav
*** Name Ranking
[+] sslv2.nse normal
[+] http-vuln-cve2012-1823.nse great

nsearch> modfav name:sslv2.nse newranking:great
[+] sslv2.nse The Script was updated successfully

nsearch> showfav
*** Name Ranking
[+] sslv2.nse great
[+] http-vuln-cve2012-1823.nse great
nsearch>
  ================================================
_ _ _____ _____ _
| \ | |/ ___|| ___| | |
| \| |\ `--. | |__ __ _ _ __ ___ | |__
| . ` | `--. \| __| / _` || '__| / __|| '_ |
| |\ |/\__/ /| |___ | (_| || | | (__ | | | |
\_| \_/\____/ \____/ \__,_||_| \___||_| |_|
================================================
Version 0.4b http://goo.gl/8mFHE5 @jjtibaquira
Email: jko@dragonjar.org | www.dragonjar.org
================================================

nsearch> showfav
*** Name Ranking
[+] sslv2.nse great
[+] http-vuln-cve2012-1823.nse great

nsearch> delfav name:sslv2.nse
[+] sslv2.nse The Script was removed successfully

nsearch> showfav
*** Name Ranking
[+] http-vuln-cve2012-1823.nse great

nsearch>

Cameradar - An RTSP Surveillance Camera Access Multitool


Cameradar hacks its way into RTSP CCTV cameras

Cameradar allows you to:
  • Detect open RTSP hosts on any accessible target
  • Get their public info (hostname, port, camera model, etc.)
  • Launch automated dictionary attacks to get their stream route (for example /live.sdp)
  • Launch automated dictionary attacks to get the username and password of the cameras
  • Generate thumbnails from them to check if the streams are valid and to have a quick preview of their content
  • Try to create a Gstreamer pipeline to check if they are properly encoded
  • Print a summary of all the informations Cameradar could get

And all of this in a single command-line.
Of course, you can also call for individual tasks if you plug in a Database to Cameradar using the MySQL cache manager for example. You can create your own cache manager by following the simple example of the dumb cache manager.

Quick install
The quick install uses docker to build Cameradar without polluting your machine with dependencies and makes it easy to deploy Cameradar in a few commands. However, it may require networking knowledge, as your docker containers will need access to the cameras subnetwork.

Dependencies
The only dependencies are docker, docker-tools, git and make.

Five steps guide
  1. git clone https://github.com/EtixLabs/cameradar.git
  2. cd cameradar/deployment
  3. Tweak the conf/cameradar.conf.json as you need (see the configuration guide here for more information)
  4. docker-compose build ; docker-compose up
By default, the version of the package in the deployment should be the last stable release.
If you want to scan a different target or different ports, change the values CAMERAS_TARGET and CAMERAS_PORTS in the docker-compose.yml file.
The generated thumbnails will be in the cameradar_thumbnails folder after Cameradar has finished executing.
If you want to deploy your custom version of Cameradar using the same method, you should check the advanced docker deployment tutorial here.

Manual installation
The manual installation is recommended if you want to tweak Cameradar and quickly test them using CMake and running Cameradar in command-line. If you just want to use Cameradar, it is recommended to use the quick install instead.

Dependencies
To install Cameradar you will need these packages
  • cmake (cmake)
  • git (git)
  • gstreamer1.x (libgstreamer1.0-dev)
  • ffmpeg (ffmpeg)
  • boost (libboost-all-dev)
  • libcurl (libcurl4-openssl-dev)

Steps
The simplest way would be to follow these steps :
  1. git clone https://github.com/EtixLabs/cameradar.git
  2. cd cameradar
  3. mkdir build
  4. cd build
  5. cmake ..
  6. make
  7. cd cameradar_standalone
  8. ./cameradar -s the_target_you_want_to_scan

Output
For each camera, Cameradar will output these JSON objects :
{
"address" : "173.16.100.45",
"ids_found" : true,
"password" : "123456",
"path_found" : true,
"port" : 554,
"product" : "Vivotek FD9381-HTV",
"protocol" : "tcp",
"route" : "/live.sdp",
"service_name" : "rtsp",
"state" : "open",
"thumbnail_path" : "/tmp/127.0.0.1/1463735257.jpg",
"username" : "admin"
}

Check camera access
If you have VLC Media Player, you should be able to use the GUI to connect to the RTSP stream using this format : rtsp://username:password@address:port/route
With the above result, the RTSP URL would be rtsp://admin:123456@173.16.100.45:554/live.sdp
If you're still in your console however, you can go even faster by using vlc in commmand-line and just run vlc rtsp://username:password@address:port/route with the camera's info instead of the placeholders.

Command line options
  • "-c" : Set a custom path to the configuration file (-c /path/to/conf) <<<<<<< HEAD
  • "-s" : Set custom subnets (overrides configuration) : You can use this argument in many ways, using a subnet (e.g.: 172.16.100.0/24) or even an IP (e.g.: 172.16.100.10), a range of IPs (e.g.: 172.16.100.10-172.16.100.20) or a mix of all those (e.g.: 172.17.100.0/24,172.16.100.10-172.16.100.20,0.0.0.0). =======
  • "-s" : Set custom target (overrides configuration)
  • "-p" : Set custom ports (overrides configuration)
  • "-m" : Set number of threads (Default value : 1)
  • "-l" : Set log level
    • "-l 1" : Log level DEBUG
      • Will print everything including debugging logs
    • "-l 2" : Log level INFO
      • Prints every normal information
    • "-l 4" : Log level WARNING
      • Only prints warning and errors
    • "-l 5" : Log level ERROR
      • Only prints errors
    • "-l 6" : Log level CRITICAL
      • Doesn't print anything since Cameradar can't have critical failures right now, however you can use this level to debug your own code easily or if you add new critical layers
  • "-d" : Launch the discovery tool
  • "-b" : Launch the dictionary attack tool on all discovered devices
    • Needs either to be launched with the -d option or to use an advanced cache manager (DB, file, ...) with data already present
  • "-t" : Generate thumbnails from detected cameras
    • Needs either to be launched with the -d option or to use an advanced cache manager (DB, file, ...) with data already present
  • "-g" : Check if the stream can be opened with GStreamer
    • Needs either to be launched with the -d option or to use an advanced cache manager (DB, file, ...) with data already present
  • "-v" : Display Cameradar's version
  • "-h" : Display this help
  • "--gst-rtsp-server" : Use this option if the attack does not seem to work (only detects the username but not the path, or the opposite). This option will switch the order of the attacks to prioritize path over credentials, which is the way priority is handled for cameras that use GStreamer's RTSP server.

Operative Framework v1.0b - Fingerprint Framework


This is a framework based on fingerprint action, this tool is used for get information on a website or a enterprise target with multiple modules (Viadeo search, Linkedin search, Reverse email whois, Reverse ip whois, SQL file forensics ...)

Dependency & launching
  • pip install -r requirements.txt
  • python operative.py

Youtube

Campaign
  • You can start a (gathering/fingerprinting) campaign with :campaign command.
  • Update a value of YOURWEBSITE.COM / ENTERPRISE_NAME in config.json file.
  • You can add a module process for a customized campaign.

Core Modules
  • core/modules/cms_gathering
  • core/modules/domain_search
  • core/modules/email_to_domain
  • core/modules/https_gathering
  • core/modules/linkedin_search
  • core/modules/reverse_ipdomain
  • core/modules/search_db
  • core/modules/waf_gathering
  • core/modules/whois_domain
  • core/modules/generate_email
  • core/modules/viadeo_search
  • core/modules/file_common
  • core/modules/get_websiteurl
  • core/modules/getform_data
  • core/modules/subdomain_search
  • core/modules/vhost_IPchecker
  • core/modules/tools_suggester
  • core/modules/metatag_look
  • core/modules/header_retrieval

SQL File forensics
  • import database in core/dbs/
  • read table
  • read columns
  • search information with pattern

Write module
For write module look core/modules/sample_module class


DBShield - Database Firewall Written In Go

Protects your data by inspecting incoming queries from your application server and rejecting abnormal ones.

How it works?
For example, this is how web server normally interacts with database server:


By adding DBShield in front of database server we can protect it against abnormal queries. To detect abnormal queries we first run DBShield in learning mode. Learning mode lets any query pass but it records information about it (pattern, username, time and source) into the internal database.


After collecting enough patterns we can run DBShield in protect mode. Protect mode can distinguish abnormal query pattern, user and source and take action based on configurations.


Demo
For demo, we are using sqlmap(automatic SQL injection and database takeover tool) to exploit the SQL injection vulnerability at user.php
In the first scenario, the sqlmap successfully exploits the SQL injection when web application connected directly to the database(MySQL), In the second scenario, we modify the user.php so DBShield gets between the web application and database which will drop the injection attempt and make sqlmap fail.


Sample Outputs
CLI
$ go run main.go
2016/10/15 16:25:31 [INFO] Config file: /etc/dbshield.yml
2016/10/15 16:25:31 [INFO] Internal DB: /tmp/model/10.0.0.21_postgres.db
2016/10/15 16:25:31 [INFO] Listening: 0.0.0.0:5000
2016/10/15 16:25:31 [INFO] Backend: postgres (10.0.0.21:5432)
2016/10/15 16:25:31 [INFO] Protect: true
2016/10/15 16:25:31 [INFO] Web interface on https://127.0.0.1:8070/
2016/10/15 16:25:33 [INFO] Connected from: 10.0.0.20:35910
2016/10/15 16:25:33 [INFO] Connected to: 10.0.0.21:5432
2016/10/15 16:25:33 [INFO] SSL connection
2016/10/15 16:25:34 [DEBUG] Client handshake done
2016/10/15 16:25:34 [DEBUG] Server handshake done
2016/10/15 16:25:34 [INFO] User: postgres
2016/10/15 16:25:34 [INFO] Database: test
2016/10/15 16:25:34 [INFO] Query: SELECT * FROM stocks where id=-1 or 1=1
2016/10/15 16:25:34 [WARN] Pattern not found: [53 55 51 52 55 52 50 53 55 51 53 49 115 116 111 99 107 115 53 55 51 53 50 105 100 54 49 52 53 53 55 51 55 57 53 55 52 48 52 53 55 51 55 57 54 49 53 55 51 55 57] (SELECT * FROM stocks where id=-1 or 1=1)
2016/10/15 16:25:34 [WARN] Dropping connection

Web Interface


Installation
Get it
$ go get -u github.com/nim4/DBShield
Then you can see help using "-h" argument:
$ $GOPATH/bin/DBShield -h
DBShield 1.0.0-beta3
Usage of DBShield:
-a get list of abnormal queries
-c file
config file (default "/etc/dbshield.yml")
-h show help
-k show parsed config and exit
-l get list of captured patterns
-version
show version
and run it with your configuration, like:
$ $GOPATH/bin/DBShield -c config.yml
see sample configuration file

Supports:
Database Protect SSL
DB2 Yes No
MariaDB Yes Yes
MySQL Yes Yes
Oracle Yes No
Postgres Yes Yes

Truehunter - Tool to detect TrueCrypt containers


The goal of Truehunter is to detect TrueCrypt containers using a fast and memory efficient approach. It was designed as a PoC some time ago as I couldn't find any open source tool with the same functionality.

Installation
Just use with Python 2.7, it does not need any additional libraries.

usage: truehunter.py [-h] [-D HEADERSFILE] [-m MINSIZE] [-M MAXSIZE]
[-R MAXHEADER] [-f] [-o OUTPUTFILE]
LOCATION
Checks for file size, unknown header, and entropy of files to determine if
they are encrypted containers.
positional arguments:
LOCATION Drive or directory to scan.
optional arguments:
-h, --help show this help message and exit.
-D HEADERSFILE, --database HEADERSFILE
Headers database file, default headers.db
-m MINSIZE, --minsize MINSIZE
Minimum file size in Kb, default 1Mb.
-M MAXSIZE, --maxsize MAXSIZE
Maximum file size in Kb, default 100Mb.
-R MAXHEADER, --repeatHeader MAXHEADER
Discard files with unknown headers repeated more than
N times, default 3.
-f, --fast Do not calculate entropy.
-o OUTPUTFILE, --outputfile OUTPUTFILE
Scan results file name, default scan_results.csv


Exploit Database - The official Exploit Database Repository


The Exploit Database is an archive of public exploits and corresponding vulnerable software, developed for use by penetration testers and vulnerability researchers. Its aim is to serve as the most comprehensive collection of exploits gathered through direct submissions, mailing lists, and other public sources, and present them in a freely-available and easy-to-navigate database. The Exploit Database is a repository for exploits and proof-of-concepts rather than advisories, making it a valuable resource for those who need actionable data right away.

This repository is updated daily with the most recently added submissions. Any additional resources can be found in our binary sploits repository.

Included with this repository is the searchsploit utility, which will allow you to search through the exploits using one or more terms. For more information, please see the SearchSploit manual.

root@kali:~# searchsploit -h
Usage: searchsploit [options] term1 [term2] ... [termN]

==========
Examples
==========
searchsploit afd windows local
searchsploit -t oracle windows
searchsploit -p 39446

=========
Options
=========
-c, --case [Term] Perform a case-sensitive search (Default is inSEnsITiVe).
-e, --exact [Term] Perform an EXACT match on exploit title (Default is AND) [Implies "-t"].
-h, --help Show this help screen.
-j, --json [Term] Show result in JSON format.
-m, --mirror [EDB-ID] Mirror (aka copies) an exploit to the current working directory.
-o, --overflow [Term] Exploit titles are allowed to overflow their columns.
-p, --path [EDB-ID] Show the full path to an exploit (and also copies the path to the clipboard if possible).
-t, --title [Term] Search JUST the exploit title (Default is title AND the file's path).
-u, --update Check for and install any exploitdb package updates (deb or git).
-w, --www [Term] Show URLs to Exploit-DB.com rather than the local path.
-x, --examine [EDB-ID] Examine (aka opens) the exploit using $PAGER.
--colour Disable colour highlighting in search results.
--id Display the EDB-ID value rather than local path.
--nmap [file.xml] Checks all results in Nmap's XML output with service version (e.g.: nmap -sV -oX file.xml).
Use "-v" (verbose) to try even more combinations
=======
Notes
=======
* You can use any number of search terms.
* Search terms are not case-sensitive (by default), and ordering is irrelevant.
* Use '-c' if you wish to reduce results by case-sensitive searching.
* And/Or '-e' if you wish to filter results by using an exact match.
* Use '-t' to exclude the file's path to filter the search results.
* Remove false positives (especially when searching using numbers - i.e. versions).
* When updating from git or displaying help, search terms will be ignored.

root@kali:~#
root@kali:~# searchsploit afd windows local
--------------------------------------------------------------------------------- ----------------------------------
Exploit Title | Path
| (/usr/share/exploitdb/platforms)
--------------------------------------------------------------------------------- ----------------------------------
Microsoft Windows XP - 'afd.sys' Local Kernel Denial of Service | ./windows/dos/17133.c
Microsoft Windows 2003/XP - 'afd.sys' Privilege Escalation (K-plugin) (MS08-066) | ./windows/local/6757.txt
Microsoft Windows XP/2003 - 'afd.sys' Privilege Escalation (MS11-080) | ./windows/local/18176.py
Microsoft Windows - 'AfdJoinLeaf' Privilege Escalation (MS11-080) (Metasploit) | ./windows/local/21844.rb
Microsoft Windows - 'afd.sys' Dangling Pointer Privilege Escalation (MS14-040) | ./win_x86/local/39446.py
Microsoft Windows 7 (x64) - 'afd.sys' Privilege Escalation (MS14-040) | ./win_x86-64/local/39525.py
Microsoft Windows (x86) - 'afd.sys' Privilege Escalation (MS11-046) | ./windows/local/40564.c
--------------------------------------------------------------------------------- ----------------------------------
root@kali:~#
root@kali:~# searchsploit -p 39446
Exploit: Microsoft Windows - 'afd.sys' Dangling Pointer Privilege Escalation (MS14-040)
URL: https://www.exploit-db.com/exploits/39446/
Path: /usr/share/exploitdb/platforms/win_x86/local/39446.py

Copied EDB-ID 39446's path to the clipboard.

root@kali:~#
SearchSploit requires either "CoreUtils" or "utilities" (e.g. bash, sed, grep, awk, etc.) for the core features to work. The self updating function will require git, and the Nmap XML option to work, will require xmllint (found in the libxml2-utils package in Debian-based systems).


inquisitor - OSINT Gathering Tool for Companies and Organizations


Inquisitor is a simple for gathering information on companies and organizations through the use of Open Source Intelligence (OSINT) sources.
The key features of Inquisitor include:
  1. The ability to cascade the ownership label of an asset (e.g. if a Registrant Name is known to belong to the target organization, then the hosts and networks registered with that name shall be marked as belonging to the target organization)
  2. The ability transform assets into other potentially related assets through querying open sources such as Google and Shodan
  3. The ability to visualize the relationships of those assets through a zoomable pack layout
It is heavily inspired from how Maltego operates, except in this tool, all transforms are performed automatically.

Installation
To install Inquisitor, simply clone the repository, enter it, and execute the installation script.
git clone https://github.com/penafieljlm/inquisitor.git
cd inquisitor
pip install cython
pip install unqlite
python setup.py install

Usage
Inquisitor has five basic commands which include scan , status , classify , dump , and visualize .
usage: inquisitor.py [-h] {scan,status,classify,dump,visualize} ...

optional arguments:
-h, --help show this help message and exit

command:
{scan,status,classify,dump,visualize}
The action to perform.
scan Search OSINT sources for intelligence based on known
assets belonging to the target.
status Prints out the current status of the specified
intelligence database.
classify Classifies an existing asset as either belonging or
not belonging to the target. Adds a new asset with the
specified classification if none is present.
dump Dumps the contents of the database in JSON format
visualize Create a D3.js visualization based on the contents of
the specified intelligence database.

Scan
In scan mode, the tool runs all available transforms for all the assets you have in your Intelligence Database. Make sure to create API Keys for the various OSINT sources indicated below and provide it to the script lest the transforms using those sources be skipped. Also, make sure you seed your Intelligence Database with some known owned target assets using the classify command first because if the database does not contain any owned assets, there will be nothing to transform.
usage: inquisitor.py scan [-h] [--google-dev-key GOOGLE_DEV_KEY]
[--google-cse-id GOOGLE_CSE_ID]
[--shodan-api-key SHODAN_API_KEY]
DATABASE

positional arguments:
DATABASE The path to the intelligence database to use. If
specified file does not exist, a new one will be
created.

optional arguments:
-h, --help show this help message and exit
--google-dev-key GOOGLE_DEV_KEY
Specifies the developer key to use to query Google
Custom Search. Visit the Google APIs Console
(http://code.google.com/apis/console) to get an API
key. If notspecified, the script will simply skip
asset transforms that involve Google Search.
--google-cse-id GOOGLE_CSE_ID
Specifies the custom search engine to query. Visit the
Google Custom Search Console
(https://cse.google.com/cse/all) to create your own
Google Custom Search Engine. If not specified, the
script will simply skip asset transforms that involve
Google Search.
--shodan-api-key SHODAN_API_KEY
Specifies the API key to use to query Shodan. Log into
your Shodan account (https://www.shodan.io/) and look
at the top right corner of the page in order to view
your API key. If not specified, the script will simply
skip asset transforms that involve Shodan.

Status
In status mode, the tool simply prints out a quick summary of the status of your scan database.
usage: inquisitor.py status [-h] DATABASE

positional arguments:
DATABASE The path to the intelligence database to use. If specified file
does not exist, a new one will be created.

optional arguments:
-h, --help show this help message and exit

Classify
In classify mode, you will be able to manually add assets and re-classify already existing assets in the Intelligence Database. You should use this command to seed your Intelligence Database with known owned target assets.
usage: inquisitor.py classify [-h] [-ar REGISTRANT [REGISTRANT ...]]
[-ur REGISTRANT [REGISTRANT ...]]
[-rr REGISTRANT [REGISTRANT ...]]
[-ab BLOCK [BLOCK ...]] [-ub BLOCK [BLOCK ...]]
[-rb BLOCK [BLOCK ...]] [-ah HOST [HOST ...]]
[-uh HOST [HOST ...]] [-rh HOST [HOST ...]]
[-ae EMAIL [EMAIL ...]] [-ue EMAIL [EMAIL ...]]
[-re EMAIL [EMAIL ...]]
DATABASE

positional arguments:
DATABASE The path to the intelligence database to use. If
specified file does not exist, a new one will be
created.

optional arguments:
-h, --help show this help message and exit
-ar REGISTRANT [REGISTRANT ...], --accept-registrant REGISTRANT [REGISTRANT ...]
Specifies a registrant to classify as accepted.
-ur REGISTRANT [REGISTRANT ...], --unmark-registrant REGISTRANT [REGISTRANT ...]
Specifies a registrant to classify as unmarked.
-rr REGISTRANT [REGISTRANT ...], --reject-registrant REGISTRANT [REGISTRANT ...]
Specifies a registrant to classify as rejected.
-ab BLOCK [BLOCK ...], --accept-block BLOCK [BLOCK ...]
Specifies a block to classify as accepted.
-ub BLOCK [BLOCK ...], --unmark-block BLOCK [BLOCK ...]
Specifies a block to classify as unmarked.
-rb BLOCK [BLOCK ...], --reject-block BLOCK [BLOCK ...]
Specifies a block to classify as rejected.
-ah HOST [HOST ...], --accept-host HOST [HOST ...]
Specifies a host to classify as accepted.
-uh HOST [HOST ...], --unmark-host HOST [HOST ...]
Specifies a host to classify as unmarked.
-rh HOST [HOST ...], --reject-host HOST [HOST ...]
Specifies a host to classify as rejected.
-ae EMAIL [EMAIL ...], --accept-email EMAIL [EMAIL ...]
Specifies a email to classify as accepted.
-ue EMAIL [EMAIL ...], --unmark-email EMAIL [EMAIL ...]
Specifies a email to classify as unmarked.
-re EMAIL [EMAIL ...], --reject-email EMAIL [EMAIL ...]
Specifies a email to classify as rejected.

Dump
In dump mode, you will be able to dump the contents of the Intelligence Database into a human-readable JSON file.
usage: inquisitor.py dump [-h] DATABASE JSON_FILE

positional arguments:
DATABASE The path to the intelligence database to use. If specified file
does not exist, a new one will be created.
JSON_FILE The path to dump the JSON file to. Overwrites existing files.

optional arguments:
-h, --help show this help message and exit

Visualize
In visualize mode, you will be able to acquire a hierarchical visualization of the Intelligence Repository.
usage: inquisitor.py visualize [-h] DATABASE HTML_FILE

positional arguments:
DATABASE The path to the intelligence database to use. If specified file
does not exist, a new one will be created.
HTML_FILE The path to dump the visualization file to. Overwrites existing
files.

optional arguments:
-h, --help show this help message and exit