This is default featured slide 1 title

Go to Blogger edit html and find these sentences.Now replace these sentences with your own descriptions.

This is default featured slide 2 title

Go to Blogger edit html and find these sentences.Now replace these sentences with your own descriptions.

This is default featured slide 3 title

Go to Blogger edit html and find these sentences.Now replace these sentences with your own descriptions.

This is default featured slide 4 title

Go to Blogger edit html and find these sentences.Now replace these sentences with your own descriptions.

This is default featured slide 5 title

Go to Blogger edit html and find these sentences.Now replace these sentences with your own descriptions.

Showing posts with label Exploits. Show all posts

getsploit - Command line utility for searching and downloading exploits


Command line search and download tool for Vulners Database inspired by searchsploit. It allows you to search online for the exploits across all the most popular collections: Exploit-DB, Metasploit, Packetstorm and others. The most powerful feature is immediate exploit source download right in your working path.

Python version
Utility was tested on a python2.6, python2.7, python3.6. If you found any bugs, don't hesitate to open issue

How to use

Search
# git clone https://github.com/vulnersCom/getsploit
# cd getsploit
# ./getsploit.py wordpress 4.7.0
Total found exploits: 8
Web-search URL: https://vulners.com/search?query=bulletinFamily%3Aexploit%20AND%20wordpress%204.7.0
+----------------------+--------------------------------+----------------------------------------------------+
| ID | Exploit Title | URL |
+======================+================================+====================================================+
| PACKETSTORM:141039 | WordPress 4.7.0 / 4.7.1 Insert | https://vulners.com/packetstorm/PACKETSTORM:141039 |
| | PHP Code Injection | |
+----------------------+--------------------------------+----------------------------------------------------+
| EDB-ID:41308 | WordPress 4.7.0/4.7.1 Plugin | https://vulners.com/exploitdb/EDB-ID:41308 |
| | Insert PHP - PHP Code | |
| | Injection | |
+----------------------+--------------------------------+----------------------------------------------------+
| EDB-ID:41223 | WordPress 4.7.0/4.7.1 - | https://vulners.com/exploitdb/EDB-ID:41223 |
| | Unauthenticated Content | |
| | Injection (PoC) | |
+----------------------+--------------------------------+----------------------------------------------------+
| PACKETSTORM:140893 | WordPress 4.7.0 / 4.7.1 REST | https://vulners.com/packetstorm/PACKETSTORM:140893 |
| | API Privilege Escalation | |
+----------------------+--------------------------------+----------------------------------------------------+
| PACKETSTORM:140902 | WordPress 4.7.0 / 4.7.1 | https://vulners.com/packetstorm/PACKETSTORM:140902 |
| | Content Injection / Code | |
| | Execution | |
+----------------------+--------------------------------+----------------------------------------------------+
| PACKETSTORM:140901 | WordPress 4.7.0 / 4.7.1 | https://vulners.com/packetstorm/PACKETSTORM:140901 |
| | Content Injection Proof Of | |
| | Concept | |
+----------------------+--------------------------------+----------------------------------------------------+
| EDB-ID:41224 | WordPress 4.7.0/4.7.1 - | https://vulners.com/exploitdb/EDB-ID:41224 |
| | Unauthenticated Content | |
| | Injection Arbitrary Code | |
| | Execution | |
+----------------------+--------------------------------+----------------------------------------------------+
| SSV-92637 | WordPress REST API content | https://vulners.com/seebug/SSV-92637 |
| | injection | |
+----------------------+--------------------------------+----------------------------------------------------+

Save exploit files
# ./getsploit.py -m wordpress 4.7.0
Total found exploits: 8
Web-search URL: https://vulners.com/search?query=bulletinFamily%3Aexploit%20AND%20wordpress%204.7.0
+----------------------+--------------------------------+----------------------------------------------------+
| ID | Exploit Title | URL |
+======================+================================+====================================================+
| PACKETSTORM:141039 | WordPress 4.7.0 / 4.7.1 Insert | https://vulners.com/packetstorm/PACKETSTORM:141039 |
| | PHP Code Injection | |
+----------------------+--------------------------------+----------------------------------------------------+
| EDB-ID:41308 | WordPress 4.7.0/4.7.1 Plugin | https://vulners.com/exploitdb/EDB-ID:41308 |
| | Insert PHP - PHP Code | |
| | Injection | |
+----------------------+--------------------------------+----------------------------------------------------+
| EDB-ID:41223 | WordPress 4.7.0/4.7.1 - | https://vulners.com/exploitdb/EDB-ID:41223 |
| | Unauthenticated Content | |
| | Injection (PoC) | |
+----------------------+--------------------------------+----------------------------------------------------+
| PACKETSTORM:140893 | WordPress 4.7.0 / 4.7.1 REST | https://vulners.com/packetstorm/PACKETSTORM:140893 |
| | API Privilege Escalation | |
+----------------------+--------------------------------+----------------------------------------------------+
| PACKETSTORM:140902 | WordPress 4.7.0 / 4.7.1 | https://vulners.com/packetstorm/PACKETSTORM:140902 |
| | Content Injection / Code | |
| | Execution | |
+----------------------+--------------------------------+----------------------------------------------------+
| PACKETSTORM:140901 | WordPress 4.7.0 / 4.7.1 | https://vulners.com/packetstorm/PACKETSTORM:140901 |
| | Content Injection Proof Of | |
| | Concept | |
+----------------------+--------------------------------+----------------------------------------------------+
| EDB-ID:41224 | WordPress 4.7.0/4.7.1 - | https://vulners.com/exploitdb/EDB-ID:41224 |
| | Unauthenticated Content | |
| | Injection Arbitrary Code | |
| | Execution | |
+----------------------+--------------------------------+----------------------------------------------------+
| SSV-92637 | WordPress REST API content | https://vulners.com/seebug/SSV-92637 |
| | injection | |
+----------------------+--------------------------------+----------------------------------------------------+

# ls
LICENSE README.md getsploit.py wordpress-470
# cd wordpress-470
# ls
edb-id41223.txt edb-id41224.txt edb-id41308.txt packetstorm140893.txt packetstorm140901.txt packetstorm140902.txt packetstorm141039.txt ssv-92637.txt

Local database
If your Python supports sqlite3 lib(builtin) you can use --update and --local commands to download whole exploit database to your PC. After update you can perform local offline searches.
# ./getsploit.py --update
Downloading getsploit database archive. Please wait, it may take time. Usually around 5-10 minutes.
219642496/219642496 [100.00%]
Unpacking database.
Database download complete. Now you may search exploits using --local key './getsploit.py -l wordpress 4.7'


Viproy - VoIP Penetration Testing and Exploitation Kit


Viproy Voip Pen-Test Kit provides penetration testing modules for VoIP networks. It supports signalling analysis for SIP and Skinny protocols, IP phone services and network infrastructure. Viproy 2.0 is released at Blackhat Arsenal USA 2014 with TCP/TLS support for SIP, vendor extentions support, Cisco CDP spoofer/sniffer, Cisco Skinny protocol analysers, VOSS exploits and network analysis modules. Furthermore, Viproy provides SIP and Skinny development libraries for custom fuzzing and analyse modules.

Current Version and Updates
Current version: 4.1 (Requires ruby 2.1.X and Metasploit Framework Github Repo)
Pre-installed repo: https://github.com/fozavci/metasploit-framework-with-viproy

Homepage of Project
http://viproy.com

Talks

Black Hat USA 2016 - VoIP Wars: The Phreakers Awaken
https://www.slideshare.net/fozavci/voip-wars-the-phreakers-awaken
https://www.youtube.com/watch?v=rl_kp5UZKlw

DEF CON 24 - VoIP Wars: The Live Workshop
To be added later

Black Hat Europe 2015 - VoIP Wars: Destroying Jar Jar Lync
http://www.slideshare.net/fozavci/voip-wars-destroying-jar-jar-lync-unfiltered-version
https://youtu.be/TMdiXYzY8qY

DEF CON 23 - The Art of VoIP Hacking Workshop Slide Deck
http://www.slideshare.net/fozavci/the-art-of-voip-hacking-defcon-23-workshop
https://youtu.be/hwDD7K9oXeI

Black Hat USA 2014 / DEF CON 22 - VoIP Wars: Attack of the Cisco Phones
https://www.youtube.com/watch?v=hqL25srtoEY

DEF CON 21 - VoIP Wars: Return of the SIP
https://www.youtube.com/watch?v=d6cGlTB6qKw

Attacking SIP/VoIP Servers Using Viproy
https://www.youtube.com/watch?v=AbXh_L0-Y5A

Current Testing Modules
  • SIP Register
  • SIP Invite
  • SIP Message
  • SIP Negotiate
  • SIP Options
  • SIP Subscribe
  • SIP Enumerate
  • SIP Brute Force
  • SIP Trust Hacking
  • SIP UDP Amplification DoS
  • SIP Proxy Bounce
  • Skinny Register
  • Skinny Call
  • Skinny Call Forward
  • CUCDM Call Forwarder
  • CUCDM Speed Dial Manipulator
  • MITM Proxy TCP
  • MITM Proxy UDP
  • Cisco CDP Spoofer
  • Boghe VoIP Client INVITE PoC Exploit (New)
  • Boghe VoIP Client MSRP PoC Exploit (New)
  • SIP Message with INVITE Support (New)
  • Sample SIP SDP Fuzzer (New)
  • MSRP Message Tester with SIP INVITE Support (New)
  • Sample MSRP Message Fuzzer with SIP INVITE Support (New)
  • Sample MSRP Message Header Fuzzer with SIP INVITE Support (New)

Documentation

Installation
Copy "lib" and "modules" folders' content to Metasploit root directory.
Mixins.rb File (lib/msf/core/auxiliary/mixins.rb) should contains the following lines
require 'msf/core/auxiliary/sip'
require 'msf/core/auxiliary/skinny'
require 'msf/core/auxiliary/msrp'

Usage of SIP Modules
https://github.com/fozavci/viproy-voipkit/blob/master/SIPUSAGE.md

Usage of Skinny Modules
https://github.com/fozavci/viproy-voipkit/blob/master/SKINNYUSAGE.md

Usage of Auxiliary Viproy Modules
https://github.com/fozavci/viproy-voipkit/blob/master/OTHERSUSAGE.md


PRET - Printer Exploitation Toolkit


PRET is a new tool for printer security testing developed in the scope of a Master's Thesis at Ruhr University Bochum. It connects to a device via network or USB and exploits the features of a given printer language. Currently PostScript, PJL and PCL are supported which are spoken by most laser printers. This allows cool stuff like capturing or manipulating print jobs, accessing the printer's file system and memory or even causing physical damage to the device. All attacks are documented in detail in the Hacking Printers Wiki.

The main idea of PRET is to facilitate the communication between the end-user and the printer. Thus, after entering a UNIX-like command, PRET translates it to PostScript, PJL or PCL, sends it to the printer, evaluates the result and translates it back to a user-friendly format. PRET offers a whole bunch of commands useful for printer attacks and fuzzing.

Installation
PRET only requires a Python2 interpreter. For colored output and SNMP support however, third party party modules need to be installed:
# pip install colorama pysnmp
If running on a Windows console and Unicode characters are not displayed correctly, install the win_unicode_console module:
# pip install win_unicode_console
For experimental, ‘driverless’ printing (see print command), ImageMagick and GhostScript need to be installed:
# apt-get install imagemagick ghostscript

Usage
usage: pret.py [-h] [-s] [-q] [-d] [-i file] [-o file] target {ps,pjl,pcl}

positional arguments:
target printer device or hostname
{ps,pjl,pcl} printing language to abuse

optional arguments:
-h, --help show this help message and exit
-s, --safe verify if language is supported
-q, --quiet suppress warnings and chit-chat
-d, --debug enter debug mode (show traffic)
-i file, --load file load and run commands from file
-o file, --log file log raw data sent to the target

Example usage:
$ ./pret.py laserjet.lan ps
$ ./pret.py /dev/usb/lp0 pjl

Positional Arguments:
PRET requires a valid target and a printer language as arguments. The target can either be the IP address/hostname of a network printer (with port 9100/tcp open) or a device like /dev/usb/lp0 for a local USB printer. To quickly discover all network printers in your subnet using SNMP broadcast, simply run PRET without arguments:
./pret.py
No target given, discovering local printers

address device uptime status
───────────────────────────────────────────────────────────────────────────────
192.168.1.5 hp LaserJet 4250 10:21:49 Ready
192.168.1.11 HP LaserJet M3027 MFP 13 days Paper jam
192.168.1.27 Lexmark X792 153 days Ready
192.168.1.28 Brother MFC-7860DW 16:31:17 Sleep mode
The printer language to be abused must be one of ps, pjl or pcl. Not all languages are supported by every printer, so you may wan't to switch languages if you don't receive any feedback. Each printer language is mapped to a different set of PRET commands and has different capabilities to exploit.

Optional Arguments:
--safe tries to check via IPP, HTTP and SNMP if the selected printing language (PS/PJL/PCL) is actually supported by the device before connecting. On non-networked printers (USB, parallel cable) this test will fail.
--quit suppresses printer model determination, intro message and some other chit-chat.
--debug shows the datastream actually sent to the device and the feedback received. Note that header data and other overhead is filtered. The see the whole traffic, use wireshark. Debugging can also be switched on/off within a PRET session using the debug command
--load filename reads and executes PRET commands from a text file. This is usefull for automation. Command files can also be invoked later within a PRET session via the load command.
--log filename writes a copy of the raw datastream sent to the printer into a file. This can be useful to build a malicious print job file which can be deployed on another printer not directly reachable, for example by printing it from USB drive.

Generic Commands
After connecting to a printer device, you will see the PRET shell and can execute various commands:
$ ./pret.py laserjet.lan pjl
________________
_/_______________/|
/___________/___//|| PRET | Printer Exploitation Toolkit v0.25
|=== |----| || by Jens Mueller <jens.a.mueller@rub.de>
| | ô| ||
|___________| ô| ||
| ||/.´---.|| | || 「 cause your device can be
|-||/_____\||-. | |´ more fun than paper jams 」
|_||=L==H==||_|__|/

(ASCII art by
Jan Foerster)

Connection to laserjet.lan established
Device: hp LaserJet 4250

Welcome to the pret shell. Type help or ? to list commands.
laserjet.lan:/> help

Available commands (type help <topic>):
=======================================
append debug edit free id ls open restart timeout
cat delete env fuzz info mirror printenv selftest touch
cd df exit get load mkdir put set traversal
chvol disable find help lock nvram pwd site unlock
close display format hold loop offline reset status version

laserjet.lan:/> ls ../../
- 834 .profile
d - bin
d - dev
d - etc
d - hp
d - hpmnt
- 1276 init
d - lib
d - pipe
d - tmp
laserjet.lan:/> exit
A list of generic PRET commands is given below:
help      List available commands or get detailed help with 'help cmd'.
debug Enter debug mode. Use 'hex' for hexdump: debug [hex]
load Run commands from file: load cmd.txt
loop Run command for multiple arguments: loop <cmd> <arg1> <arg2> …
open Connect to remote device: open <target>
close Disconnect from device.
timeout Set connection timeout: timeout <seconds>
discover Discover local printer devices via SNMP.
print Print image file or raw text: print <file>|"text"
site Execute custom command on printer: site <command>
exit Exit the interpreter.
Generic file system operations with a PS/PJL/PCL specific implementation are:
┌───────────┬─────┬─────┬─────┬────────────────────────────────────────┐
│ Command │ PS │ PJL │ PCL │ Description │
├───────────┼─────┼─────┼─────┼────────────────────────────────────────┤
│ ls │ ✓ │ ✓ │ ✓ │ List contents of remote directory. │
│ get │ ✓ │ ✓ │ ✓ │ Receive file: get <file> │
│ put │ ✓ │ ✓ │ ✓ │ Send file: put <local file> │
│ append │ ✓ │ ✓ │ │ Append to file: append <file> <str> │
│ delete │ ✓ │ ✓ │ ✓ │ Delete remote file: delete <file> │
│ rename │ ✓ │ │ │ Rename remote file: rename <old> <new> │
│ find │ ✓ │ ✓ │ │ Recursively list directory contents. │
│ mirror │ ✓ │ ✓ │ │ Mirror remote filesystem to local dir. │
│ cat │ ✓ │ ✓ │ ✓ │ Output remote file to stdout. │
│ edit │ ✓ │ ✓ │ ✓ │ Edit remote files with vim. │
│ touch │ ✓ │ ✓ │ │ Update file timestamps: touch <file> │
│ mkdir │ ✓ │ ✓ │ │ Create remote directory: mkdir <path> │
├───────────┼─────┼─────┼─────┼────────────────────────────────────────┤
│ cd │ ✓ │ ✓ │ │ Change remote working directory. │
│ pwd │ ✓ │ ✓ │ │ Show working directory on device. │
│ chvol │ ✓ │ ✓ │ │ Change remote volume: chvol <volume> │
│ traversal │ ✓ │ ✓ │ │ Set path traversal: traversal <path> │
├───────────┼─────┼─────┼─────┼────────────────────────────────────────┤
│ format │ ✓ │ ✓ │ │ Initialize printer's file system. │
│ fuzz │ ✓ │ ✓ │ │ File system fuzzing: fuzz <category> │
├─ ─ ─ ─ ─ ─┴─ ─ ─┴─ ─ ─┴─ ─ ─┴─ ─ ─ ─ ─ ─ ─ ─ ─ ─ ─ ─ ─ ─ ─ ─ ─ ─ ─ ─ ┤
│ path - Explore fs structure with path traversal strategies. │
│ write - First put/append file, then check for its existence. │
│ blind - Read-only tests for existing files like /etc/passwd. │
├───────────┬─────┬─────┬─────┬────────────────────────────────────────┤
│ df │ ✓ │ ✓ │ │ Show volume information. │
│ free │ ✓ │ ✓ │ ✓ │ Show available memory. │
└───────────┴─────┴─────┴─────┴────────────────────────────────────────┘

Commands in PS mode
id         Show device information.
version Show PostScript interpreter version.
devices Show available I/O devices.
uptime Show system uptime (might be random).
date Show printer's system date and time.
pagecount Show printer's page counter.

lock Set startjob and system parameters password.
unlock Unset startjob and system parameters password.
restart Restart PostScript interpreter.
reset Reset PostScript settings to factory defaults.
disable Disable printing functionality.
destroy Cause physical damage to printer's NVRAM.
hang Execute PostScript infinite loop.

overlay Put overlay eps file on all hardcopies: overlay <file.eps>
cross Put printer graffiti on all hardcopies: cross <font> <text>
replace Replace string in documents to be printed: replace <old> <new>
capture Capture further jobs to be printed on this device.
hold Enable job retention.

set Set key to value in topmost dictionary: set <key=value>
known List supported PostScript operators: known <operator>
search Search all dictionaries by key: search <key>
dicts Return a list of dictionaries and their permissions.
resource List or dump PostScript resource: resource <category> [dump]

dump Dump dictionary: dump <dict>
Dictionaries: - systemdict - statusdict - userdict
- globaldict - serverdict - errordict
- internaldict - currentsystemparams
- currentuserparams - currentpagedevice

config Change printer settings: config <setting>
duplex - Set duplex printing.
copies # - Set number of copies.
economode - Set economic mode.
negative - Set negative print.
mirror - Set mirror inversion.
Not all commands are supported by every printer. Especially Brother and Kyocera devices use their own PostScript clones – Br-Script and KPDL – instead of licensing original ‘Adobe PostScript’. Such flavours of the PostScript language may not be 100% compatible, especially concerning security sensitive features like capturing print jobs. Access to the file system is supported by most printers, however usually limited to a certain, sandboxed directory.

Commands in PJL mode
id         Show device information.
status Enable status messages.
version Show firmware version or serial number (from 'info config').
pagecount Manipulate printer's page counter: pagecount <number>
printenv Show printer environment variable: printenv <VAR>
env Show environment variables (alias for 'info variables').
set Set printer environment variable: set <VAR=VALUE>

display Set printer's display message: display <message>
offline Take printer offline and display message: offline <message>
restart Restart printer.
reset Reset to factory defaults.
selftest Perform various printer self-tests.
disable Disable printing functionality.
destroy Cause physical damage to printer's NVRAM.
flood Flood user input, may reveal buffer overflows.

lock Lock control panel settings and disk write access.
unlock Unlock control panel settings and disk write access.
hold Enable job retention.

nvram NVRAM operations: nvram <operation>
nvram dump [all] - Dump (all) NVRAM to local file.
nvram read addr - Read single byte from address.
nvram write addr value - Write single byte to address.

info Show information: info <category>
info config - Provides configuration information.
info filesys - Returns PJL file system information.
info id - Provides the printer model number.
info memory - Identifies amount of memory available.
info pagecount - Returns the number of pages printed.
info status - Provides the current printer status.
info ustatus - Lists the unsolicited status variables.
info variables - Lists printer's environment variables.
Some commands are supported exclusively by HP printers, because other vendors have only implemented a subset of the PJL standard. This is especially true for PML based commands like restartor reset. Enabling long-term job retention via the hold command seems to be possible for some Epson devices only. NVRAM access via the nvram command is a proprietary feature of Brother printers. Limited access to the file system is supported by various HP, OKI, Konica, Xerox, Epson and Ricoh devices.

Commands in PCL mode
selftest   Perform printer self-test.
info Show information: info <category>
info fonts - Show installed fonts.
info macros - Show installed macros.
info patterns - Show user-defined patterns.
info symbols - Show symbol sets.
info extended - Show extended fonts.
PCL is a very limited page description language without access to the file system. The get/put/ls commands therefore use a virtual file system based on PCL macros, implemented mostly for the hack value. This proof-of-concept shows that even a device which supports only minimalist languages like PCL can be used to store arbitrary files like copyright infringing material. Although such a file sharing service is not a security vulnerability per se, it might apply as ‘misuse of service’ depending on the corporate policy

File Listing
  • pret.py - Executable main program
  • capabilities.py - Routines to check for printer langauge support
  • discovery.py - Routines to list printers using SNMP broadcast
  • printer.py - Generic code to describe a printing device
  • postscript.py - PS spezific code (inherits from class printer)
  • pjl.py - PJL spezific code (inherits from class printer)
  • pcl.py - PCL spezific code (inherits from class printer)
  • helper.py - Help functions for output, logging, sockets, etc.
  • codebook.py - Static table of PJL status/error codes
  • fuzzer.py - Constants for file system fuzzing
  • mibs/* - Printer specific SNMP MIBs
  • db/* - database of supported models
  • lpd/* - Scripts for LPD fuzzing

Getting Started
Given the features and various proprietary extensions in printing languages like PostScript and PJL, conducting a pentest on printers is not a trivial job. PRET can help to assist and verify known issues in the language. Once you have played around with the tool, you may wan't to perform a systematic printer security analysis. A good starting point is the Printer Security Testing Cheat Sheet.


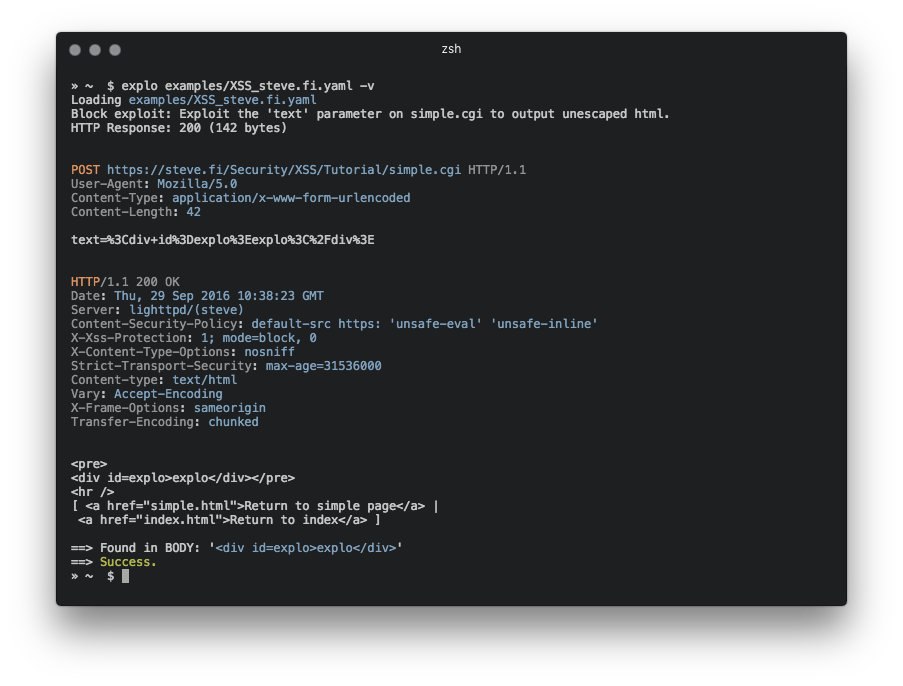
explo - Human And Machine Readable Web Vulnerability Testing Format

explo is a simple tool to describe web security issues in a human and machine readable format. By defining a request/condition workflow, explo is able to exploit security issues without the need of writing a script. This allows to share complex vulnerabilities in a simple readable and executable format.

Example for extracting a csrf token and using this in a form:
name: get_csrf
description: extract csrf token
module: http
parameter:
url: http://example.com/contact
method: GET
header:
user-agent: Mozilla/5.0
extract:
csrf: [CSS, "#csrf"]
---
name: exploit
description: exploits sql injection vulnerability with valid csrf token
module: http
parameter:
url: http://example.com/contact
method: POST
body:
csrf: "{{get_csrf.extracted.csrf}}"
username: "' SQL INJECTION"
find: You have an error in your SQL syntax


In this example definition file the security issue is tested by executing two steps which are run from top to bottom. The last step returns a success or failure, depending on the string 'You have an error in your SQL syntax' to be found.

Installation

Install via PyPI
pip install explo

Install via source
git clone https://github.com/dtag-dev-sec/explo
cd explo
python setup.py install

Usage
explo [--verbose|-v] testcase.yaml
explo [--verbose|-v] examples/*.yaml
There are a few example testcases in the examples/ folder.
$ explo examples/SQLI_simple_testphp.vulnweb.com.yaml
You can also include explo as a python lib:
from explo.core import from_content as explo_from_content
from explo.core import ExploException, ProxyException

def save_log(msg):
print(msg)

try:
result = explo_from_content(explo_yaml_file, save_log)
except ExploException as err:
print(err)

Modules
Modules can be added to improve functionality and classes of security issues.

http (basic)
The http modules allows to make a http request, extract content and search/verify content.
The following data is made available for following steps:
  • the http response body: stepname.response.content
  • the http response cookies: stepname.response.cookies
  • extracted content: response.extracted.variable_name
If a find_regex parameter is set, a regular expression match is executed on the response body. If this fails, this module returns a failure and thus stopping the executing of the current workflow (and all steps).
When extracting by regular expressions, use the match group extract to mark the value to extract (view below for an example).
For referencing cookies, reference the name of the previous step where cookies should be taken from (cookies: the_other_step.response.cookies).
Parameter examples:
parameter:
url: http://example.com
method: GET
allow_redirects: True
headers:
User-Agent: explo
Content-Type: abc
cookies: stepname.response.cookies
body:
key: value
find: search for string
find_regex: search for (reg|ular)expression
find_in_headers: searchstring in headers
extract:
variable1: [CSS, '#csrf']
variable2: [REGEX, '<input(.*?)value="(?P<extract>.*?)"']

http_header
The http header module allows to check if a response misses a specified set of headers (and values). All other parameters are identical to the http module.
The following data is made available for other modules:
  • the http response body: stepname.response.content
  • the http response cookies: stepname.response.cookies
Parameter examples:
parameter:
url: http://example.com
method: GET
allow_redirects: True
headers:
User-Agent: explo
Content-Type: abc
body:
key: value
headers_required:
X-XSS-Protection: 1
Server: . # all values are valid

sqli_blind
The sqli_blind module is able to identify time based blind sql injections.
The following data is made available for other modules:
  • the http response body: stepname.response.content
  • the http response cookies: stepname.response.cookies
Parameter examples:
parameter:
url: http://example.com/vulnerable.php?id=1' waitfor delay '00:00:5'--
method: GET
delay_seconds: 5
If the threshold of 5 seconds (delay_seconds) is exceeded, the check returns true (and thus resulting in a success).


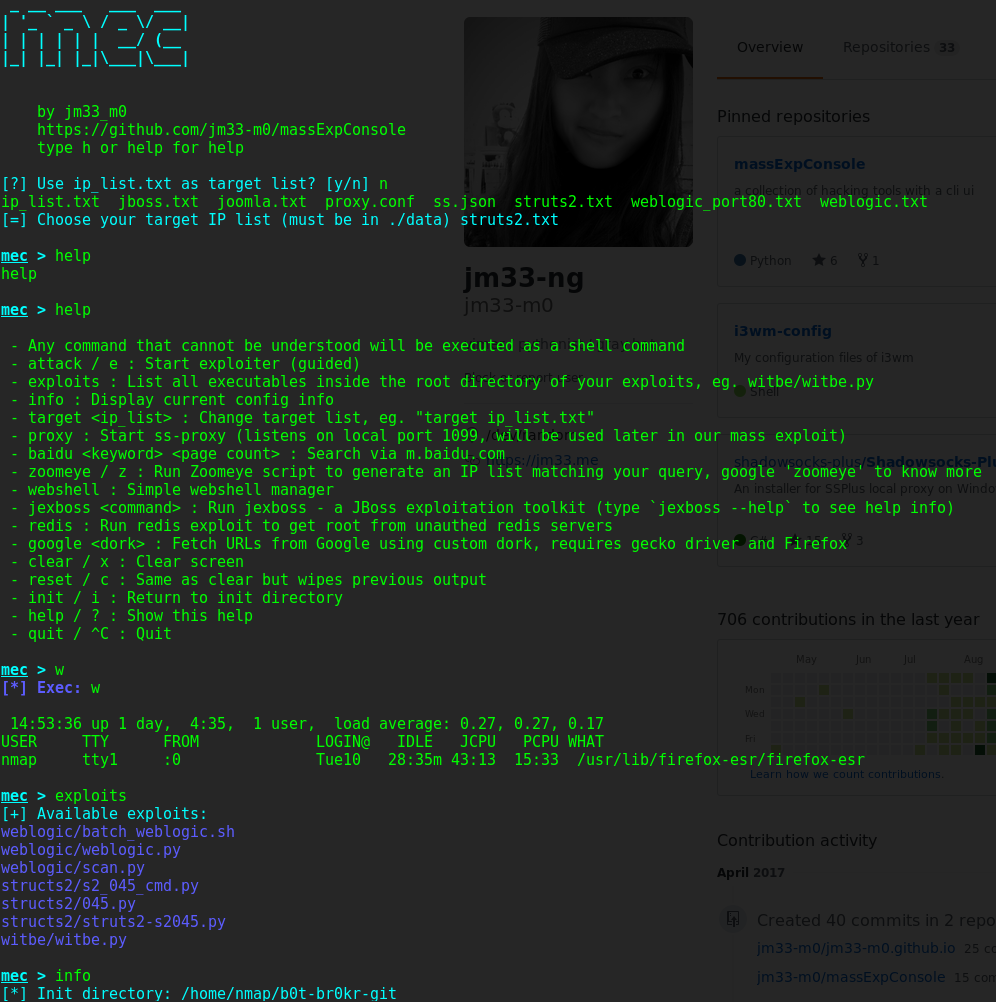
massExpConsole - Collection of Tools and Exploits with a CLI UI


Collection of Tools and Exploits with a CLI UI

What does it do?
  • an easy-to-use user interface (cli)
  • execute any adapted exploit with process-level concurrency
  • crawler for baidu and zoomeye
  • a simple webshell manager
  • some built-in exploits (automated)
  • more to come...

Requirements
  • GNU/Linux or MacOS, WSL (Windows Subsystem Linux), fully tested under Kali Linux (Rolling, 2017), Ubuntu Linux (16.04 LTS) and Fedora 25 (it will work on other distros too as long as you have dealt with all deps)
  • proxychains4 (in $PATH), used by exploiter, requires a working socks5 proxy (you can modify its config in mec.py)
  • Java is required when using Java deserialization exploits, you might want to install openjdk-8-jre if you haven't installed it yet
  • python packages (not complete, as some third-party scripts might need other deps as well):
    • requests
    • bs4
    • beautifulsoup4
    • html5lib
    • docopt
    • pip3 install on the go
  • note that you have to install all the deps of your exploits or tools as well

Usage
  • just run mec.py, if it complains about missing modules, install them
  • if you want to add your own exploit script (or binary file, whatever):
    • cd exploits, mkdir <yourExploitDir>
    • your exploit should take the last argument passed to it as its target, dig into mec.py to know more
    • chmod 755 <exploitBin> to make sure it can be executed by current user
    • use attack command then m to select your custom exploit
  • type help in the console to see all available features

QuickSand.io - Tool For Scanning Streams Within Office Documents Plus Xor DB Attack


QuickSand is a compact C framework to analyze suspected malware documents to 1) identify exploits in streams of different encodings, 2) locate and extract embedded executables. By having the ability to locate embedded obfuscated executables, QuickSand could detect documents that contain zero-day or unknown obfuscated exploits.

File Formats For Exploit and Active Content Detection
  • doc, docx, docm, rtf, etc
  • ppt, pptx, pps, ppsx, etc
  • xls, xlsx, etc
  • mime mso
  • eml email

File Formats For Executable Detection
  • All of the above, plus PDF.
  • Any document format such as HWP.

Lite Version - Mplv2 License
  • Key dictionary up to 256 byte XOR
  • Bitwise ROL, ROR, NOT
  • Addition or substraction math cipher
  • Executable extraction: Windows, Mac, Linux, VBA
  • Exploit search
  • RTF pre processing
  • Hex stream extract
  • Base 64 Stream extract
  • Embedded Zip extract
  • ExOleObjStgCompressedAtom extract
  • zLib Decode
  • Mime Mso xml Decoding
  • OpenXML decode (unzip)
  • Yara signatures included: Executables, active content, exploits CVE 2014 and earlier
Example results and more info blog post

Full Version - Commercial License
  • Key cryptanalysis 1-1024 bytes factors of 2; or a specified odd size 1-1024 bytes
  • 1 Byte zerospace not replaced brute force XOR search
  • XOR Look Ahead cipher
  • More Yara signatures included: All lite plus most recent exploits 2014-2016 for CVE identification
  • Try the full version online at QuickSand.io

Dependencies (not included)
  • Yara 3.4+
  • zlib 1.2.1+
  • libzip 1.1.1+

Distributed components under their own licensing
  • MD5 by RSA Data Security, Inc.
  • SHA1 by Paul E. Jones
  • SHA2 by Aaron D. Gifford
  • jWrite by TonyWilk for json output
  • tinydir by Cong Xu, Baudouin Feildel for directory processing

Quick Start
  • ./build.sh
  • ./quicksand.out -h
  • ./quicksand.out malware.doc

Documentation


Web Exploit Detector - Tool To Detect Possible Infections, Malicious Code And Suspicious Files In Web Hosting Environments


The Web Exploit Detector is a Node.js application (and NPM module) used to detect possible infections, malicious code and suspicious files in web hosting environments. This application is intended to be run on web servers hosting one or more websites. Running the application will generate a list of files that are potentially infected together with a description of the infection and references to online resources relating to it.

As of version 1.1.0 the application also includes utilities to generate and compare snapshots of a directory structure, allowing users to see if any files have been modified, added or removed.
The application is hosted here on GitHub so that others can benefit from it, as well as allowing others to contribute their own detection rules.

Installation

Regular users
The simplest way to install Web Exploit Detector is as a global NPM module: -
npm install -g web_exploit_detector
If you are running Linux or another Unix-based OS you might need to run this command as root (e.g. sudo npm install -g web_exploit_detector).

Updating
The module should be updated regularly to make sure that all of the latest detection rules are present. Running the above command will always download the latest stable (tested) version. To update a version that has already been installed, simply run the following: -
npm update -g web_exploit_detector
Again, you may have to use the sudo command as above.

Technical users
You can also clone the Git repository and run the script directly like so: -
  1. git clone https://github.com/polaris64/web_exploit_detector
  2. cd web_exploit_detector
  3. npm install

Running

From NPM module
If you have installed Web Exploit Detector as an NPM module (see above) then running the scanner is as simple as running the following command, passing in the path to your webroot (location of your website files): -
wed-scanner --webroot=/var/www/html
Other command-line options are available, simply run wed-scanner --help to see a help message describing them.
Running the script in this way will produce human-readable output to the console. This is very useful when running the script with cron for example as the output can be sent as an e-mail whenever the script runs.
The script also supports the writing of results to a more computer-friendly JSON format for later processing. To enable this output, see the --output command line argument.

From cloned Git repository
Simply call the script via node and pass the path to your webroot as follows: -
node index.js --webroot=/var/www/html

Recursive directory snapshots
The Web Exploit Detector also comes with two utilities to help to identify files that might have changed unexpectedly. A successful attack on a site usually involves deleting files, adding new files or changing existing files in some way.

Snapshots
A snapshot (as used by these utilities) is a JSON file which lists all files as well as a description of their contents at the point in which the snapshot was created. If a snapshot was generated on Monday, for example, and then the site was attacked on Tuesday, then running a comparison between this snapshot and the current site files afterwards will show that one or more files were added, deleted or changed. The goal of these utilities therefore is to allow these snapshots to be created and for the comparisons to be performed when required.
The snapshot stores each file path together with a SHA-256 hash of the file contents. A hash, or digest, is a small summary of a message, which in this case is the file's contents. If the file contents change, even in a very small way, the hash will become completely different. This provides a good way of detecting any changes to file contents.

Usage
The following two utilities are also installed as part of Web Exploit Detector: -
  • wed-generate-snapshot: this utility allows a snapshot to be generated for all files (recursively) in a directory specified by "--webroot". The snapshot will be saved to a file specified in the "--output" option.
  • wed-compare-snapshot: once a snapshot has been generated it can be compared against the current contents of the same directory. The snapshot to check is specified using the "--snapshot" option. The base directory to check against is stored within the snapshot, but if the base directory has changed since the snapshot was generated then the --webroot option can be used.

Workflow
Snapshots can be generated as frequently as required, but as a general rule of thumb they should be generated whenever a site is in a clean (non-infected) state and whenever a legitimate change has been made. For CMS-based sites like WordPress, snapshots should be created regularly as new uploads will cause the new state to change from the stored snapshot. For sites whose files should never change, a single snapshot can be generated and then used indefinitely ensure nothing actually does change.

Usage as a module
The src/web-exploit-detector.js script is an ES6 module that exports the set of rules as rules as well as a number of functions: -
  • executeTests(settings): runs the exploit checker based on the passed settings object. For usage, please consult the index.js script.
  • formatResult(result): takes a single test result from the array returned from executeTests() and generates a string of results ready for output for that test.
  • getFileList(path): returns an array of files from the base path using readDirRecursive().
  • processRulesOnFile(file, rules): processes all rules from the array rules on a single file (string path).
  • readDirRecursive(path): recursive function which returns a Promise which will be resolved with an array of all files in path and sub-directories.
The src/cli.js script is a simple command-line interface (CLI) to this module as used by the wed-scanner script, so reading this script shows one way in which this module can be used.
The project uses Babel to compile the ES6 modules in "src" to plain JavaScript modules in "lib". If you are running an older version of Node.js then modules can be require()'d from the "lib" directory instead.

Building
The package contains Babel as a dev-dependency and the "build" and "watch:build" scripts. When running the "build" script (npm run build), the ES6 modules in "./src" will be compiled and saved to "./lib", where they are included by the CLI scripts.
The "./lib" directory is included in the repository so that any user can clone the repository and run the application directly without having to install dev-dependencies and build the application.

Excluding results per rule
Sometimes rules, especially those tagged with suspicion, will identify a clean file as a potential exploit. Because of this, a system to allow files to be excluded from being checked for a rule is also included.
The wed-results-to-exceptions script takes an output file from the main detector script (see the --output option) and gives you the choice to exclude each file in turn for each specific rule. All excluded files are stored in a file called wed-exceptions.json (in the user's home directory) which is read by the main script before running the scan. If a file is listed in this file then all attached rules (by ID) will be skipped when checking this file.
For usage instructions, simply run wed-results-to-exceptions. You will need to have a valid output JSON from a previous run of the main detector first using the --output option.
For users working directly with the Git repository, run node results_to_exceptions.js in the project root directory.

Rule engine
The application operates using a collection of "rules" which are loaded when the application is run. Each rule consists of an ID, name, description, list of URLs, tags, deprecation flag and most importantly a set of tests.
Each individual test must be one of the following: -
  • A regular expression: the simplest type of test, any value matching the regex will pass the test.
  • A Boolean callback: the callback function must return a Boolean value indicating if the value passes the test. The callback is free to perform any synchronous operations.
  • A Promise callback: the callback function must return a Promise which is resolved with a Boolean value indicating if the value passes the test. This type of callback is free to perform any asynchronous operations.
The following test types are supported: -
  • "path": used to check the file path. This test must exist and should evaluate to true if the file path is considered to match the rule.
  • "content": used to check the contents of a file. This test is optional and file contents will only be read and sent to rules that implement this test type. When this test is a function, the content (string) will be passed as the first argument and the file path will be passed as the second argument, allowing the test to perform additional file operations.

Expanding on the rules
As web-based exploits are constantly evolving and new exploits are being created, the set of rules need to be updated too. As I host a number of websites I am constantly observing new kinds of exploits, so I will be adding to the set of rules whenever I can. I run this tool on my own servers, so of course I want it to be as functional as possible!
This brings me onto the reasons why I have made this application available as an open-source project: firstly so that you and others can benefit from it and secondly so that we can all collaborate to contribute detection rules so that the application is always up to date.

Contributing rules
If you have discovered an exploit that is not detected by this tool then please either contact me to let me know or even better, write your own rule and add it to the third-party rule-set (rules/third-party/index.js), then send me a pull request.
Don't worry if you don't know how to write your own rules; the most important thing is that the rule gets added, so feel free to send me as much information as you can about the exploit and I will try to create my own rule for it.
Rules are categorised, but the simplest way to add your own rule is to add it to the third-party rule-set mentioned above. Rule IDs are written in the following format: "author:type:sub-type(s):rule-id". For example, one of my own rules is "P64:php:cms:wordpress:wso_webshell". "P64" is me (the author), "php:cms:wordpress" is the grouping (a PHP-specific rule, for the Content Management System (CMS) called WordPress) and "wso_webshell" is the specific rule ID. When writing your own rules, try to follow this format, and replace "P64" with your own GitHub username or other unique ID.

Unit tests and linting
The project contains a set of Jasmine tests which can be run using npm test. It also contains an ESLint configuration, and ESLint can be run using npm run lint.
When developing, tests can also be run whenever a source file changes by running npm run watch:test. To run tests and ESLint, the npm run watch:all script can be used.
Please note that unless you already have Jasmine and/or nodemon installed, you should run npm install in non-production mode to ensure that the dev-dependencies are installed.


DBShield - Database Firewall Written In Go

Protects your data by inspecting incoming queries from your application server and rejecting abnormal ones.

How it works?
For example, this is how web server normally interacts with database server:


By adding DBShield in front of database server we can protect it against abnormal queries. To detect abnormal queries we first run DBShield in learning mode. Learning mode lets any query pass but it records information about it (pattern, username, time and source) into the internal database.


After collecting enough patterns we can run DBShield in protect mode. Protect mode can distinguish abnormal query pattern, user and source and take action based on configurations.


Demo
For demo, we are using sqlmap(automatic SQL injection and database takeover tool) to exploit the SQL injection vulnerability at user.php
In the first scenario, the sqlmap successfully exploits the SQL injection when web application connected directly to the database(MySQL), In the second scenario, we modify the user.php so DBShield gets between the web application and database which will drop the injection attempt and make sqlmap fail.


Sample Outputs
CLI
$ go run main.go
2016/10/15 16:25:31 [INFO] Config file: /etc/dbshield.yml
2016/10/15 16:25:31 [INFO] Internal DB: /tmp/model/10.0.0.21_postgres.db
2016/10/15 16:25:31 [INFO] Listening: 0.0.0.0:5000
2016/10/15 16:25:31 [INFO] Backend: postgres (10.0.0.21:5432)
2016/10/15 16:25:31 [INFO] Protect: true
2016/10/15 16:25:31 [INFO] Web interface on https://127.0.0.1:8070/
2016/10/15 16:25:33 [INFO] Connected from: 10.0.0.20:35910
2016/10/15 16:25:33 [INFO] Connected to: 10.0.0.21:5432
2016/10/15 16:25:33 [INFO] SSL connection
2016/10/15 16:25:34 [DEBUG] Client handshake done
2016/10/15 16:25:34 [DEBUG] Server handshake done
2016/10/15 16:25:34 [INFO] User: postgres
2016/10/15 16:25:34 [INFO] Database: test
2016/10/15 16:25:34 [INFO] Query: SELECT * FROM stocks where id=-1 or 1=1
2016/10/15 16:25:34 [WARN] Pattern not found: [53 55 51 52 55 52 50 53 55 51 53 49 115 116 111 99 107 115 53 55 51 53 50 105 100 54 49 52 53 53 55 51 55 57 53 55 52 48 52 53 55 51 55 57 54 49 53 55 51 55 57] (SELECT * FROM stocks where id=-1 or 1=1)
2016/10/15 16:25:34 [WARN] Dropping connection

Web Interface


Installation
Get it
$ go get -u github.com/nim4/DBShield
Then you can see help using "-h" argument:
$ $GOPATH/bin/DBShield -h
DBShield 1.0.0-beta3
Usage of DBShield:
-a get list of abnormal queries
-c file
config file (default "/etc/dbshield.yml")
-h show help
-k show parsed config and exit
-l get list of captured patterns
-version
show version
and run it with your configuration, like:
$ $GOPATH/bin/DBShield -c config.yml
see sample configuration file

Supports:
Database Protect SSL
DB2 Yes No
MariaDB Yes Yes
MySQL Yes Yes
Oracle Yes No
Postgres Yes Yes

EaST - Exploits and Security Tools Framework


Pentest framework environment is the basis of IT security specialist’s toolkit. This software is essential as for learning and improving of knowledge in IT systems attacks and for inspections and proactive protection. The need of native comprehensive open source pen test framework with high level of trust existed for a long time. That is why EAST framework was created for native and native friendly IT security markets. EAST is a framework that has all necessary resources for wide range exploits to run, starting from Web to buffer overruns. EAST differs from similar toolkits by its ease of use. Even a beginner can handle it and start to advance in IT security.

Main features:
  • Framework security. Software used for IT security must have a high level of user trust. Easy to check open source Python code realized in EAST. It is used for all parts of the framework and modules. Relative little amount of code eases its verification by any user. No OS changes applied during software installation.
  • Framework maximum simplicity. Archive downloads, main python script start.py launches, which allows exploits start-stop and message traffic. All handled local or remotely via browser.
  • Exploits simplicity of creation and editing. Possibility to edit and add modules and exploits on the fly without restart. Module code body is easy and minimal in terms of amount.
  • Cross-platform + minimal requirements and dependencies. Tests for Windows and Linux. Should function everywhere where Python is installed. Framework contains all dependencies and does not download additional libraries.
  • Full capacity of vanilla pen test framework. In spite of simplicity and “unoverload” the framework has all necessary resources for wide range exploits to run, starting from Web to buffer overruns.
  • Wide enhancement possibilities. Third party developers can create their own open source solutions or participate in EAST development by use of Server-client architecture, message traffic API and support libraries.

Requirements

Usage
git clone https://github.com/C0reL0ader/EaST && cd EaST
python start.py [-p PORT] [--all-interfaces]

Additional resources