This is default featured slide 1 title

Go to Blogger edit html and find these sentences.Now replace these sentences with your own descriptions.

This is default featured slide 2 title

Go to Blogger edit html and find these sentences.Now replace these sentences with your own descriptions.

This is default featured slide 3 title

Go to Blogger edit html and find these sentences.Now replace these sentences with your own descriptions.

This is default featured slide 4 title

Go to Blogger edit html and find these sentences.Now replace these sentences with your own descriptions.

This is default featured slide 5 title

Go to Blogger edit html and find these sentences.Now replace these sentences with your own descriptions.

Showing posts with label Testing. Show all posts

Viproy - VoIP Penetration Testing and Exploitation Kit


Viproy Voip Pen-Test Kit provides penetration testing modules for VoIP networks. It supports signalling analysis for SIP and Skinny protocols, IP phone services and network infrastructure. Viproy 2.0 is released at Blackhat Arsenal USA 2014 with TCP/TLS support for SIP, vendor extentions support, Cisco CDP spoofer/sniffer, Cisco Skinny protocol analysers, VOSS exploits and network analysis modules. Furthermore, Viproy provides SIP and Skinny development libraries for custom fuzzing and analyse modules.

Current Version and Updates
Current version: 4.1 (Requires ruby 2.1.X and Metasploit Framework Github Repo)
Pre-installed repo: https://github.com/fozavci/metasploit-framework-with-viproy

Homepage of Project
http://viproy.com

Talks

Black Hat USA 2016 - VoIP Wars: The Phreakers Awaken
https://www.slideshare.net/fozavci/voip-wars-the-phreakers-awaken
https://www.youtube.com/watch?v=rl_kp5UZKlw

DEF CON 24 - VoIP Wars: The Live Workshop
To be added later

Black Hat Europe 2015 - VoIP Wars: Destroying Jar Jar Lync
http://www.slideshare.net/fozavci/voip-wars-destroying-jar-jar-lync-unfiltered-version
https://youtu.be/TMdiXYzY8qY

DEF CON 23 - The Art of VoIP Hacking Workshop Slide Deck
http://www.slideshare.net/fozavci/the-art-of-voip-hacking-defcon-23-workshop
https://youtu.be/hwDD7K9oXeI

Black Hat USA 2014 / DEF CON 22 - VoIP Wars: Attack of the Cisco Phones
https://www.youtube.com/watch?v=hqL25srtoEY

DEF CON 21 - VoIP Wars: Return of the SIP
https://www.youtube.com/watch?v=d6cGlTB6qKw

Attacking SIP/VoIP Servers Using Viproy
https://www.youtube.com/watch?v=AbXh_L0-Y5A

Current Testing Modules
  • SIP Register
  • SIP Invite
  • SIP Message
  • SIP Negotiate
  • SIP Options
  • SIP Subscribe
  • SIP Enumerate
  • SIP Brute Force
  • SIP Trust Hacking
  • SIP UDP Amplification DoS
  • SIP Proxy Bounce
  • Skinny Register
  • Skinny Call
  • Skinny Call Forward
  • CUCDM Call Forwarder
  • CUCDM Speed Dial Manipulator
  • MITM Proxy TCP
  • MITM Proxy UDP
  • Cisco CDP Spoofer
  • Boghe VoIP Client INVITE PoC Exploit (New)
  • Boghe VoIP Client MSRP PoC Exploit (New)
  • SIP Message with INVITE Support (New)
  • Sample SIP SDP Fuzzer (New)
  • MSRP Message Tester with SIP INVITE Support (New)
  • Sample MSRP Message Fuzzer with SIP INVITE Support (New)
  • Sample MSRP Message Header Fuzzer with SIP INVITE Support (New)

Documentation

Installation
Copy "lib" and "modules" folders' content to Metasploit root directory.
Mixins.rb File (lib/msf/core/auxiliary/mixins.rb) should contains the following lines
require 'msf/core/auxiliary/sip'
require 'msf/core/auxiliary/skinny'
require 'msf/core/auxiliary/msrp'

Usage of SIP Modules
https://github.com/fozavci/viproy-voipkit/blob/master/SIPUSAGE.md

Usage of Skinny Modules
https://github.com/fozavci/viproy-voipkit/blob/master/SKINNYUSAGE.md

Usage of Auxiliary Viproy Modules
https://github.com/fozavci/viproy-voipkit/blob/master/OTHERSUSAGE.md


DATA - Credential Phish Analysis and Automation


Credential Phish Analysis and Automation

BUCKLEGRIPPER (py)
  • Given a suspected phishing url or file of line separated urls, visit, screenshot, and scrape for interesting files.
  • Requirements can be installed by running or reviewing install_bucklegripper_deps.sh
usage: bucklegripper.py [-h] [-u URL] [-s SOURCE] [-r READFILE] [-a USERAGENT]

Visit a suspected phishing page, screenshot it and pillage it for phishing
archives

optional arguments:
-h, --help show this help message and exit
-u URL, --url URL Url to visit
-s SOURCE, --source SOURCE
Apply a source to where this url came from
-r READFILE, --readfile READFILE
Read in a file of URLs one per line
-a USERAGENT, --useragent USERAGENT
Custom User-Agent
Example of reading in a single url
$ python bucklegripper.py -s openphish -u http://www.govwebsearch.com/apc/opc/pdp/safe/optusnet.com.au/Login.html 

.: BUCKLEGRIPPER v0.1 https://github.com/hadojae/DATA/ :.

[+] Processing http://www.govwebsearch.com/apc/opc/pdp/safe/optusnet.com.au/Login.html
[+] Screencapped http://www.govwebsearch.com/apc/opc/pdp/safe/optusnet.com.au/Login.html as 20170503-032950-openphish-www.govwebsearch.com.png
[+] Found Zip file at http://www.govwebsearch.com/apc/opc/pdp/safe/optusnet.com.au.zip
[+] Saved http://www.govwebsearch.com/apc/opc/pdp/safe/optusnet.com.au.zip as 20170503-032950-openphish-www.govwebsearch.com-optusnet.com.au.zip
[+] Found Opendir at http://www.govwebsearch.com/apc/opc/pdp/safe/optusnet.com.au/
[+] Found php file: http://www.govwebsearch.com/apc/opc/pdp/safe/optusnet.com.au/post.php
[+] Found Opendir at http://www.govwebsearch.com/apc/opc/pdp/safe/
[+] Saved http://www.govwebsearch.com/apc/opc/pdp/safe/optusnet.com.au.zip as 20170503-032951-openphish-www.govwebsearch.com-optusnet.com.au.zip
[+] Found Opendir at http://www.govwebsearch.com/apc/opc/pdp/
[+] Found Opendir at http://www.govwebsearch.com/apc/opc/
[+] Found Opendir at http://www.govwebsearch.com/apc/
Example of reading in a file of line separated urls
$ python bucklegripper.py -s openphish -r ../../test_urls.txt

.: BUCKLEGRIPPER v0.1 https://github.com/hadojae/DATA/ :.

[+] Beginning processing of ../../test_urls.txt

[+] Processing http://onjasela.net/DB/fr/
[+] Screencapped http://onjasela.net/DB/fr/ as 20170503-010034-openphish-onjasela.net.png

[+] Processing http://suesschool.com/yahoologin/yahoologin/clients/login.php
[+] Screencapped http://suesschool.com/yahoologin/yahoologin/clients/login.php as 20170503-010053-openphish-suesschool.com.png
[+] Found Opendir at http://suesschool.com/yahoologin/yahoologin/clients/
[+] Found php file: http://suesschool.com/yahoologin/yahoologin/clients/login.php
[+] Found php file: http://suesschool.com/yahoologin/yahoologin/clients/data.php
[+] Found php file: http://suesschool.com/yahoologin/yahoologin/clients/block.php
[+] Found Opendir at http://suesschool.com/yahoologin/yahoologin/
[+] Found php file: http://suesschool.com/yahoologin/yahoologin/login.php
[+] Found php file: http://suesschool.com/yahoologin/yahoologin/data.php
[+] Found php file: http://suesschool.com/yahoologin/yahoologin/block.php
[+] Found Zip file at http://suesschool.com/yahoologin.zip
[+] Saved http://suesschool.com/yahoologin.zip as 20170503-010125-openphish-suesschool.com-yahoologin.zip
[+] Found Opendir at http://suesschool.com/yahoologin/

[+] Processing http://communitypartnersjc.org/wp-admin/js/index
[+] Screencapped http://communitypartnersjc.org/wp-admin/js/index as 20170503-010138-openphish-communitypartnersjc.org.png

[+] Processing http://ytrdesh.com/info/
[+] Screencapped http://ytrdesh.com/info/ as 20170503-010148-openphish-ytrdesh.com.png

...continues...

BULLYBLINDER (py)
  • While capturing a pcap visit a suspected phishing page. Handle redirectors and obfuscation to find a web form. Scrape the form and make educated guesses at what should be entered into the fields. Submit the form and repeat.
  • Requirements can be installed by running or reviewing install_bullyblinder_deps.sh
usage: bullyblinder.py [-h] -u URL [-a USERAGENT] -i INTERFACE

Visit a suspected phishing page and attempt form filling while getting a pcap

optional arguments:
-h, --help show this help message and exit
-u URL, --url URL Url to visit
-a USERAGENT, --useragent USERAGENT
Custom User-Agent to use
-i INTERFACE, --interface INTERFACE
Interface to tell tshark to listen on
Example Usage
$ python bullyblinder.py -i eth0 -u http://www.justpropertydevelopers.com/scanned

.: BULLYBLINDER v0.1 https://github.com/hadojae/DATA/ :.

[+] Preparing pcap: 20170503-033243-www.justpropertydevelopers.com.pcap

[+] Processing http://www.justpropertydevelopers.com/scanned

[+] Submitting POST
[+] Control: <HiddenControl(hidCflag=1)>, Control.Type: hidden, Control.Name: hidCflag, Control.ID: hidCflag
[+] Control: <SelectControl(<None>=[])>, Control.Type: select, Control.Name: None, Control.ID: None
[+] Control: <SelectControl(<None>=[*0])>, Control.Type: select, Control.Name: None, Control.ID: None
[+] Control: <SelectControl(<None>=[*1])>, Control.Type: select, Control.Name: None, Control.ID: None
[+] Control: <SelectControl(<None>=[*2])>, Control.Type: select, Control.Name: None, Control.ID: None
[+] Control: <SelectControl(<None>=[*3])>, Control.Type: select, Control.Name: None, Control.ID: None
[+] Control: <SelectControl(<None>=[*4])>, Control.Type: select, Control.Name: None, Control.ID: None
[+] Control: <TextControl(Email=shannonjudith@gmail.com)>, Control.Type: email, Control.Name: Email, Control.ID: Email
[+] Control: <PasswordControl(Passwd=696969)>, Control.Type: password, Control.Name: Passwd, Control.ID: Passwd
[+] Control: <SubmitControl(signIn=Sign in to view attachment) (readonly)>, Control.Type: submit, Control.Name: signIn, Control.ID: signIn
[+] Control: <CheckboxControl(PersistentCookie=[yes])>, Control.Type: checkbox, Control.Name: PersistentCookie, Control.ID: PersistentCookie
[+] Control: <HiddenControl(rmShown=1) (readonly)>, Control.Type: hidden, Control.Name: rmShown, Control.ID: None

[-] No form found, checking for redirectors and obfuscation.

[+] Found js window.location or document.location, processing the redir

[+] https://drive.google.com/#my-drive appears to be a legitimate website.

[+] Complete! Submitted 1 form(s)

[+] Url Request Chain:
http://justpropertydevelopers.com/scan/docg/doc/filewords/index.php
--http://justpropertydevelopers.com/scan/docg/doc/filewords/index.php

SLICKSHOES (sh)
  • A basic bash script that pulls urls out of pdfs in streams or in clear view.
  • The only argument to the script is the path to a folder containing the pdfs you want to process.
  • REQUIRES pdf-parser.py from https://blog.didierstevens.com/programs/pdf-tools/ location to be set in first line of script
Example Usage
$ ./slickshoes.sh ~/PDFs/
http://4cgemstones.com/polaiowpwwww/GD/index.php
http://80bpm.net/invoice-17524-Apr-26-2017-US-048591/
http://acheirapido.com.br/arquivos/pdf/
http://adams-kuwait.com/REview/office
http://rfaprojects.co.uk/invoice-80633-Apr-24-2017-US-665952/
http://sacm.net/SCANNED/ZN3747CGMSCWC/
https://geloscubinho.com.br/cgi/pdf/index.php
http://afriquecalabashsafaris.com/layouts/GD/index.php
http://akukoomole.com/AdobeLogin/index.php
...continues...
*PINCHERSOFPERIL and BULLYBUSTER are WIP
DATA scripts are a constant work in progress. Feedback, issues, and additions are welcomed.
Proper python packages will be created once suffecient testing and features have been added and more bugs have been squashed.

Troubleshooting
If you have pcap writing issues, use this to fixup dumpcap perms, observed when using some VPS
sudo chgrp YOUR_USER /usr/bin/dumpcap
sudo chmod 750 /usr/bin/dumpcap
sudo setcap cap_net_raw,cap_net_admin+eip /usr/bin/dumpcap
Be sure to disable NIC features when capturing traffic run this as root. Checksum errors will cause all sorts of nightmares.
# for i in rx tx sg tso ufo gso gro lro; do ethtool -K eth0 $i off; done


BruteSploit - Collection Of Method For Automated Generate, Bruteforce And Manipulation Wordlist


BruteSploit is a collection of method for automated Generate, Bruteforce and Manipulation wordlist with interactive shell. That can be used during a penetration test to enumerate and can be used in CTF for manipulation,combine,transform and permutation some words or file text.

Tutorial 
Check in this video :

Changelog
  • v.1.1.1 Added Brute Instagram
  • v.1.1.0 Fixed Bugs
  • v.1.0.0 Release Brutsploit

Getting Started
  1. git clone https://github.com/Screetsec/Brutesploit.git
  2. cd Brutesploit
  3. chmod +x Brutesploit
  4. sudo ./Brutesploit or sudo su ./Brutesploit

A linux operating system. We recommend :
  • Kali Linux 2 or Kali 2016.1 rolling
  • Cyborg
  • Parrot
  • BackTrack
  • Backbox

Credits

explo - Human And Machine Readable Web Vulnerability Testing Format

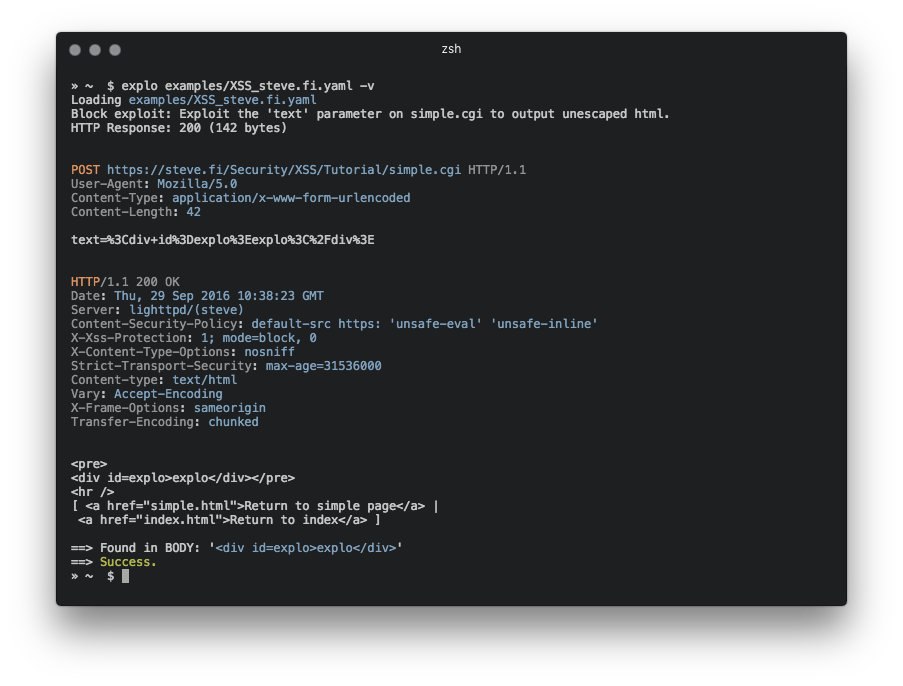
explo is a simple tool to describe web security issues in a human and machine readable format. By defining a request/condition workflow, explo is able to exploit security issues without the need of writing a script. This allows to share complex vulnerabilities in a simple readable and executable format.

Example for extracting a csrf token and using this in a form:
name: get_csrf
description: extract csrf token
module: http
parameter:
url: http://example.com/contact
method: GET
header:
user-agent: Mozilla/5.0
extract:
csrf: [CSS, "#csrf"]
---
name: exploit
description: exploits sql injection vulnerability with valid csrf token
module: http
parameter:
url: http://example.com/contact
method: POST
body:
csrf: "{{get_csrf.extracted.csrf}}"
username: "' SQL INJECTION"
find: You have an error in your SQL syntax


In this example definition file the security issue is tested by executing two steps which are run from top to bottom. The last step returns a success or failure, depending on the string 'You have an error in your SQL syntax' to be found.

Installation

Install via PyPI
pip install explo

Install via source
git clone https://github.com/dtag-dev-sec/explo
cd explo
python setup.py install

Usage
explo [--verbose|-v] testcase.yaml
explo [--verbose|-v] examples/*.yaml
There are a few example testcases in the examples/ folder.
$ explo examples/SQLI_simple_testphp.vulnweb.com.yaml
You can also include explo as a python lib:
from explo.core import from_content as explo_from_content
from explo.core import ExploException, ProxyException

def save_log(msg):
print(msg)

try:
result = explo_from_content(explo_yaml_file, save_log)
except ExploException as err:
print(err)

Modules
Modules can be added to improve functionality and classes of security issues.

http (basic)
The http modules allows to make a http request, extract content and search/verify content.
The following data is made available for following steps:
  • the http response body: stepname.response.content
  • the http response cookies: stepname.response.cookies
  • extracted content: response.extracted.variable_name
If a find_regex parameter is set, a regular expression match is executed on the response body. If this fails, this module returns a failure and thus stopping the executing of the current workflow (and all steps).
When extracting by regular expressions, use the match group extract to mark the value to extract (view below for an example).
For referencing cookies, reference the name of the previous step where cookies should be taken from (cookies: the_other_step.response.cookies).
Parameter examples:
parameter:
url: http://example.com
method: GET
allow_redirects: True
headers:
User-Agent: explo
Content-Type: abc
cookies: stepname.response.cookies
body:
key: value
find: search for string
find_regex: search for (reg|ular)expression
find_in_headers: searchstring in headers
extract:
variable1: [CSS, '#csrf']
variable2: [REGEX, '<input(.*?)value="(?P<extract>.*?)"']

http_header
The http header module allows to check if a response misses a specified set of headers (and values). All other parameters are identical to the http module.
The following data is made available for other modules:
  • the http response body: stepname.response.content
  • the http response cookies: stepname.response.cookies
Parameter examples:
parameter:
url: http://example.com
method: GET
allow_redirects: True
headers:
User-Agent: explo
Content-Type: abc
body:
key: value
headers_required:
X-XSS-Protection: 1
Server: . # all values are valid

sqli_blind
The sqli_blind module is able to identify time based blind sql injections.
The following data is made available for other modules:
  • the http response body: stepname.response.content
  • the http response cookies: stepname.response.cookies
Parameter examples:
parameter:
url: http://example.com/vulnerable.php?id=1' waitfor delay '00:00:5'--
method: GET
delay_seconds: 5
If the threshold of 5 seconds (delay_seconds) is exceeded, the check returns true (and thus resulting in a success).


WarChild - Denial of Service Testing Suite


Warchild is a denial of service testing suite made for analysing the strength of your website against different kinds of denial of service attacks you will be facing which are mainly organised by crooks to cause damage to your website.


Installation
For Installing the required modules just run the following command in your terminal :) 

pip install -r requirements.txt

Use
python warchild.py

Overview
This Denial Of Service suite comprises of the following features :
  1. CloudBust :- Cloudbust a.k.a AETHON is a cloudflare resolver that looks into the cloudflare protected website for misconfigured DNS configuration basically uses dnsdumpster.com as its resolver :)and identifies the backend IP of the website. We will add more updates in upcoming time.

  2. HTTP Flood :- HTTP Flood is a type of Denial of Service attack in which the attacker manipulates HTTP and POST unwanted requests in order to attack a web server or application. In an HTTP flood, the HTTP clients such as web browser interact with an application
    or server to send HTTP requests. The aim of the attack is when to compel the server to allocate as many resources as possible to serving the attack thus denying legitimate users access to the server's resources. ALISA is a http d.o.s tool written in such a way to suck all of the website's resources and is a layer 7 D.O.S tool.


  3. TCP SYN Flood :- A SYN flood is a form of denial-of-service attack in which an attacker sends a succession of SYN requests to a target's system in
    an attempt to consume enough server resources to make the system unresponsive to legitimate traffic.

  4. UDP Flood :- A UDP flood attack is a denial-of-service (DoS) attack using the User Datagram Protocol (UDP), a sessionless/connectionless computer networking protocol.

Author
Souhardya Sardar is an independent security analyst and programmer who loves to break things in order to secure them. Github :- github.com/Souhardya


Operative Framework v1.0b - Fingerprint Framework


This is a framework based on fingerprint action, this tool is used for get information on a website or a enterprise target with multiple modules (Viadeo search, Linkedin search, Reverse email whois, Reverse ip whois, SQL file forensics ...)

Dependency & launching
  • pip install -r requirements.txt
  • python operative.py

Youtube

Campaign
  • You can start a (gathering/fingerprinting) campaign with :campaign command.
  • Update a value of YOURWEBSITE.COM / ENTERPRISE_NAME in config.json file.
  • You can add a module process for a customized campaign.

Core Modules
  • core/modules/cms_gathering
  • core/modules/domain_search
  • core/modules/email_to_domain
  • core/modules/https_gathering
  • core/modules/linkedin_search
  • core/modules/reverse_ipdomain
  • core/modules/search_db
  • core/modules/waf_gathering
  • core/modules/whois_domain
  • core/modules/generate_email
  • core/modules/viadeo_search
  • core/modules/file_common
  • core/modules/get_websiteurl
  • core/modules/getform_data
  • core/modules/subdomain_search
  • core/modules/vhost_IPchecker
  • core/modules/tools_suggester
  • core/modules/metatag_look
  • core/modules/header_retrieval

SQL File forensics
  • import database in core/dbs/
  • read table
  • read columns
  • search information with pattern

Write module
For write module look core/modules/sample_module class


droopescan - A plugin-based scanner that aids security researchers in identifying issues with several CMSs (Drupal, Silverstripe & Wordpress)


A plugin-based scanner that aids security researchers in identifying issues with several CMS:
  • Drupal.
  • SilverStripe.
  • Wordpress.

Partial functionality for:
  • Joomla (version enumeration and interesting URLs only).
  • Moodle (identification doesn't work yet. You need to force 'scan moodle')
computer:~/droopescan$ droopescan scan drupal -u http://example.org/ -t 8
[+] No themes found.

[+] Possible interesting urls found:
Default changelog file - https://www.example.org/CHANGELOG.txt
Default admin - https://www.example.org/user/login

[+] Possible version(s):
7.34

[+] Plugins found:
views https://www.example.org/sites/all/modules/views/
https://www.example.org/sites/all/modules/views/README.txt
https://www.example.org/sites/all/modules/views/LICENSE.txt
token https://www.example.org/sites/all/modules/token/
https://www.example.org/sites/all/modules/token/README.txt
https://www.example.org/sites/all/modules/token/LICENSE.txt
pathauto https://www.example.org/sites/all/modules/pathauto/
https://www.example.org/sites/all/modules/pathauto/README.txt
https://www.example.org/sites/all/modules/pathauto/LICENSE.txt
https://www.example.org/sites/all/modules/pathauto/API.txt
libraries https://www.example.org/sites/all/modules/libraries/
https://www.example.org/sites/all/modules/libraries/CHANGELOG.txt
https://www.example.org/sites/all/modules/libraries/README.txt
https://www.example.org/sites/all/modules/libraries/LICENSE.txt
entity https://www.example.org/sites/all/modules/entity/
https://www.example.org/sites/all/modules/entity/README.txt
https://www.example.org/sites/all/modules/entity/LICENSE.txt
google_analytics https://www.example.org/sites/all/modules/google_analytics/
https://www.example.org/sites/all/modules/google_analytics/README.txt
https://www.example.org/sites/all/modules/google_analytics/LICENSE.txt
ctools https://www.example.org/sites/all/modules/ctools/
https://www.example.org/sites/all/modules/ctools/CHANGELOG.txt
https://www.example.org/sites/all/modules/ctools/LICENSE.txt
https://www.example.org/sites/all/modules/ctools/API.txt
features https://www.example.org/sites/all/modules/features/
https://www.example.org/sites/all/modules/features/CHANGELOG.txt
https://www.example.org/sites/all/modules/features/README.txt
https://www.example.org/sites/all/modules/features/LICENSE.txt
https://www.example.org/sites/all/modules/features/API.txt
[... snip for README ...]

[+] Scan finished (0:04:59.502427 elapsed)
You can get a full list of options by running:
droopescan --help
droopescan scan --help

Why not X?
Because droopescan:
  • is fast
  • is stable
  • is up to date
  • allows simultaneous scanning of multiple sites
  • is 100% python

Installation
Installation is easy using pip:
apt-get install python-pip
pip install droopescan
Manual installation is as follows:
git clone https://github.com/droope/droopescan.git
cd droopescan
pip install -r requirements.txt
./droopescan scan --help
The master branch corresponds to the latest release (what is in pypi). Development branch is unstable and all pull requests must be made against it. More notes regarding installation can be found here .

Features

Scan types.
Droopescan aims to be the most accurate by default, while not overloading the target server due to excessive concurrent requests. Due to this, by default, a large number of requests will be made with four threads; change these settings by using the --number and --threads arguments respectively.
This tool is able to perform four kinds of tests. By default all tests are ran, but you can specify one of the following with the -e or --enumerate flag:
  • p -- Plugin checks : Performs several thousand HTTP requests and returns a listing of all plugins found to be installed in the target host.
  • t -- Theme checks : As above, but for themes.
  • v -- Version checks : Downloads several files and, based on the checksums of these files, returns a list of all possible versions.
  • i -- Interesting url checks : Checks for interesting urls (admin panels, readme files, etc.)
More notes regarding scanning can be found here .

Target specification.
You can specify a particular host to scan by passing the -u or --url parameter:
    droopescan scan drupal -u example.org
You can also omit the drupal argument. This will trigger “CMS identification”, like so:
    droopescan scan -u example.org
Multiple URLs may be scanned utilising the -U or --url-file parameter. This parameter should be set to the path of a file which contains a list of URLs.
    droopescan scan drupal -U list_of_urls.txt
The drupal parameter may also be ommited in this example. For each site, it will make several GET requests in order to perform CMS identification, and if the site is deemed to be a supported CMS, it is scanned and added to the output list. This can be useful, for example, to run droopescan across all your organisation's sites.
    droopescan scan -U list_of_urls.txt
The code block below contains an example list of URLs, one per line:
http://localhost/drupal/6.0/
http://localhost/drupal/6.1/
http://localhost/drupal/6.10/
http://localhost/drupal/6.11/
http://localhost/drupal/6.12/
A file containing URLs and a value to override the default host header with separated by tabs or spaces is also OK for URL files. This can be handy when conducting a scan through a large range of hosts and you want to prevent unnecessary DNS queries. To clarify, an example below:
192.168.1.1 example.org
http://192.168.1.1/ example.org
http://192.168.1.2/drupal/ example.org
It is quite tempting to test whether the scanner works for a particular CMS by scanning the official site (e.g. wordpress.org for wordpress), but the official sites rarely run vainilla installations of their respective CMS or do unorthodox things. For example, wordpress.org runs the bleeding edge version of wordpress, which will not be identified as wordpress by droopescan at all because the checksums do not match any known wordpress version.

Authentication.
The application fully supports .netrc files and http_proxy environment variables.
Use a .netrc file for basic authentication. An example netrc (a file named .netrc placed in your root home directory) file could look as follows:
machine secret.google.com
login admin@google.com
password Winter01
You can set the http_proxy and https_proxy variables. These allow you to set a parent HTTP proxy, in which you can handle more complex types of authentication (e.g. Fiddler, ZAP, Burp)
export http_proxy='user:password@localhost:8080'
export https_proxy='user:password@localhost:8080'
droopescan scan drupal --url http://localhost/drupal
WARNING: By design, to allow intercepting proxies and the testing of applications with bad SSL, droopescan allows self-signed or otherwise invalid certificates. ˙ ͜ʟ˙

Output.
This application supports both "standard output", meant for human consumption, or JSON, which is more suitable for machine consumption. This output is stable between major versions.
This can be controlled with the --output flag. Some sample JSON output would look as follows (minus the excessive whitespace):
{
"themes": {
"is_empty": true,
"finds": [

]
},
"interesting urls": {
"is_empty": false,
"finds": [
{
"url": "https:\/\/www.drupal.org\/CHANGELOG.txt",
"description": "Default changelog file."
},
{
"url": "https:\/\/www.drupal.org\/user\/login",
"description": "Default admin."
}
]
},
"version": {
"is_empty": false,
"finds": [
"7.29",
"7.30",
"7.31"
]
},
"plugins": {
"is_empty": false,
"finds": [
{
"url": "https:\/\/www.drupal.org\/sites\/all\/modules\/views\/",
"name": "views"
},
[...snip...]
]
}
}
Some attributes might be missing from the JSON object if parts of the scan are not ran.
This is how multi-site output looks like; each line contains a valid JSON object as shown above.
    $ droopescan scan drupal -U six_and_above.txt -e v
{"host": "http://localhost/drupal-7.6/", "version": {"is_empty": false, "finds": ["7.6"]}}
{"host": "http://localhost/drupal-7.7/", "version": {"is_empty": false, "finds": ["7.7"]}}
{"host": "http://localhost/drupal-7.8/", "version": {"is_empty": false, "finds": ["7.8"]}}
{"host": "http://localhost/drupal-7.9/", "version": {"is_empty": false, "finds": ["7.9"]}}
{"host": "http://localhost/drupal-7.10/", "version": {"is_empty": false, "finds": ["7.10"]}}
{"host": "http://localhost/drupal-7.11/", "version": {"is_empty": false, "finds": ["7.11"]}}
{"host": "http://localhost/drupal-7.12/", "version": {"is_empty": false, "finds": ["7.12"]}}
{"host": "http://localhost/drupal-7.13/", "version": {"is_empty": false, "finds": ["7.13"]}}
{"host": "http://localhost/drupal-7.14/", "version": {"is_empty": false, "finds": ["7.14"]}}
{"host": "http://localhost/drupal-7.15/", "version": {"is_empty": false, "finds": ["7.15"]}}
{"host": "http://localhost/drupal-7.16/", "version": {"is_empty": false, "finds": ["7.16"]}}
{"host": "http://localhost/drupal-7.17/", "version": {"is_empty": false, "finds": ["7.17"]}}
{"host": "http://localhost/drupal-7.18/", "version": {"is_empty": false, "finds": ["7.18"]}}
{"host": "http://localhost/drupal-7.19/", "version": {"is_empty": false, "finds": ["7.19"]}}
{"host": "http://localhost/drupal-7.20/", "version": {"is_empty": false, "finds": ["7.20"]}}
{"host": "http://localhost/drupal-7.21/", "version": {"is_empty": false, "finds": ["7.21"]}}
{"host": "http://localhost/drupal-7.22/", "version": {"is_empty": false, "finds": ["7.22"]}}
{"host": "http://localhost/drupal-7.23/", "version": {"is_empty": false, "finds": ["7.23"]}}
{"host": "http://localhost/drupal-7.24/", "version": {"is_empty": false, "finds": ["7.24"]}}
{"host": "http://localhost/drupal-7.25/", "version": {"is_empty": false, "finds": ["7.25"]}}
{"host": "http://localhost/drupal-7.26/", "version": {"is_empty": false, "finds": ["7.26"]}}
{"host": "http://localhost/drupal-7.27/", "version": {"is_empty": false, "finds": ["7.27"]}}
{"host": "http://localhost/drupal-7.28/", "version": {"is_empty": false, "finds": ["7.28"]}}
{"host": "http://localhost/drupal-7.29/", "version": {"is_empty": false, "finds": ["7.29"]}}
{"host": "http://localhost/drupal-7.30/", "version": {"is_empty": false, "finds": ["7.30"]}}
{"host": "http://localhost/drupal-7.31/", "version": {"is_empty": false, "finds": ["7.31"]}}
{"host": "http://localhost/drupal-7.32/", "version": {"is_empty": false, "finds": ["7.32"]}}
{"host": "http://localhost/drupal-7.33/", "version": {"is_empty": false, "finds": ["7.33"]}}
{"host": "http://localhost/drupal-7.34/", "version": {"is_empty": false, "finds": ["7.34"]}}

Debug.
When things are not going exactly your way, you can check why by using the --debug-requests command.
Some output might look like this:
computer:~/droopescan# droopescan scan silverstripe -u http://localhost -n 10 -e p --debug-requests
[head] http://localhost/framework/... 403
[head] http://localhost/cms/css/layout.css... 404
[head] http://localhost/framework/css/UploadField.css... 200
[head] http://localhost/misc/test/error/404/ispresent.html... 404
[head] http://localhost/widgetextensions/... 404
[head] http://localhost/orbit/... 404
[head] http://localhost/sitemap/... 404
[head] http://localhost/simplestspam/... 404
[head] http://localhost/ecommerce_modifier_example/... 404
[head] http://localhost/silverstripe-hashpath/... 404
[head] http://localhost/timeline/... 404
[head] http://localhost/silverstripe-hiddenfields/... 404
[head] http://localhost/addressable/... 404
[head] http://localhost/silverstripe-description/... 404
[+] No plugins found.

[+] Scan finished (0:00:00.058422 elapsed)
The --debug paramter also exists and may be used to debug application internals.

Stats.
You can get an up to date report on the capabilities of the scanner by running the following command
    droopescan stats
Some sample output might look as follows:
Functionality available for ‘drupal’:
- Enumerate plugins (XXXX plugins.)
- Enumerate themes (XXXX themes.)
- Enumerate interesting urls (X urls.)
- Enumerate version (up to version X.X.X-alphaXX, X.XX, X.XX.)
Functionality available for ‘joomla’:
- Enumerate interesting urls (X urls.)
- Enumerate version (up to version XX.X, X.X.X, X.X.XX.rcX.)
Functionality available for ‘wordpress’:
- Enumerate interesting urls (X urls.)
- Enumerate version (up to version X.X.X, X.X.X, X.X.X.)
Functionality available for ‘silverstripe’:
- Enumerate plugins (XXX plugins.)
- Enumerate themes (XX themes.)
- Enumerate interesting urls (X urls.)
- Enumerate version (up to version X.X.XX, X.X.XX, X.X.XX.)
It is important to verify that the latest version available for the CMS installation is available within droopescan , as otherwise results may be inaccurate.

Contribute.

Create your own plugin.
You can add suport for your favourite CMS. The process is actually quite simple, and a lot of information can be glimpsed by viewing the example.py file in the plugins/ folder.
This file should serve well as a base for your implementation.
You can create your own plugin for Joomla and enable it as follows:
$ cp plugins/example.py plugins/joomla.py
$ cp plugins.d/example.conf plugins.d/joomla.conf
You then need to go to plugins/joomla.py and change a few things:
  • The class name needs to be Joomla.
  • The plugin label (located at Meta.label) needs to be changed to joomla.
  • At the end of the file, the register call needs to be modified to reflect the correct class name.
  • The exposed function, 'example', needs to be renamed to joomla.
    @controller.expose(help='example scanner')
def joomla(self):
self.plugin_init()
We also need to change the plugins.d/joomla.conf file, and change it to the following:
[joomla]
enable_plugin = true
We should now be in a state which looks as follows:
$ droopescan scan joomla
[+] --url parameter is required.
Your next step would be to generate a valid plugin wordlist, a valid theme wordlist, a versions.xml file, and optionally a list of interesting URLs, as well as replace all variables that are in joomla.py with values that are correct for your implementation.
The plugin needs to update automatically in order for a pull request to be accepted. Further documentation may be later made available, but for now, keep in mind that the update_version_check, update_version, update_plugins_check and update_plugins need to be implemented. For reference, please review the drupal.py file. This is required in order to ensure plugins are kept to date.

Issues & Pull Requests.
Pull requests that create new plugins are welcome provided that maintenance for those plugins is done automatically.
Please remember to make your pull requests against the develoment branch rather than the master. Issues can be raised on the issue tracker here on GitHub.
To run tests, some dependencies must be installed. Running the following commands will result in them being installed and the tests being ran:
    apt-get install libxslt1-dev libxml2-dev zlib1g-dev python python-pip python-dev python3 python3-pip python3-dev
pip install -r requirements.txt -r requirements_test.txt
pip3 install -r requirements.txt -r requirements_test.txt
./droopescan test
You can run individual tests with the -s flag.
./droopescan test -s test_integration_drupal


HatCloud - Tool for identify real IP of CloudFlare (Bypass CloudFlare)


HatCloud build in Ruby. It makes bypass in CloudFlare for discover real IP. This can be useful if you need test your server and website. Testing your protection against Ddos (Denial of Service) or Dos. CloudFlare is services and distributed domain name server services, sitting between the visitor and the Cloudflare user's hosting provider, acting as a reverse proxy for websites. Your network protects, speeds up and improves availability for a website or the mobile application with a DNS change.

Version: 1.0
Use: 
ruby hatcloud.rb -h or --help 
ruby hatcloud.rb -b your site

or 
ruby hatcloud.rb --byp your site

Screenshot


struts-pwn - An exploit for Apache Struts CVE-2017-5638


An exploit for Apache Struts CVE-2017-5638

Usage

Testing a single URL.
python struts-pwn.py --url 'http://example.com/struts2-showcase/index.action' -c 'id'

Testing a list of URLs.
python struts-pwn.py --list 'urls.txt' -c 'id'

Checking if the vulnerability exists against a single URL.
python struts-pwn.py --check --url 'http://example.com/struts2-showcase/index.action'

Checking if the vulnerability exists against a list of URLs.
python struts-pwn.py --check --list 'urls.txt'

Requirements
  • Python2 or Python3
  • requests

Legal Disclaimer
This project is made for educational and ethical testing purposes only. Usage of struts-pwn for attacking targets without prior mutual consent is illegal. It is the end user's responsibility to obey all applicable local, state and federal laws. Developers assume no liability and are not responsible for any misuse or damage caused by this program.

Author
Mazin Ahmed

OverThruster - HID Attack Payload Generator For Arduinos


OverThruster is a tool to generate sketches for Arduinos when used as an HID Attack. It was designed around devices with the ATMEGA32U4 chip, like the CJMCU-BEETLE, or the new LilyGo "BadUSB" devices popping up on ebay and aliexpress that look like USB sticks but contain an Arduino. I wrote this because the few other tools out there that do similar don't have as many customization options like the UAC Bypass options or the notification bubble options. I wanted to create something that could quickly generate a custom payload and that did not require anything extra to be install beyond the standard Python libraries and the Arduino IDE. I also wrote this to get better at Python. This is my first release of anything, so expect problems.

Requirements

Use
  1. start by launching OverThruster.py
  2. Select the target's OS
  3. Select the specific payload
  4. Fill in the required settings
  5. Generate the .ino file
  6. Open the .ino file in the Arduino IDE
  7. Flash the sketch to your Arduino device

Notes
  1. After flashing the payload, the Arduino IDE will disconnect the Arduino, then it will automatically reconnect, and deliver the payload. Be ready for characters to suddenly be typed to the screen; I recommend having notepad or similar open and focused when you flash the sketch
  2. OverThruster currently drops the .ino file and the Metasploit .rc file in the working directory, so look for them there.
  3. For the UAC Bypass techniques, timing is key. Older devices will open the Terminal with Admin rights at a slower speed, and therefore you may need to adjust the delay() in the BypassUAC functions in the sketch
  4. This is just the beginning. Many more payloads, features, options and additions are coming.
  5. Please contribute if you have something to add.


SPARTA - Network Infrastructure Penetration Testing Tool


SPARTA is a python GUI application which simplifies network infrastructure penetration testing by aiding the penetration tester in the scanning and enumeration phase. It allows the tester to save time by having point-and-click access to his toolkit and by displaying all tool output in a convenient way. If little time is spent setting up commands and tools, more time can be spent focusing on analysing results. Despite the automation capabilities, the commands and tools used are fully customisable as each tester has his own methods, habits and preferences.

Requirements
It is recommended that Kali Linux is used as it already has most tools installed, however SPARTA would most likely also work in Debian based systems.
Kali (preferred):
apt-get install python-elixir
Ubuntu 12.04+ (untested)
apt-get install python-elixir python-qt4 xsltproc
Other than these, the following tools are required for SPARTA to have its minimum functionality:
  • nmap (for adding hosts)
  • hydra (for the brute tab)
  • cutycapt (for screenshots)
In Kali Linux these can be installed with:
apt-get install nmap hydra cutycapt
In Kali, to ensure that you have all the tools used by SPARTA's default configuration use:
apt-get install ldap-utils rwho rsh-client x11-apps finger

Installation
cd /usr/share/
git clone https://github.com/secforce/sparta.git

Place the "sparta" file in /usr/bin/ and make it executable.
Type 'sparta' in any terminal to launch the application.

Source code
The source code is structured in folders as such:
  • [app] - Contains the functionality (logic) as well as the models used by both the logic and gui
  • [controller] - The controller interfaces between the gui and the logic (MVC design)
  • [db] - Contains everything related to database, database tables, etc
  • [doc] - Contains all SPARTA documentation
  • [images] - Icons and images
  • [parsers] - Contains nmap xml output parser files
  • [scripts] - Contains custom scripts used by SPARTA
  • [ui] - Contains the gui (.ui and .py generated by Qt Creator). Do not manually edit these.
  • [wordlists] - Contains wordlists used by SPARTA
  • README.txt - This file.
  • sparta.conf - SPARTA's configuration file. Edit it to add custom tools and commands. If deleted, SPARTA will regenerate a new one.
  • sparta.py - The main program. The one that needs to be executed by the user.

Demos


Known issues
SPARTA uses a third-party tool called Cutycapt to take screenshots. One of the problems with the version that is currently in Kali's repositories is that it fails to take screenshots of HTTPS pages when self-signed certificates are in use. A way around this is to compile the Cutycapt executable yourself and edit SPARTA's configuration file to specify the path to the compiled executable.
It can be compiled in Kali by following these instructions:
% sudo apt-get install subversion libqt4-webkit libqt4-dev g++
% svn co svn://svn.code.sf.net/p/cutycapt/code/ cutycapt
% cd cutycapt/CutyCapt
% qmake
% make
% ./CutyCapt --url=http://www.example.org --out=example.png


wafpass - WAF Security Benchmark


                        ██╗    ██╗ █████╗ ███████╗██████╗  █████╗ ███████╗███████╗
██║ ██║██╔══██╗██╔════╝██╔══██╗██╔══██╗██╔════╝██╔════╝
██║ █╗ ██║███████║█████╗ ██████╔╝███████║███████╗███████╗
██║███╗██║██╔══██║██╔══╝ ██╔═══╝ ██╔══██║╚════██║╚════██║
╚███╔███╔╝██║ ██║██║ ██║ ██║ ██║███████║███████║
╚══╝╚══╝ ╚═╝ ╚═╝╚═╝ ╚═╝ ╚═╝ ╚═╝╚══════╝╚══════╝

WAFPASS - Copyright (c) 2017 Hamed Izadi (@hezd).
WAFPASS Analysing parameters with all payloads' bypass methods, aiming at benchmarking security solutions like WAF.
Today a great number of website owners around the globe use “Web Application Firewalls” to improve their security. However, these security applications suffer from many deficits such as poor performance, lack of updates, and so forth. Thus, they are hindered from working effectively against everyday attacks that are equipped with cutting edge technological innovations. This vulnerability can cause various issues and even lead to security failures.
WAFPASS’s ultimate goal is to present a solution for promoting security systems like WAF in addition to providing a general overview of the security solutions.
WAFPASS supports HTTP,HTTPS connections, GET and POST requests and the use of Cookies in order to access pages restricted to authenticated users. Also, an intercepting proxy can be set up.

Requirements:
Python version 3.4.x is required for running this program.

Disclaimer:
This tool is only for testing and academic purposes and can only be used where strict consent has been given. Do not use it for illegal purposes!

Installation:
Download WAFPASS by cloning the Git repository:
  $ git clone https://github.com/wafpassproject/wafpass.git

Supported Platforms:
  • Linux
  • Mac OS X
  • Windows

Usage:
To get a list of all options and switches use:
  $ python3 wapfass.py -h
You can add your payloads in /payloads/payloads.csv like this:
  payload@description

Support:
WAFPASS is the project of many hours of work and total personal dedication.
Please help us to improve this project.


Smith - A Very Quick And Very Dirty Client/Server Tool For Testing Firewalls


A client/server style agent meant for testing connectivity to and from a machine on a network.

Installation
python setup.py install or pip install . should install smith. Note: If you want to use the tcp/udp protocol options, you'll need to install scapy and it's dependencies. Ubuntu has 'apt-get install python-scapy'. You can also pip install scapy, but I don't know if that installs all dependencies on all OS's. I didn't include scapy in the requires because the 'rest' option doesn't utilize it, and is sufficient for a lot of usecases on its own.

Functions: ping and listen

ping
$: smith ping -h

usage:
Initiate a port-specific ping against a listening agent

positional arguments:
port The port the remote agent is listening on
destination IPv4 address of the server the remote agent is
listening on
{TCP,UDP,REST} Protocol to use to contact the remote agent. TCP and
UDP use raw sockets which will bypass IPTABLES rules.

optional arguments:
-h, --help show this help message and exit
-t TIMEOUT, --timeout TIMEOUT
Seconds to wait for response from server before giving
up. Zero means 'wait forever'

Example
$: smith ping 12345 127.0.0.1 REST --timeout 10


listen
$: smith listen -h
usage:
Server-side: listen for incoming ping requests from remote client.

positional arguments:
port The port the remote client is pinging
{TCP,UDP,REST} Protocol to use to contact the remote agent.TCP and UDP use
raw sockets which will bypass IPTABLES rules.

optional arguments:
-h, --help show this help message and exit

Example
$: smith ping 12345 127.0.0.1 REST --timeout 10


Drozer - The Leading Security Assessment Framework for Android


drozer is a comprehensive security audit and attack framework for Android.

With increasing pressure to support mobile working, the ingress of Android into the enterprise is gathering momentum. Have you considered the threat posed by the Android app that supports your business function, or Android devices being used as part of your BYOD strategy?

drozer helps to provide confidence that Android apps and devices being developed by, or deployed across, your organisation do not pose an unacceptable level of risk. By allowing you to interact with the Dalvik VM, other apps’ IPC endpoints and the underlying OS.

drozer provides tools to help you use and share public exploits for Android. For remote exploits, it can generate shellcode to help you to deploy the drozer Agent as a remote administrator tool, with maximum leverage on the device.

Faster Android Security Assessments

drozer helps to reduce the time taken for Android security assessments by automating the tedious and time-consuming.
  • Discover and interact with the attack surface exposed by Android apps.
  • Execute dynamic Java-code on a device, to avoid the need to compile and install small test scripts.

Test against Real Android Devices

drozer runs both in Android emulators and on real devices. It does not require USB debugging or other development features to be enabled; so you can perform assessments on devices in their production state to get better results.

Automate and Extend

drozer can be easily extended with additional modules to find, test and exploit other weaknesses; this, combined with scripting possibilities, helps you to automate regression testing for security issues.

Test your Exposure to Public Exploits

drozer provides point-and-go implementations of many public Android exploits. You can use these to identify vulnerable devices in your organisation, and to understand the risk that these pose.


[Drozer] The Leading Security Testing Framework for Android.


drozer enables you to search for security vulnerabilities in apps and devices by assuming the role of an app and interacting with the Dalvik VM, other apps’ IPC endpoints and the underlying OS.
drozer provides tools to help you use and share public Android exploits. It helps you to deploy a drozer agent by using weasel – MWR’s advanced exploitation payload.
For the latest Mercury updates, follow @mwrdrozer.

Features

drozer allows you to use dynamic analysis during an Android security assessment. By assuming the role of an Android app you can:
  • find information about installed packages.
  • interact with the 4 IPC endpoints – activities, broadcast receivers, content providers and services.
  • use a proper shell to play with the underlying Linux OS (from the content of an unprivileged application).
  • check an app’s attack surface, and search for known vulnerabilities.
  • create new modules to share your latest findings on Android.
drozer’s remote exploitation features provide a unified framework for sharing Android payloads and exploits. It helps to reduce the time needed for vulnerability assessments and mobile red-teaming exercises, and includes the outcome of some of MWR’s cutting-edge research into advanced Android payloads and exploits.

How it Works

drozer does all of this over the network: it does not require ADB.